180 lines
5.7 KiB
Markdown
180 lines
5.7 KiB
Markdown
之前给大家介绍了二叉树的[前序遍历](),[中序遍历]()的迭代法和 Morris 方法,今天咱们来说一下二叉后序遍历的迭代法及 Morris 方法。
|
||
|
||
注:阅读该文章前,建议各位先阅读之前的三篇文章,对该文章的理解有很大帮助。
|
||
|
||
## Morris
|
||
|
||
后序遍历的 Morris 方法也比之前两种代码稍微长一些,看着挺唬人,其实不难,和我们之前说的没差多少。下面我们一起来干掉它吧。
|
||
|
||
我们先来复习下之前说过的[中序遍历](),见下图。
|
||
|
||
|
||
|
||
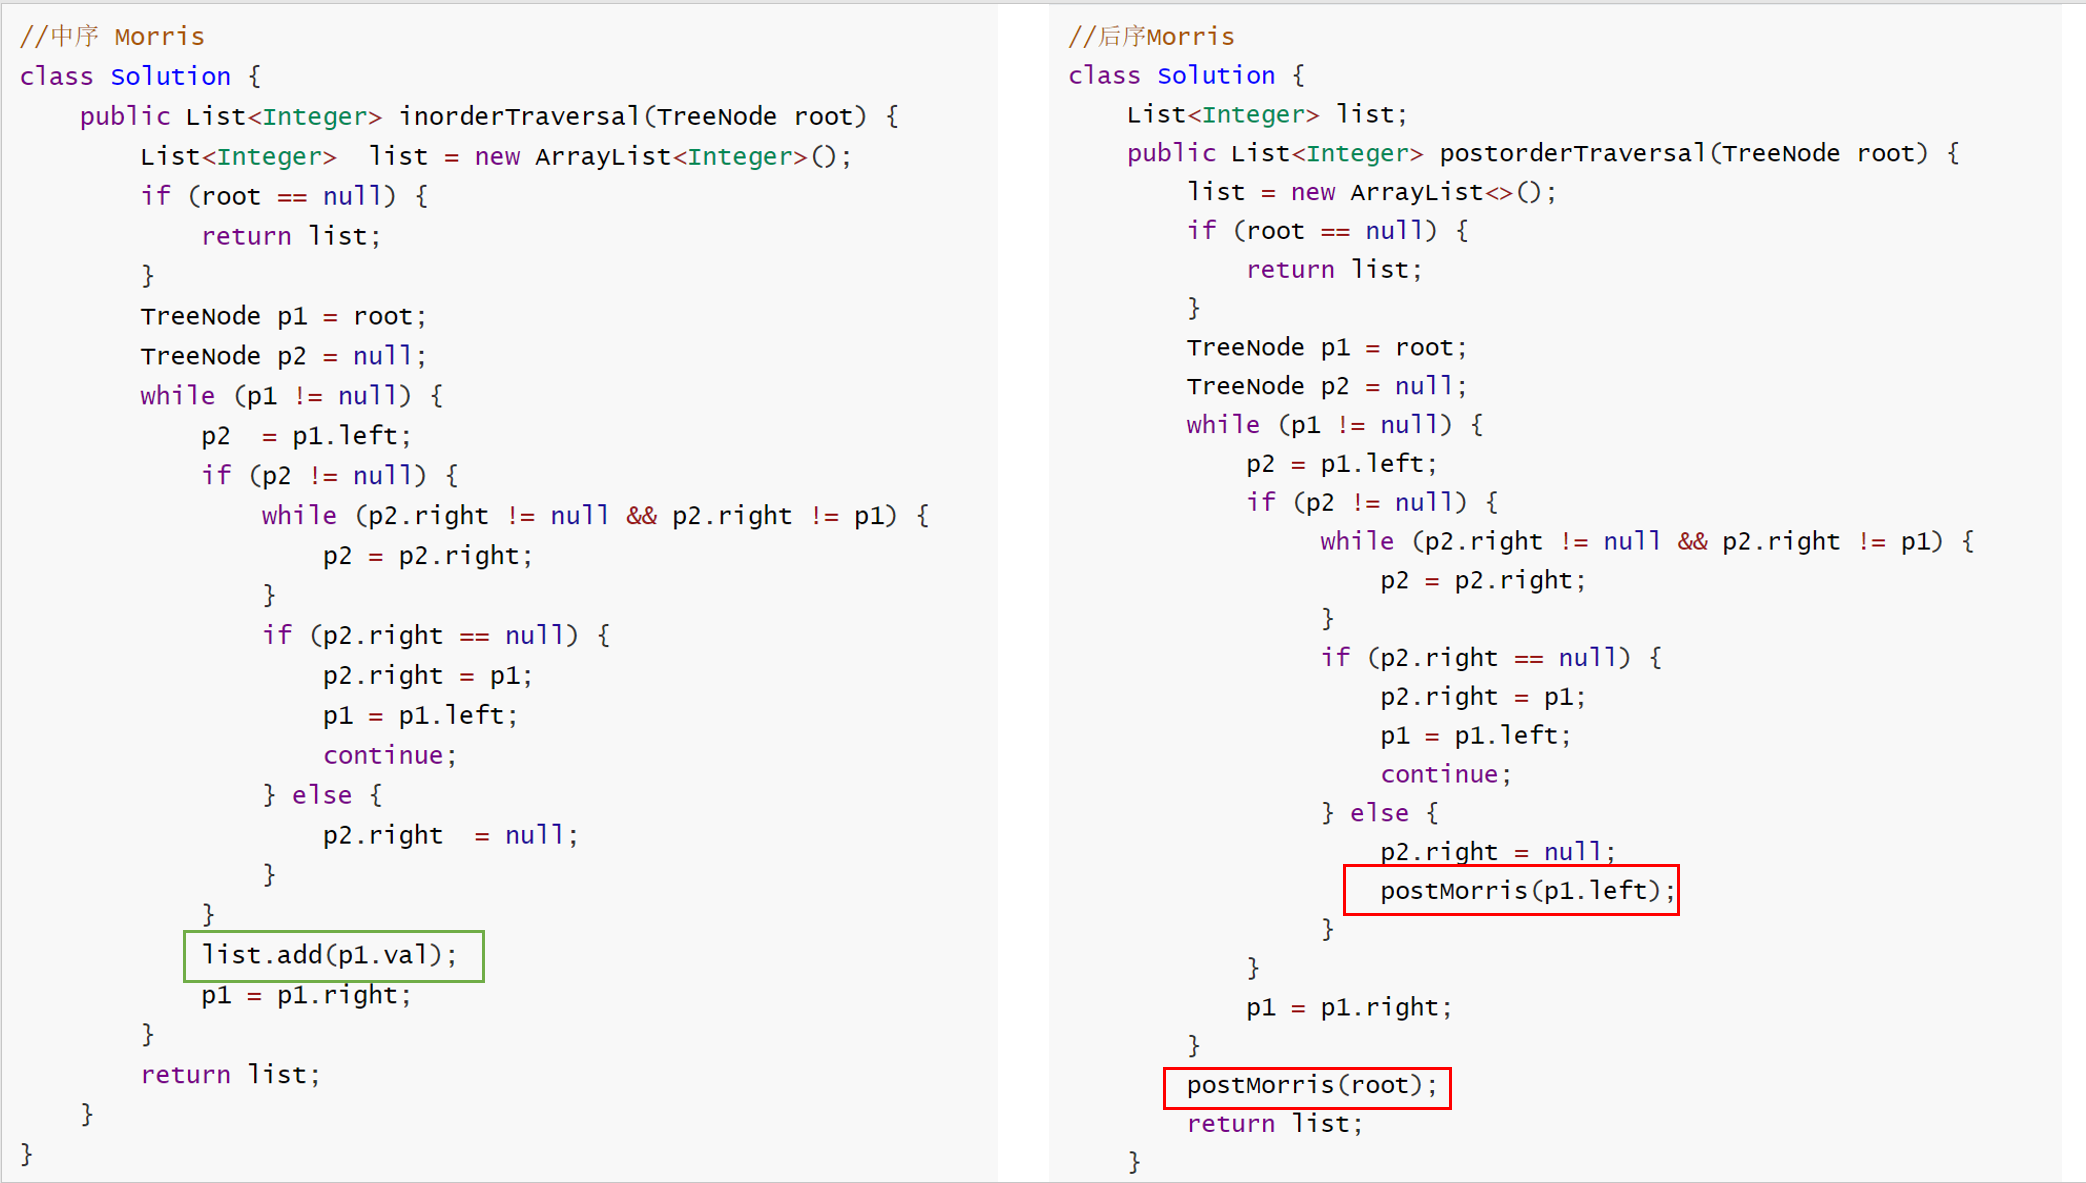
另外我们来对比下,中序遍历和后序遍历的 Morris 方法,代码有哪里不同。
|
||
|
||
|
||
|
||
由上图可知,仅仅有三处不同,后序遍历里少了 `list.add()`,多了一个函数`postMorris()` ,那后序遍历的 list.add() 肯定是在 postMorris 函数中的。所以我们搞懂了 postMorris 函数,也就搞懂了后序遍历的 Morris 方法(默认大家看了之前的文章,没有看过的同学,可以点击文首的链接)
|
||
|
||
下面我们一起来剖析下 postMorris 函数.代码如下
|
||
|
||
```java
|
||
public void postMorris(TreeNode root) {
|
||
//反转转链表,详情看下方图片
|
||
TreeNode reverseNode = reverseList(root);
|
||
//遍历链表
|
||
TreeNode cur = reverseNode;
|
||
while (cur != null) {
|
||
list.add(cur.val);
|
||
cur = cur.right;
|
||
}
|
||
//反转回来
|
||
reverseList(reverseNode);
|
||
}
|
||
|
||
//反转链表
|
||
public TreeNode reverseList(TreeNode head) {
|
||
TreeNode cur = head;
|
||
TreeNode pre = null;
|
||
while (cur != null) {
|
||
TreeNode next = cur.right;
|
||
cur.right = pre;
|
||
pre = cur;
|
||
cur = next;
|
||
}
|
||
return pre;
|
||
}
|
||
```
|
||
|
||
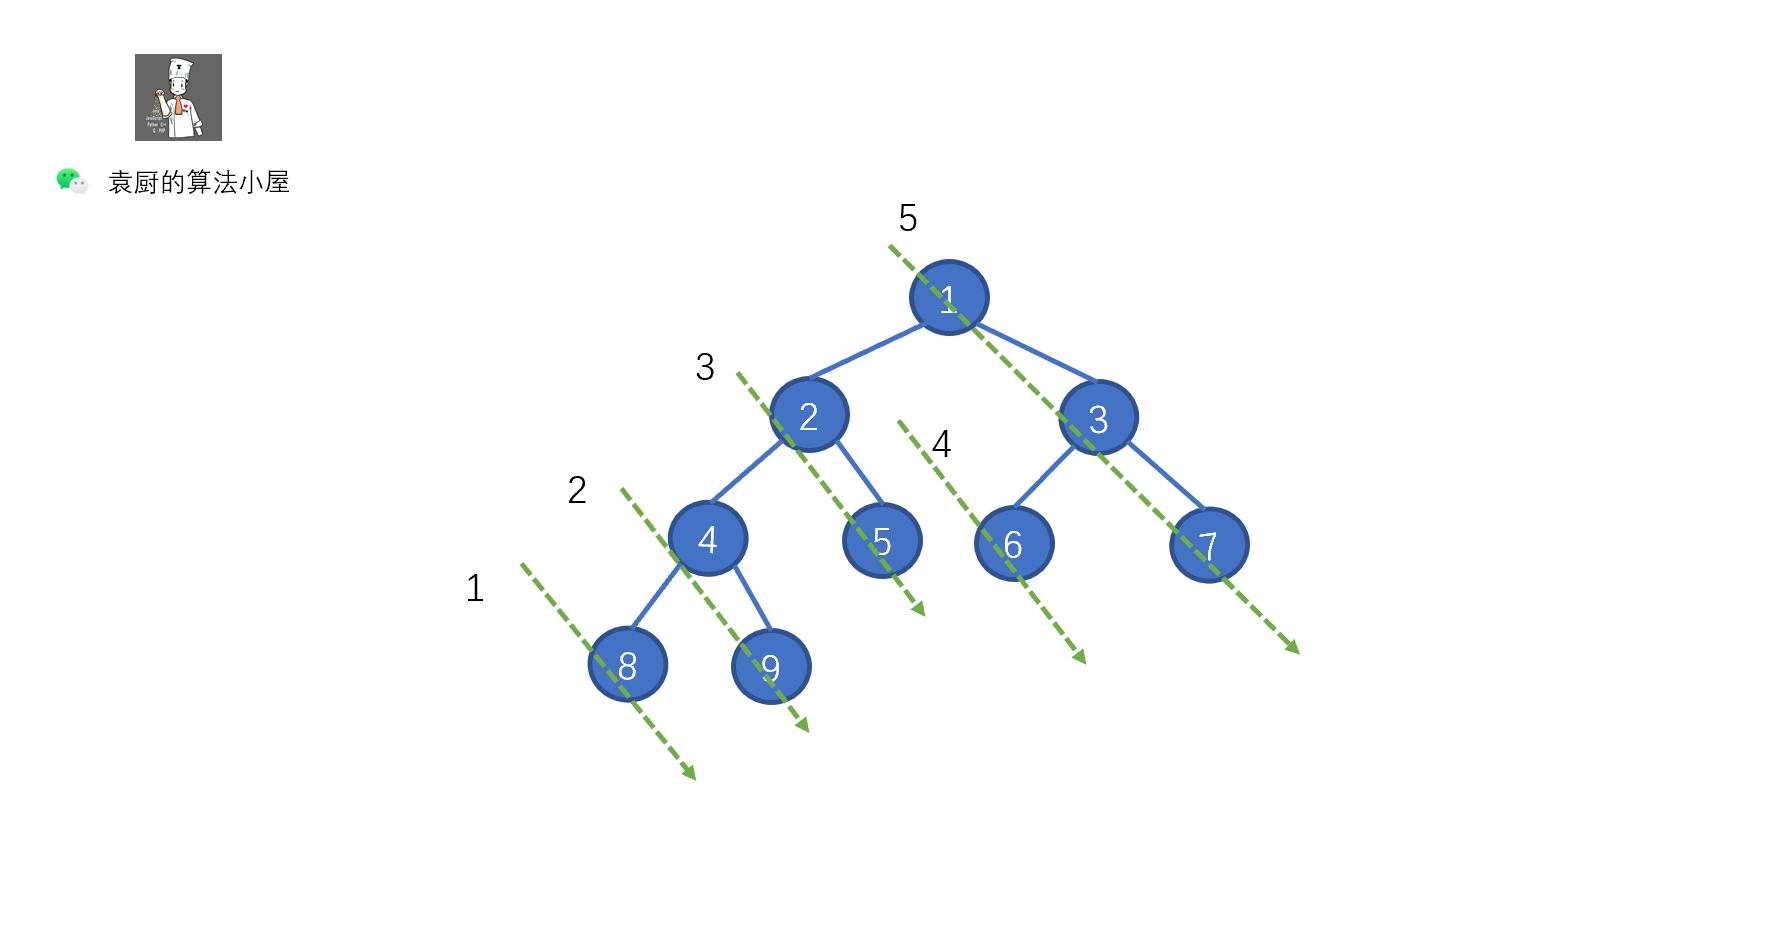
上面的代码,是不是贼熟悉,和我们的倒序输出链表一致,步骤为,反转链表,遍历链表,将链表反转回原样。只不过我们将 ListNode.next 写成了 TreeNode.right 将树中的遍历右子节点的路线,看成了一个链表,见下图。
|
||
|
||
|
||
|
||
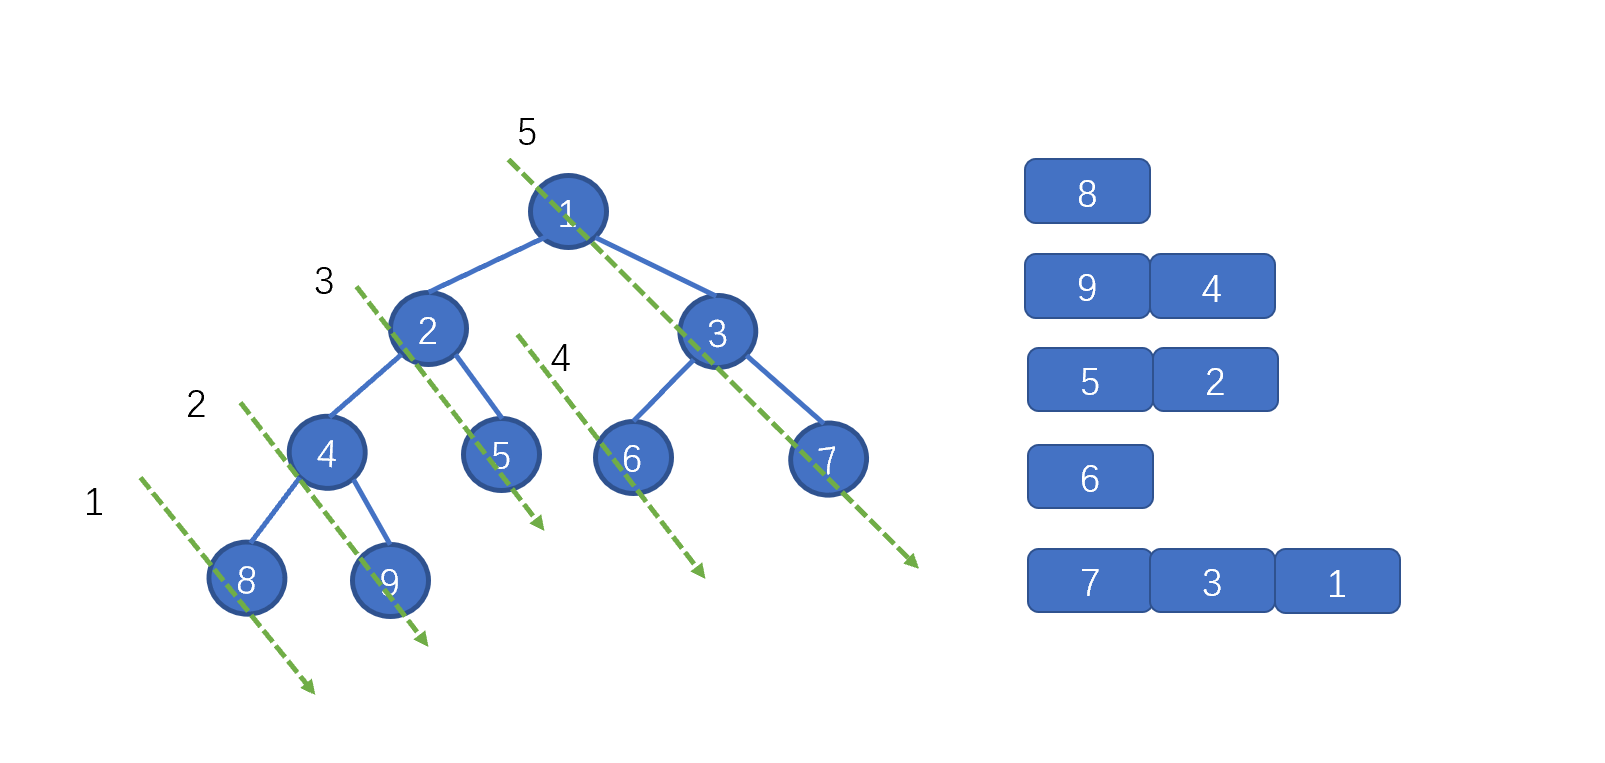
上图中的一个绿色虚线,代表一个链表,我们根据序号进行倒序遍历,看下是什么情况
|
||
|
||
|
||
|
||

|
||
|
||
到这块是不是就整懂啦,打完收工!
|
||
|
||
```java
|
||
class Solution {
|
||
List<Integer> list;
|
||
public List<Integer> postorderTraversal(TreeNode root) {
|
||
list = new ArrayList<>();
|
||
if (root == null) {
|
||
return list;
|
||
}
|
||
TreeNode p1 = root;
|
||
TreeNode p2 = null;
|
||
while (p1 != null) {
|
||
p2 = p1.left;
|
||
if (p2 != null) {
|
||
while (p2.right != null && p2.right != p1) {
|
||
p2 = p2.right;
|
||
}
|
||
if (p2.right == null) {
|
||
p2.right = p1;
|
||
p1 = p1.left;
|
||
continue;
|
||
} else {
|
||
p2.right = null;
|
||
postMorris(p1.left);
|
||
}
|
||
}
|
||
p1 = p1.right;
|
||
}
|
||
//以根节点为起点的链表
|
||
postMorris(root);
|
||
return list;
|
||
}
|
||
public void postMorris(TreeNode root) {
|
||
//翻转链表
|
||
TreeNode reverseNode = reverseList(root);
|
||
//从后往前遍历
|
||
TreeNode cur = reverseNode;
|
||
while (cur != null) {
|
||
list.add(cur.val);
|
||
cur = cur.right;
|
||
}
|
||
//翻转回来
|
||
reverseList(reverseNode);
|
||
}
|
||
public TreeNode reverseList(TreeNode head) {
|
||
TreeNode cur = head;
|
||
TreeNode pre = null;
|
||
while (cur != null) {
|
||
TreeNode next = cur.right;
|
||
cur.right = pre;
|
||
pre = cur;
|
||
cur = next;
|
||
}
|
||
return pre;
|
||
}
|
||
|
||
}
|
||
```
|
||
|
||
Swift Code:
|
||
|
||
```swift
|
||
class Solution {
|
||
var list:[Int] = []
|
||
func postorderTraversal(_ root: TreeNode?) -> [Int] {
|
||
guard root != nil else {
|
||
return list
|
||
}
|
||
var p1 = root, p2: TreeNode?
|
||
while p1 != nil {
|
||
p2 = p1!.left
|
||
if p2 != nil {
|
||
while p2!.right != nil && p2!.right !== p1 {
|
||
p2 = p2!.right
|
||
}
|
||
if p2!.right == nil {
|
||
p2!.right = p1
|
||
p1 = p1!.left
|
||
continue
|
||
} else {
|
||
p2!.right = nil
|
||
postMorris(p1!.left)
|
||
}
|
||
}
|
||
p1 = p1!.right
|
||
}
|
||
//以根节点为起点的链表
|
||
postMorris(root!)
|
||
return list
|
||
}
|
||
|
||
func postMorris(_ root: TreeNode?) {
|
||
let reverseNode = reverseList(root)
|
||
//从后往前遍历
|
||
var cur = reverseNode
|
||
while cur != nil {
|
||
list.append(cur!.val)
|
||
cur = cur!.right
|
||
}
|
||
reverseList(reverseNode)
|
||
}
|
||
|
||
func reverseList(_ head: TreeNode?) -> TreeNode? {
|
||
var cur = head, pre: TreeNode?
|
||
while cur != nil {
|
||
let next = cur?.right
|
||
cur?.right = pre
|
||
pre = cur
|
||
cur = next
|
||
}
|
||
return pre
|
||
}
|
||
}
|
||
```
|
||
|
||
时间复杂度 O(n)空间复杂度 O(1)
|
||
|
||
总结:后序遍历比起前序和中序稍微复杂了一些,所以我们解题的时候,需要好好注意一下,迭代法的核心是利用一个指针来定位我们上一个遍历的节点,Morris 的核心是,将某节点的右子节点,看成是一条链表,进行反向遍历。
|
||
|
||
好啦,今天就唠到这吧,拜了个拜。
|