208 lines
7.7 KiB
Java
208 lines
7.7 KiB
Java
之前给大家介绍了二叉树的[前序遍历](),[中序遍历]()的迭代法和 Morris 方法,今天咱们来说一下二叉后序遍历的迭代法及 Morris 方法。
|
||
|
||
注:阅读该文章前,建议各位先阅读之前的三篇文章,对该文章的理解有很大帮助。
|
||
|
||
## 迭代
|
||
|
||
后序遍历的相比前两种方法,难理解了一些,所以这里我们需要认真思考一下,每一行的代码的作用。
|
||
|
||
我们先来复习一下,二叉树的后序遍历
|
||
|
||
|
||
|
||
我们知道后序遍历的顺序是,` 对于树中的某节点, 先遍历该节点的左子树, 再遍历其右子树, 最后遍历该节点`。
|
||
|
||
那么我们如何利用栈来解决呢?
|
||
|
||
我们直接来看动画,看动画之前,但是我们`需要带着问题看动画`,问题搞懂之后也就搞定了后序遍历。
|
||
|
||
1.动画中的橙色指针发挥了什么作用
|
||
|
||
2.为什么动画中的某节点,为什么出栈后又入栈呢?
|
||
|
||
好啦,下面我们看动画吧!
|
||
|
||
|
||
|
||
相信大家看完动画之后,也能够发现其中规律。
|
||
|
||
我们来对其中之前提出的问题进行解答
|
||
|
||
1.动画中的橙色箭头的作用?
|
||
|
||
> 用来定位住上一个访问节点,这样我们就知道 cur 节点的 right 节点是否被访问,如果被访问,我们则需要遍历 cur 节点。
|
||
|
||
2.为什么有的节点出栈后又入栈了呢?
|
||
|
||
> 出栈又入栈的原因是,我们发现 cur 节点的 right 不为 null ,并且 cur.right 也没有被访问过。因为 `cur.right != preNode `,所以当前我们还不能够遍历该节点,应该先遍历其右子树中的节点。
|
||
>
|
||
> 所以我们将其入栈后,然后`cur = cur.right`
|
||
|
||
```java
|
||
class Solution {
|
||
public List<Integer> postorderTraversal(TreeNode root) {
|
||
Stack<TreeNode> stack = new Stack<>();
|
||
List<Integer> list = new ArrayList<>();
|
||
TreeNode cur = root;
|
||
//这个用来记录前一个访问的节点,也就是橙色箭头
|
||
TreeNode preNode = null;
|
||
while (cur != null || !stack.isEmpty()) {
|
||
//和之前写的中序一致
|
||
while (cur != null) {
|
||
stack.push(cur);
|
||
cur = cur.left;
|
||
}
|
||
//1.出栈,可以想一下,这一步的原因。
|
||
cur = stack.pop();
|
||
//2.if 里的判断语句有什么含义?
|
||
if (cur.right == null || cur.right == preNode) {
|
||
list.add(cur.val);
|
||
//更新下 preNode,也就是定位住上一个访问节点。
|
||
preNode = cur;
|
||
cur = null;
|
||
} else {
|
||
//3.再次压入栈,和上面那条 1 的关系?
|
||
stack.push(cur);
|
||
cur = cur.right;
|
||
}
|
||
}
|
||
return list;
|
||
}
|
||
}
|
||
```
|
||
|
||
当然也可以修改下代码逻辑将 `cur = stack.pop()` 改成 `cur = stack.peek()`,下面再修改一两行代码也可以实现,这里这样写是方便动画模拟,大家可以随意发挥。
|
||
|
||
时间复杂度 O(n), 空间复杂度O(n)
|
||
|
||
这里二叉树的三种迭代方式到这里就结束啦,大家可以进行归纳总结,三种遍历方式大同小异,建议各位,掌握之后,自己手撕一下,从搭建二叉树开始。
|
||
|
||
另外大家也可以看下 Carl 哥的这篇文章,迭代遍历的另一种实现方式。
|
||
|
||
> https://leetcode-cn.com/problems/binary-tree-postorder-traversal/solution/bang-ni-dui-er-cha-shu-bu-zai-mi-mang-che-di-chi-t/
|
||
|
||
好啦,下面我们看下后序遍历的 Morris 方法。
|
||
|
||
## Morris
|
||
|
||
后序遍历的 Morris 方法也比之前两种代码稍微长一些,看着挺唬人,其实不难,和我们之前说的没差多少。下面我们一起来干掉它吧。
|
||
|
||
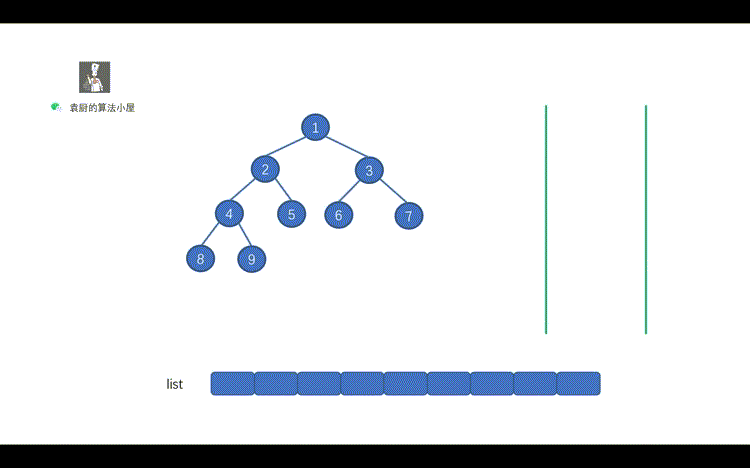
我们先来复习下之前说过的[中序遍历](),见下图。
|
||
|
||
|
||
|
||
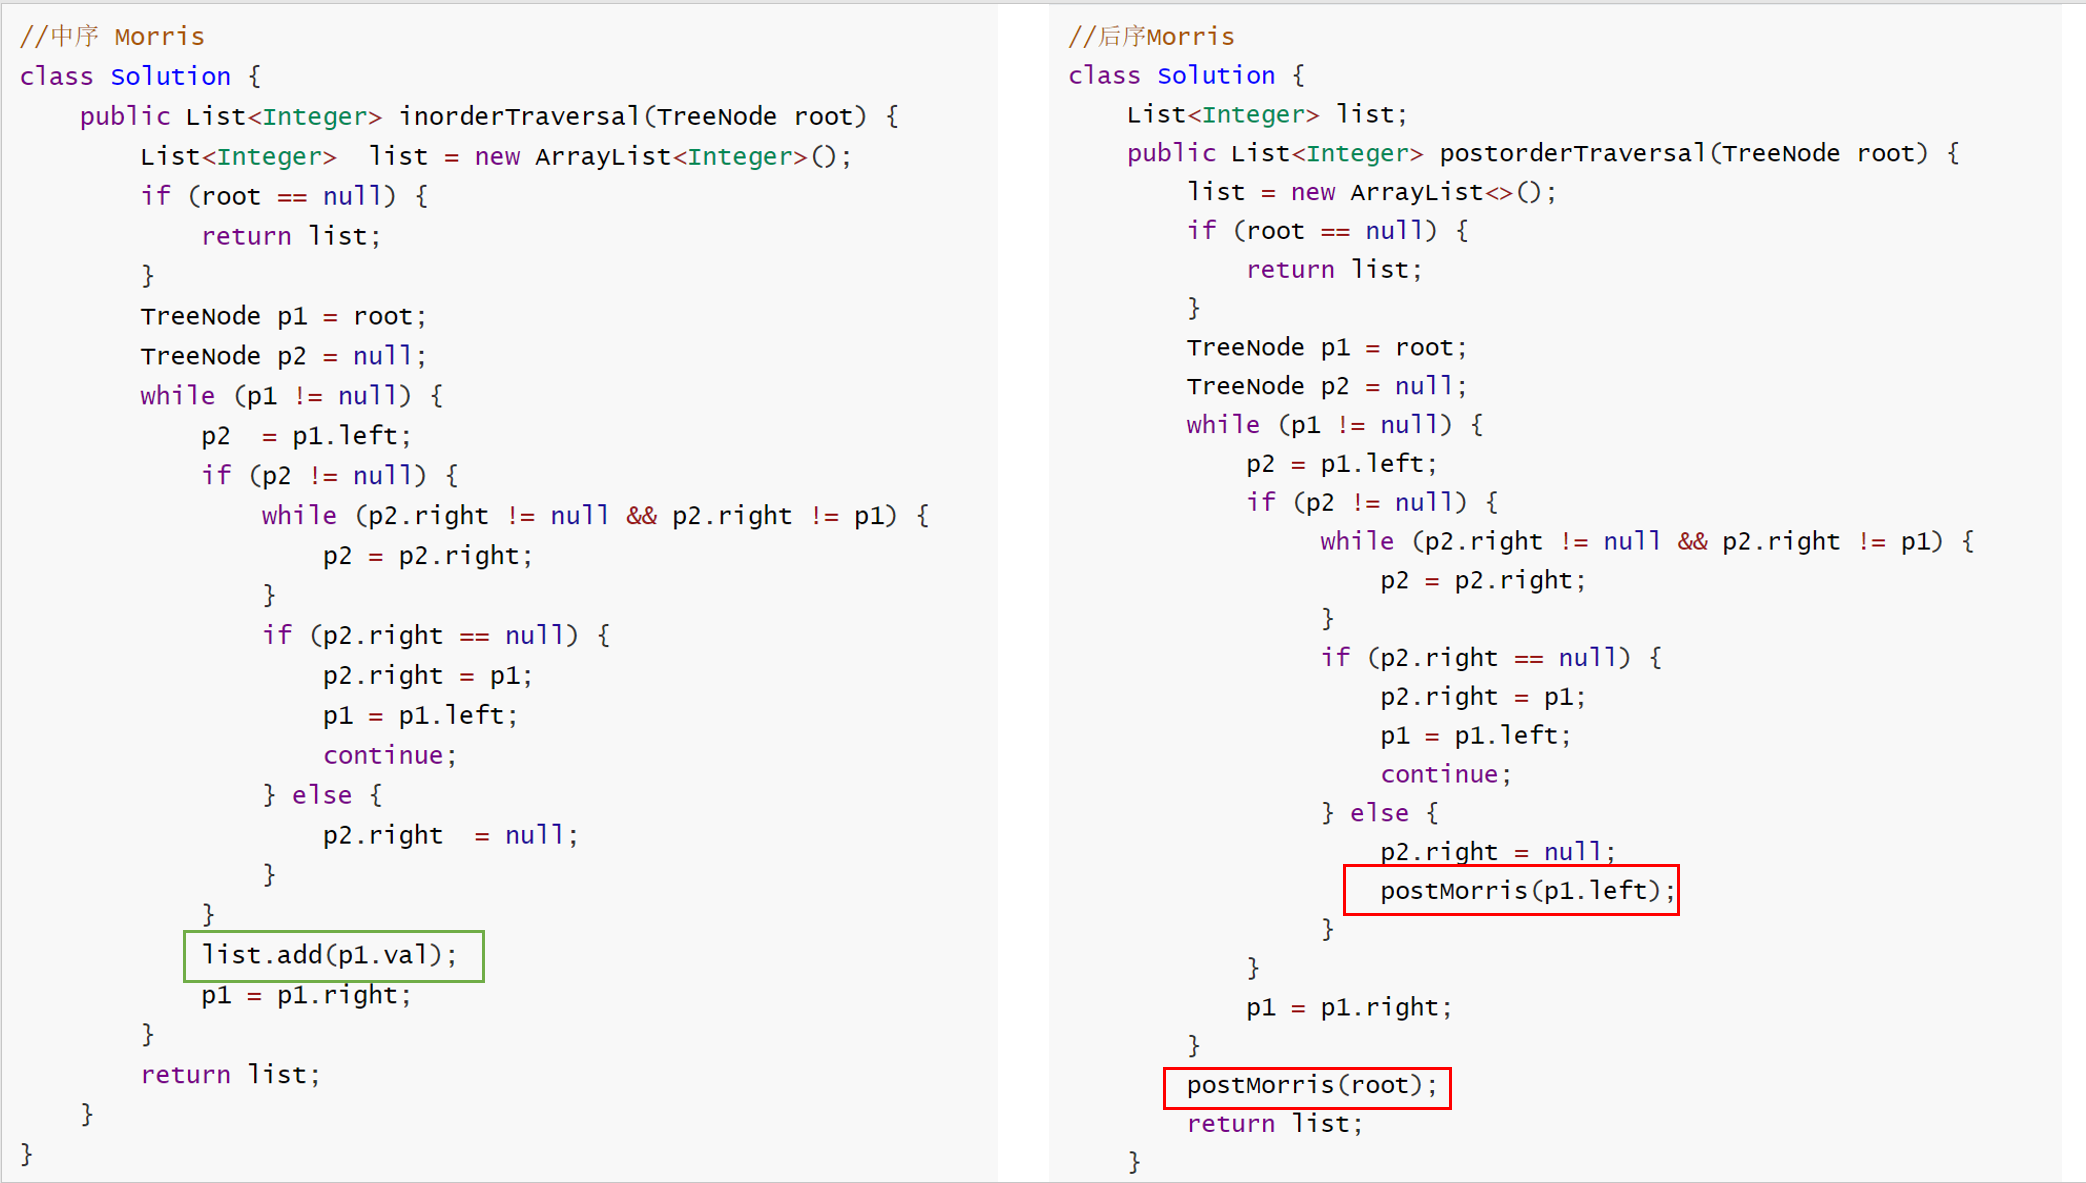
另外我们来对比下,中序遍历和后序遍历的 Morris 方法,代码有哪里不同。
|
||
|
||
|
||
|
||
由上图可知,仅仅有三处不同,后序遍历里少了 `list.add()`,多了一个函数` postMorris() ` ,那后序遍历的 list.add() 肯定是在 postMorris 函数中的。所以我们搞懂了 postMorris 函数,也就搞懂了后序遍历的 Morris 方法(默认大家看了之前的文章,没有看过的同学,可以点击文首的链接)
|
||
|
||
下面我们一起来剖析下 postMorris 函数.代码如下
|
||
|
||
```java
|
||
public void postMorris(TreeNode root) {
|
||
//反转转链表,详情看下方图片
|
||
TreeNode reverseNode = reverseList(root);
|
||
//遍历链表
|
||
TreeNode cur = reverseNode;
|
||
while (cur != null) {
|
||
list.add(cur.val);
|
||
cur = cur.right;
|
||
}
|
||
//反转回来
|
||
reverseList(reverseNode);
|
||
}
|
||
|
||
//反转链表
|
||
public TreeNode reverseList(TreeNode head) {
|
||
TreeNode cur = head;
|
||
TreeNode pre = null;
|
||
while (cur != null) {
|
||
TreeNode next = cur.right;
|
||
cur.right = pre;
|
||
pre = cur;
|
||
cur = next;
|
||
}
|
||
return pre;
|
||
}
|
||
```
|
||
|
||
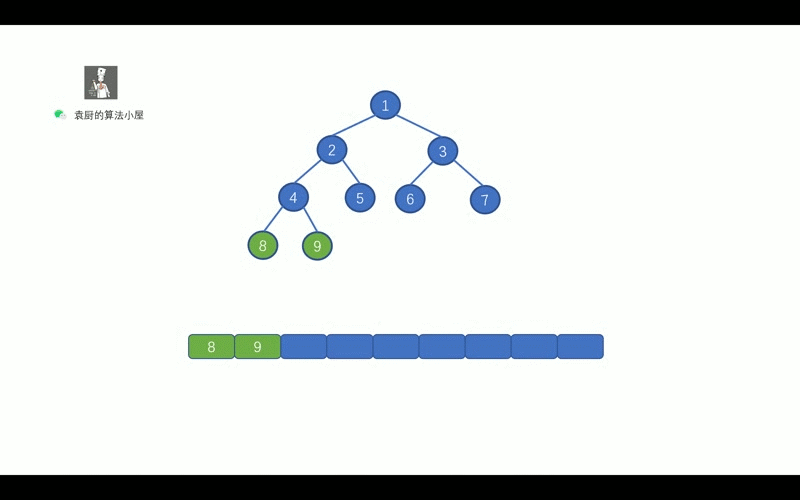
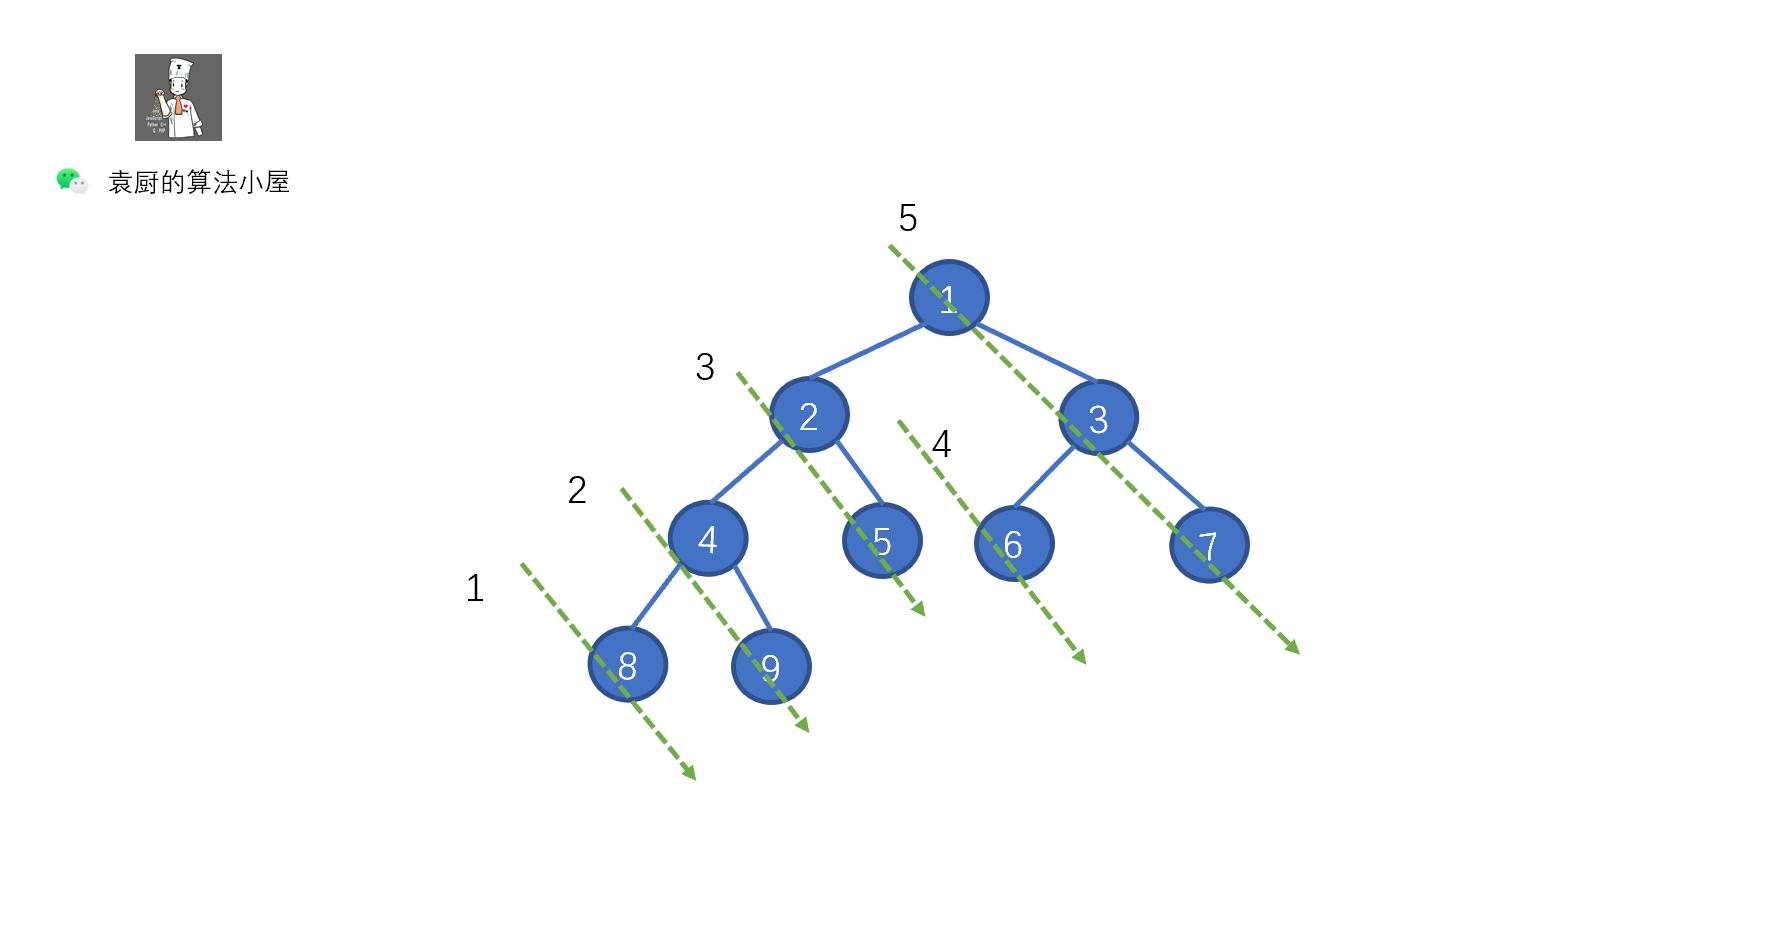
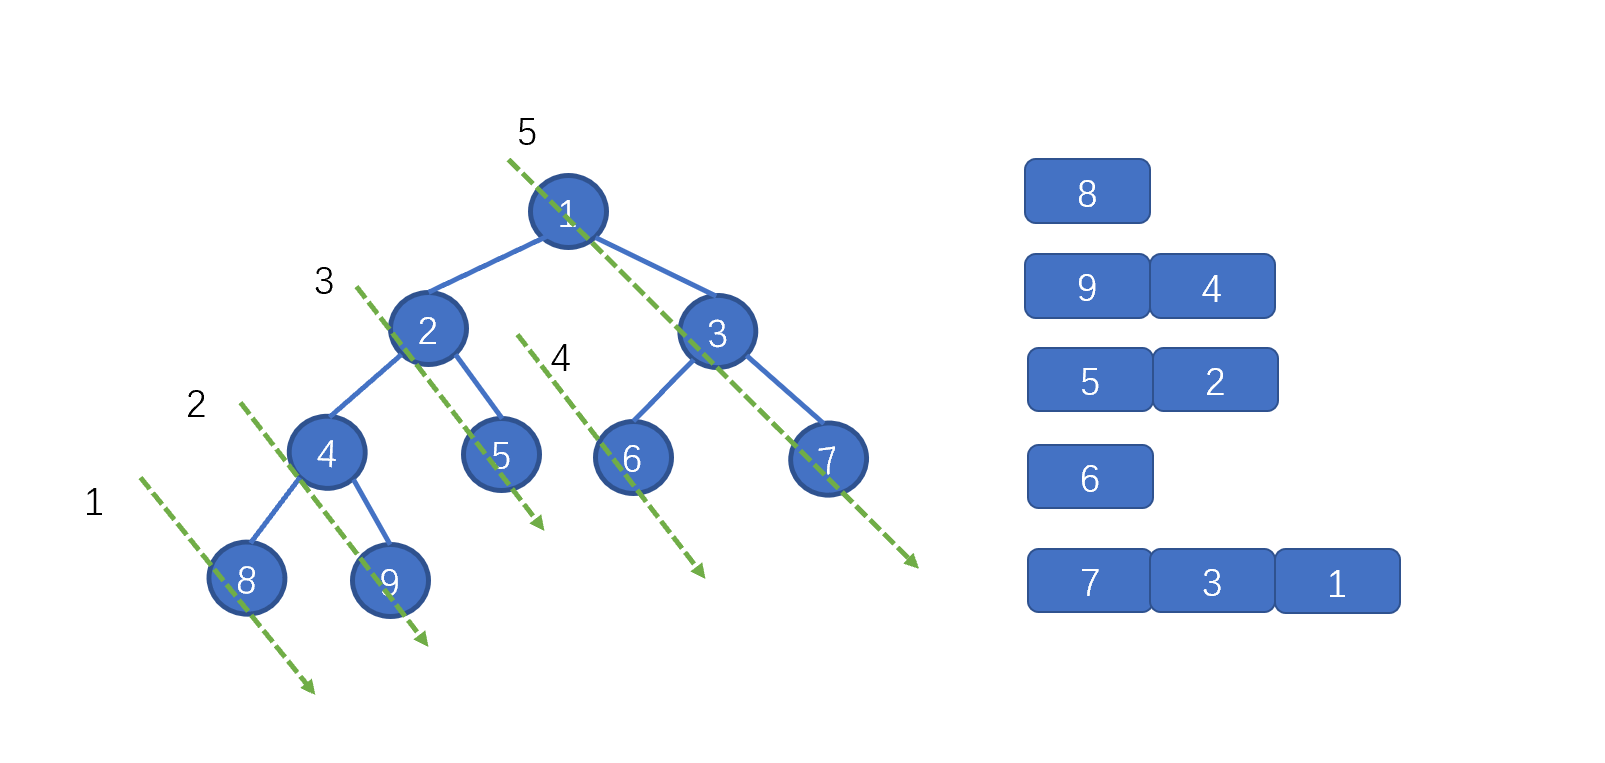
上面的代码,是不是贼熟悉,和我们的倒序输出链表一致,步骤为,反转链表,遍历链表,将链表反转回原样。只不过我们将 ListNode.next 写成了 TreeNode.right 将树中的遍历右子节点的路线,看成了一个链表,见下图。
|
||
|
||
|
||
|
||
上图中的一个绿色虚线,代表一个链表,我们根据序号进行倒序遍历,看下是什么情况
|
||
|
||
|
||
|
||

|
||
|
||
到这块是不是就整懂啦,打完收工!
|
||
|
||
```java
|
||
class Solution {
|
||
List<Integer> list;
|
||
public List<Integer> postorderTraversal(TreeNode root) {
|
||
list = new ArrayList<>();
|
||
if (root == null) {
|
||
return list;
|
||
}
|
||
TreeNode p1 = root;
|
||
TreeNode p2 = null;
|
||
while (p1 != null) {
|
||
p2 = p1.left;
|
||
if (p2 != null) {
|
||
while (p2.right != null && p2.right != p1) {
|
||
p2 = p2.right;
|
||
}
|
||
if (p2.right == null) {
|
||
p2.right = p1;
|
||
p1 = p1.left;
|
||
continue;
|
||
} else {
|
||
p2.right = null;
|
||
postMorris(p1.left);
|
||
}
|
||
}
|
||
p1 = p1.right;
|
||
}
|
||
//以根节点为起点的链表
|
||
postMorris(root);
|
||
return list;
|
||
}
|
||
public void postMorris(TreeNode root) {
|
||
//翻转链表
|
||
TreeNode reverseNode = reverseList(root);
|
||
//从后往前遍历
|
||
TreeNode cur = reverseNode;
|
||
while (cur != null) {
|
||
list.add(cur.val);
|
||
cur = cur.right;
|
||
}
|
||
//翻转回来
|
||
reverseList(reverseNode);
|
||
}
|
||
public TreeNode reverseList(TreeNode head) {
|
||
TreeNode cur = head;
|
||
TreeNode pre = null;
|
||
while (cur != null) {
|
||
TreeNode next = cur.right;
|
||
cur.right = pre;
|
||
pre = cur;
|
||
cur = next;
|
||
}
|
||
return pre;
|
||
}
|
||
|
||
}
|
||
```
|
||
|
||
时间复杂度 O(n)空间复杂度 O(1)
|
||
|
||
总结:后序遍历比起前序和中序稍微复杂了一些,所以我们解题的时候,需要好好注意一下,迭代法的核心是利用一个指针来定位我们上一个遍历的节点,Morris 的核心是,将某节点的右子节点,看成是一条链表,进行反向遍历。
|
||
|
||
好啦,今天就唠到这吧,拜了个拜。
|
||
|
||
|
||
|