mirror of
https://github.com/yeasy/docker_practice.git
synced 2026-03-14 05:41:11 +00:00
Compare commits
96 Commits
| Author | SHA1 | Date | |
|---|---|---|---|
|
|
dc0f1223a0 | ||
|
|
dad6b9f022 | ||
|
|
e049bf2741 | ||
|
|
e59b50b43b | ||
|
|
8888612782 | ||
|
|
aa431b9a79 | ||
|
|
500325b7c8 | ||
|
|
cba52767b7 | ||
|
|
dc3a1c92d5 | ||
|
|
2ae8979c5c | ||
|
|
41633ecf24 | ||
|
|
48bcb9470b | ||
|
|
d47f565e83 | ||
|
|
b54b5b0a0f | ||
|
|
6c8e710c53 | ||
|
|
27f495466d | ||
|
|
cc8c36b1a3 | ||
|
|
f4e21a70b1 | ||
|
|
a2cdfdfded | ||
|
|
3b0f3c0cb2 | ||
|
|
37581d3016 | ||
|
|
49fd7a94da | ||
|
|
0a8887957e | ||
|
|
3356aa627f | ||
|
|
f20936e0af | ||
|
|
247bbcdc59 | ||
|
|
efdc3de9e0 | ||
|
|
42bb1bd1a1 | ||
|
|
c5935658bb | ||
|
|
bc6d6c85e3 | ||
|
|
ff7d5976a7 | ||
|
|
3a3939686c | ||
|
|
1a966e2979 | ||
|
|
a7d3a8291f | ||
|
|
6f9a5cca90 | ||
|
|
a5b762c2ce | ||
|
|
3cdde73798 | ||
|
|
e9213ea244 | ||
|
|
2b6e28d6a9 | ||
|
|
0699e96e36 | ||
|
|
2069a436e1 | ||
|
|
7b808e4d3d | ||
|
|
a071218f77 | ||
|
|
48718d6035 | ||
|
|
8666d2683f | ||
|
|
84c2183cc8 | ||
|
|
7ec38273bb | ||
|
|
6bca9e8dff | ||
|
|
6c6d2ac973 | ||
|
|
8747860b95 | ||
|
|
5a00a6b32f | ||
|
|
8a3be4634e | ||
|
|
c075122492 | ||
|
|
c9ebe3da2b | ||
|
|
941e01623c | ||
|
|
593a0c39ff | ||
|
|
823239010a | ||
|
|
d00b6e1911 | ||
|
|
b8dc1a7b16 | ||
|
|
710c1ec457 | ||
|
|
b9247c16df | ||
|
|
59af28af86 | ||
|
|
0baf0fec99 | ||
|
|
d14a0e0c4a | ||
|
|
e7c1782c51 | ||
|
|
7b02f90f09 | ||
|
|
4ed6156a03 | ||
|
|
3b959abf68 | ||
|
|
a0c7670738 | ||
|
|
8280d40922 | ||
|
|
1c1d81bd49 | ||
|
|
4f48fc2066 | ||
|
|
00ec580e74 | ||
|
|
3974a2de24 | ||
|
|
3442dab121 | ||
|
|
2e747fe2a5 | ||
|
|
df2537b721 | ||
|
|
bf04ac99a3 | ||
|
|
77c8ae525a | ||
|
|
f7dcffc7be | ||
|
|
a17f3f6b2f | ||
|
|
8576e16b61 | ||
|
|
4949de94c4 | ||
|
|
44e504c604 | ||
|
|
0370871867 | ||
|
|
d3c197ddfc | ||
|
|
8fc2003414 | ||
|
|
c446640591 | ||
|
|
6a97772e79 | ||
|
|
d4bbcc0cfb | ||
|
|
994f6ac101 | ||
|
|
fbf5a286ab | ||
|
|
81e68f241c | ||
|
|
aff886341f | ||
|
|
44530ff366 | ||
|
|
e2baa6401a |
32
.drone.yml
32
.drone.yml
@@ -1,17 +1,15 @@
|
||||
workspace:
|
||||
base: /srv/gitbook-src
|
||||
path: .
|
||||
pipeline:
|
||||
build:
|
||||
image: yeasy/docker_practice:latest
|
||||
# pull: true
|
||||
environment:
|
||||
- TZ=Asia/Shanghai
|
||||
secrets: [key1, key2]
|
||||
commands:
|
||||
# - echo $${key1}
|
||||
# - echo $KEY2
|
||||
- docker-entrypoint.sh build
|
||||
when:
|
||||
event: [push, pull_request, tag, deployment]
|
||||
branch: master
|
||||
kind: pipeline
|
||||
type: docker
|
||||
name: build
|
||||
steps:
|
||||
- name: build
|
||||
image: yeasy/docker_practice:latest
|
||||
pull: if-not-exists # always never
|
||||
environment:
|
||||
TZ: Asia/Shanghai
|
||||
commands:
|
||||
- docker-entrypoint.sh build
|
||||
|
||||
trigger:
|
||||
branch:
|
||||
- master
|
||||
|
||||
@@ -1,4 +1,4 @@
|
||||
# EditorConfig is awesome: http://EditorConfig.org
|
||||
# EditorConfig is awesome: https://EditorConfig.org
|
||||
|
||||
root = true
|
||||
|
||||
|
||||
2
.gitattributes
vendored
2
.gitattributes
vendored
@@ -2,4 +2,4 @@
|
||||
|
||||
*.sh text eol=lf
|
||||
|
||||
*.py linguist-language=go
|
||||
* linguist-language=go
|
||||
|
||||
14
.github/ISSUE_TEMPLATE/Bug_report.md
vendored
14
.github/ISSUE_TEMPLATE/Bug_report.md
vendored
@@ -12,22 +12,20 @@ about: Create a report to help us improve
|
||||
|
||||
* [x] Linux
|
||||
* [x] CentOS 7
|
||||
* [x] Ubuntu 14.04
|
||||
* [x] Fedora
|
||||
* [x] Ubuntu 16.04 +
|
||||
* [x] Debian 7
|
||||
* [x] Debian 8 +
|
||||
* [x] CoreOS
|
||||
* [x] Debian 9 +
|
||||
* [x] macOS
|
||||
* [x] Windows 10
|
||||
* [x] Raspberry Pi (ARM)
|
||||
* [x] Others (Pls describe below)
|
||||
|
||||
### Docker Version
|
||||
<!--如果你的 Docker 版本低于 18.09 请尽可能升级到该版本,保留你的 Docker 版本,其他选项删除-->
|
||||
<!--if Docker version under 18.09, please upgrade Docker to 18.09-->
|
||||
<!--如果你的 Docker 版本低于 19.03 请尽可能升级到该版本,保留你的 Docker 版本,其他选项删除-->
|
||||
<!--if Docker version under 19.03, please upgrade Docker to 19.03-->
|
||||
|
||||
* [x] Edge (v18.09)
|
||||
* [x] Stable (v18.09)
|
||||
* [x] Edge (v19.03)
|
||||
* [x] Stable (v19.03)
|
||||
* [x] 1.13.0 or Before
|
||||
|
||||
### Problem Description
|
||||
|
||||
14
.github/ISSUE_TEMPLATE/Custom.md
vendored
14
.github/ISSUE_TEMPLATE/Custom.md
vendored
@@ -12,22 +12,20 @@ about: Create a issue about Docker
|
||||
|
||||
* [x] Linux
|
||||
* [x] CentOS 7
|
||||
* [x] Ubuntu 14.04
|
||||
* [x] Fedora
|
||||
* [x] Ubuntu 16.04 +
|
||||
* [x] Debian 7
|
||||
* [x] Debian 8 +
|
||||
* [x] CoreOS
|
||||
* [x] Debian 9 +
|
||||
* [x] macOS
|
||||
* [x] Windows 10
|
||||
* [x] Raspberry Pi (ARM)
|
||||
* [x] Others (Pls describe below)
|
||||
|
||||
### Docker Version
|
||||
<!--如果你的 Docker 版本低于 18.09 请尽可能升级到该版本,保留你的 Docker 版本,其他选项删除-->
|
||||
<!--if Docker version under 18.09, please upgrade Docker to 18.09-->
|
||||
<!--如果你的 Docker 版本低于 19.03 请尽可能升级到该版本,保留你的 Docker 版本,其他选项删除-->
|
||||
<!--if Docker version under 19.03, please upgrade Docker to 19.03-->
|
||||
|
||||
* [x] Edge (v18.09)
|
||||
* [x] Stable (v18.09)
|
||||
* [x] Edge (v19.03)
|
||||
* [x] Stable (v19.03)
|
||||
* [x] 1.13.0 or Before
|
||||
|
||||
### Problem Description
|
||||
|
||||
8
.github/PULL_REQUEST_TEMPLATE.md
vendored
8
.github/PULL_REQUEST_TEMPLATE.md
vendored
@@ -1,20 +1,20 @@
|
||||
<!--
|
||||
Thanks for your contribution.
|
||||
Thanks for your contribution.
|
||||
See [CONTRIBUTING](CONTRIBUTING.md) for contribution guidelines.
|
||||
-->
|
||||
|
||||
### Proposed changes (Mandatory)
|
||||
|
||||
<!--
|
||||
Tell us what you did and why:
|
||||
Tell us what you did and why:
|
||||
|
||||
One line short description
|
||||
|
||||
|
||||
And details in other paragraphs.
|
||||
-->
|
||||
|
||||
### Fix issues (Optional)
|
||||
|
||||
<!--
|
||||
Tell us what issues you fixed, e.g., fix #123
|
||||
Tell us what issues you fixed, e.g., fix #123
|
||||
-->
|
||||
|
||||
18
.github/workflows/ci.yaml
vendored
Normal file
18
.github/workflows/ci.yaml
vendored
Normal file
@@ -0,0 +1,18 @@
|
||||
on:
|
||||
push:
|
||||
pull_request:
|
||||
|
||||
name: CI
|
||||
|
||||
jobs:
|
||||
build:
|
||||
name: Build GitBook
|
||||
runs-on: ubuntu-latest
|
||||
steps:
|
||||
- uses: actions/checkout@master
|
||||
with:
|
||||
fetch-depth: 2
|
||||
- name: Build
|
||||
uses: docker://yeasy/docker_practice
|
||||
with:
|
||||
args: build
|
||||
33
.travis.yml
33
.travis.yml
@@ -1,7 +1,8 @@
|
||||
language: bash
|
||||
sudo: required
|
||||
|
||||
services:
|
||||
- docker
|
||||
|
||||
before_install:
|
||||
- openssl aes-256-cbc -K $encrypted_6cc8cff04075_key -iv $encrypted_6cc8cff04075_iv
|
||||
-in .travis/id_rsa.enc -out ~/.ssh/id_rsa -d
|
||||
@@ -10,35 +11,43 @@ before_install:
|
||||
- date
|
||||
- git config --global user.name "khs1994"
|
||||
- git config --global user.email "khs1994@khs1994.com"
|
||||
|
||||
script:
|
||||
- docker run -it --rm -v $PWD:/srv/gitbook-src yeasy/docker_practice build
|
||||
|
||||
after_success:
|
||||
- sudo chmod -R 777 _book
|
||||
- echo "FROM nginx:1.13.8-alpine" >> Dockerfile
|
||||
|
||||
- echo "FROM nginx:alpine" >> Dockerfile
|
||||
- echo "COPY _book /usr/share/nginx/html" >> Dockerfile
|
||||
|
||||
- echo "$DOCKER_PASSWORD" | docker login -u "$DOCKER_USERNAME" --password-stdin
|
||||
- docker build -t dockerpracticecn/docker_practice .
|
||||
- docker run -dit --rm -p 4000:80 dockerpracticecn/docker_practice
|
||||
|
||||
- docker build -t dockerpracticesig/docker_practice:us-en .
|
||||
- docker run -dit --rm -p 4000:80 dockerpracticesig/docker_practice:us-en
|
||||
|
||||
- sleep 5
|
||||
- curl 127.0.0.1:4000
|
||||
- docker push dockerpracticecn/docker_practice
|
||||
|
||||
- docker push dockerpracticesig/docker_practice:us-en
|
||||
|
||||
- cd _book
|
||||
- git init
|
||||
- git remote add origin "$REPO"
|
||||
- git remote add origin "$DEPLOY_REPO"
|
||||
- git add .
|
||||
- COMMIT=`date "+%F %T"`
|
||||
- git commit -m "Travis CI Site updated $COMMIT"
|
||||
- git push -f origin master:"$DEPLOY_BRANCH"
|
||||
|
||||
env:
|
||||
global:
|
||||
- DEPLOY_BRANCH: pages
|
||||
# - DEPLOY_BRANCH: legacy-pages
|
||||
- REPO: git@github.com:yeasy/docker_practice.git
|
||||
- DEPLOY_BRANCH: master
|
||||
- DEPLOY_REPO: git@github.com:docker-practice/us-en.git
|
||||
|
||||
addons:
|
||||
ssh_known_hosts:
|
||||
- github.com
|
||||
|
||||
branches:
|
||||
only:
|
||||
- master
|
||||
- dev
|
||||
# - docker-legacy
|
||||
- english
|
||||
|
||||
@@ -1,4 +1,4 @@
|
||||
FROM node:9-alpine
|
||||
FROM node:alpine
|
||||
|
||||
ENV TZ=Asia/Shanghai
|
||||
|
||||
|
||||
@@ -11,7 +11,7 @@
|
||||
"-livereload",
|
||||
"image-captions",
|
||||
"github",
|
||||
"page-treeview",
|
||||
"page-treeview@2.9.8",
|
||||
"editlink"
|
||||
],
|
||||
"pluginsConfig": {
|
||||
|
||||
@@ -6,12 +6,14 @@ if [ $1 = "sh" ];then sh ; exit 0; fi
|
||||
|
||||
rm -rf node_modules _book
|
||||
|
||||
cp -a . ../gitbook
|
||||
srcDir=$PWD
|
||||
|
||||
cd ../gitbook
|
||||
cp -a . /srv/gitbook
|
||||
|
||||
cd /srv/gitbook
|
||||
|
||||
main(){
|
||||
if [ "$1" = build ];then gitbook build; cp -a _book ../gitbook-src; echo $START; date "+%F %T"; exit 0; fi
|
||||
if [ "$1" = build ];then gitbook build && cp -a _book $srcDir && echo $START && date "+%F %T" && exit 0; fi
|
||||
exec gitbook serve
|
||||
exit 0
|
||||
}
|
||||
|
||||
@@ -1,5 +1,11 @@
|
||||
## 主要修订记录
|
||||
|
||||
* 1.1.0 2019-12-31
|
||||
* 全面支持 v19.x 新版本
|
||||
* 增加 `BuildKit`
|
||||
* 增加 `docker manifest` 命令使用说明
|
||||
* 移除 `Ubuntu 14.04` `Debian 8` `Debian 7`
|
||||
|
||||
* 1.0.0: 2018-12-31
|
||||
* 全面支持 v18.x 新版本
|
||||
* 添加如何调试 Docker
|
||||
|
||||
31
README.md
31
README.md
@@ -1,20 +1,25 @@
|
||||
# Docker — 从入门到实践
|
||||
# Docker — 从入门到实践(英文版)
|
||||
|
||||
[](https://github.com/yeasy/docker_practice)  [](https://travis-ci.org/yeasy/docker_practice) [](https://github.com/yeasy/docker_practice/releases) [](https://gitter.im/docker_practice/Lobby?utm_source=badge&utm_medium=badge&utm_campaign=pr-badge&utm_content=badge)
|
||||
[](https://github.com/yeasy/docker_practice) [](https://travis-ci.org/yeasy/docker_practice) [](https://github.com/yeasy/docker_practice/releases) [](https://github.com/docker/docker-ce) [](https://union-click.jd.com/jdc?e=&p=AyIGZRtYFAcXBFIZWR0yEgRQH1kXAhs3EUQDS10iXhBeGlcJDBkNXg9JHU4YDk5ER1xOGRNLGEEcVV8BXURFUFdfC0RVU1JRUy1OVxUBFwNXGVscMlVYLlAaXAV1Z1JHA0dWEHVXZTliY1QLWStaJQAWB10fXhwKEDdlG1wlUHzf462DsLMO0%2F%2BUjp2VIgZlG18RBBcCUBlbEAoTBWUcWxwySVI7HAhBBxEOBUgOFQYQUGUraxYyIjdVK1glQHxXUEhYEVEUUFQcC0IHGgRRSAgVARAPAhsLFgNCDl0ZWiUAEwZREg%3D%3D&t=W1dCFFlQCxxKQgFHREkdSVJKSQVJHFRXFk9FUlpGQUpLCVBaTFhbXQtWVmpSWRtYEAYQBVUS)
|
||||
|
||||
v1.0.0
|
||||
**v1.1.0**
|
||||
|
||||
*说明:本书自 0.9.0 版本起基于最新的 Docker CE v18.X 特性进行讲解。Docker 旧版本(1.13-)使用,请参考 [docker-legacy](https://github.com/yeasy/docker_practice/tree/docker-legacy) 分支。*
|
||||
| 语言 | 构建状态 | - |
|
||||
| :------------- | :------------- | :--- |
|
||||
| [zh-hans](https://github.com/yeasy/docker_practice) | [](https://travis-ci.org/yeasy/docker_practice)| [阅读](https://docker_practice.gitee.io/zh-cn) |
|
||||
| [us-en](https://github.com/yeasy/docker_practice/tree/english) | [](https://travis-ci.org/yeasy/docker_practice)| [阅读](https://docker_practice.gitee.io/us-en) |
|
||||
| [zh-hant](https://github.com/yeasy/docker_practice/tree/zh-Hant) | [](https://travis-ci.org/yeasy/docker_practice)| [阅读](https://docker_practice.gitee.io/zh_hant) |
|
||||
|
||||
[Docker](http://www.docker.com) 是个划时代的开源项目,它彻底释放了计算虚拟化的威力,极大提高了应用的维护效率,降低了云计算应用开发的成本!使用 Docker,可以让应用的部署、测试和分发都变得前所未有的高效和轻松!
|
||||
[Docker](https://www.docker.com) 是个划时代的开源项目,它彻底释放了计算虚拟化的威力,极大提高了应用的维护效率,降低了云计算应用开发的成本!使用 Docker,可以让应用的部署、测试和分发都变得前所未有的高效和轻松!
|
||||
|
||||
无论是应用开发者、运维人员、还是其他信息技术从业人员,都有必要认识和掌握 Docker,节约有限的生命。
|
||||
|
||||
本书既适用于具备基础 Linux 知识的 Docker 初学者,也希望可供理解原理和实现的高级用户参考。同时,书中给出的实践案例,可供在进行实际部署时借鉴。前六章为基础内容,供用户理解 Docker 的基本概念和操作;7 ~ 9 章介绍包括数据管理、网络等高级操作;第 10 ~ 13 章介绍了容器生态中的几个核心项目;14、15 章讨论了关于 Docker 安全和实现技术等高级话题。后续章节则分别介绍包括 Etcd、CoreOS、Kubernetes、Mesos、容器云等相关热门开源项目。最后,还展示了使用容器技术的典型的应用场景和实践案例。
|
||||
|
||||
* 在线阅读:[GitBook](https://yeasy.gitbooks.io/docker_practice/content/),[Github](https://github.com/yeasy/docker_practice/blob/master/SUMMARY.md),[国内镜像](https://github.com/yeasy/docker_practice/wiki/%E9%A1%B9%E7%9B%AE%E5%9B%BD%E5%86%85%E9%95%9C%E5%83%8F)
|
||||
* 下载:[pdf](https://github.com/yeasy/docker_practice/wiki/%E4%B8%8B%E8%BD%BD), [epub](https://github.com/yeasy/docker_practice/wiki/%E4%B8%8B%E8%BD%BD)
|
||||
* [离线阅读](https://github.com/yeasy/docker_practice/wiki/%E7%A6%BB%E7%BA%BF%E9%98%85%E8%AF%BB%E5%8A%9F%E8%83%BD%E8%AF%A6%E8%A7%A3)
|
||||
* 在线阅读:[docker-practice.com](https://docker-practice.com/),[GitBook](https://yeasy.gitbooks.io/docker_practice/content/),[Github](https://github.com/yeasy/docker_practice/blob/master/SUMMARY.md),[GitBook 国内镜像](https://docker_practice.gitee.io/zh-cn),[GitBook 英文版国内镜像](https://docker_practice.gitee.io/us_en),[国内镜像](https://github.com/yeasy/docker_practice/wiki/%E9%A1%B9%E7%9B%AE%E5%9B%BD%E5%86%85%E9%95%9C%E5%83%8F)
|
||||
* 下载:[pdf](https://github.com/yeasy/docker_practice/wiki/%E4%B8%8B%E8%BD%BD),[epub](https://github.com/yeasy/docker_practice/wiki/%E4%B8%8B%E8%BD%BD)
|
||||
* [离线阅读 `$ docker run -it --rm -p 4000:80 dockerpracticesig/docker_practice`](https://github.com/yeasy/docker_practice/wiki/%E7%A6%BB%E7%BA%BF%E9%98%85%E8%AF%BB%E5%8A%9F%E8%83%BD%E8%AF%A6%E8%A7%A3)
|
||||
* [英文翻译](https://github.com/yeasy/docker_practice/issues/363)
|
||||
|
||||
Docker 自身仍在快速发展中,生态环境也在蓬勃成长。建议初学者使用最新稳定版本的 Docker 进行学习实践。欢迎 [参与项目维护](CONTRIBUTING.md)。
|
||||
|
||||
@@ -30,6 +35,7 @@ Docker 自身仍在快速发展中,生态环境也在蓬勃成长。建议初
|
||||
<p align="center"><strong>微信扫码 随时随地阅读~</strong></p>
|
||||
|
||||
## 技术交流
|
||||
|
||||
欢迎加入 Docker 技术交流 QQ 群,分享 Docker 资源,交流 Docker 技术。
|
||||
|
||||
* QQ 群 I (已满):341410255
|
||||
@@ -41,16 +47,17 @@ Docker 自身仍在快速发展中,生态环境也在蓬勃成长。建议初
|
||||
* QQ 群 VII (已满):252403484
|
||||
* QQ 群 VIII(已满):544818750
|
||||
* QQ 群 IX (已满):571502246
|
||||
* QQ 群 X (可加):145983035
|
||||
* QQ 群 X (可加):145983035
|
||||
|
||||
>如果有问题,请通过 [Issues](https://github.com/yeasy/docker_practice/issues/new/choose) 来提出。
|
||||
|
||||
## 进阶学习
|
||||

|
||||
|
||||
《[Docker 技术入门与实战](http://item.jd.com/12453318.html)》第三版已经面世,介绍最新的容器技术栈,欢迎大家阅读使用并反馈建议。
|
||||
[](https://union-click.jd.com/jdc?e=&p=AyIGZRtYFAcXBFIZWR0yEgRQH1kXAhs3EUQDS10iXhBeGlcJDBkNXg9JHU4YDk5ER1xOGRNLGEEcVV8BXURFUFdfC0RVU1JRUy1OVxUBFwNXGVscMlVYLlAaXAV1Z1JHA0dWEHVXZTliY1QLWStaJQAWB10fXhwKEDdlG1wlUHzf462DsLMO0%2F%2BUjp2VIgZlG18RBBcCUBlbEAoTBWUcWxwySVI7HAhBBxEOBUgOFQYQUGUraxYyIjdVK1glQHxXUEhYEVEUUFQcC0IHGgRRSAgVARAPAhsLFgNCDl0ZWiUAEwZREg%3D%3D&t=W1dCFFlQCxxKQgFHREkdSVJKSQVJHFRXFk9FUlpGQUpLCVBaTFhbXQtWVmpSWRtYEAYQBVUS)
|
||||
|
||||
* [京东图书](https://item.jd.com/12453318.html)
|
||||
《[Docker 技术入门与实战](https://union-click.jd.com/jdc?e=&p=AyIGZRtYFAcXBFIZWR0yEgRQH1kXAhs3EUQDS10iXhBeGlcJDBkNXg9JHU4YDk5ER1xOGRNLGEEcVV8BXURFUFdfC0RVU1JRUy1OVxUBFwNXGVscMlVYLlAaXAV1Z1JHA0dWEHVXZTliY1QLWStaJQAWB10fXhwKEDdlG1wlUHzf462DsLMO0%2F%2BUjp2VIgZlG18RBBcCUBlbEAoTBWUcWxwySVI7HAhBBxEOBUgOFQYQUGUraxYyIjdVK1glQHxXUEhYEVEUUFQcC0IHGgRRSAgVARAPAhsLFgNCDl0ZWiUAEwZREg%3D%3D&t=W1dCFFlQCxxKQgFHREkdSVJKSQVJHFRXFk9FUlpGQUpLCVBaTFhbXQtWVmpSWRtYEAYQBVUS)》第三版已经面世,介绍最新的容器技术栈,欢迎大家阅读使用并反馈建议。
|
||||
|
||||
* [京东图书](https://union-click.jd.com/jdc?e=&p=AyIGZRtYFAcXBFIZWR0yEgRQH1kXAhs3EUQDS10iXhBeGlcJDBkNXg9JHU4YDk5ER1xOGRNLGEEcVV8BXURFUFdfC0RVU1JRUy1OVxUBFwNXGVscMlVYLlAaXAV1Z1JHA0dWEHVXZTliY1QLWStaJQAWB10fXhwKEDdlG1wlUHzf462DsLMO0%2F%2BUjp2VIgZlG18RBBcCUBlbEAoTBWUcWxwySVI7HAhBBxEOBUgOFQYQUGUraxYyIjdVK1glQHxXUEhYEVEUUFQcC0IHGgRRSAgVARAPAhsLFgNCDl0ZWiUAEwZREg%3D%3D&t=W1dCFFlQCxxKQgFHREkdSVJKSQVJHFRXFk9FUlpGQUpLCVBaTFhbXQtWVmpSWRtYEAYQBVUS)
|
||||
* [China-Pub](http://product.china-pub.com/8052127)
|
||||
|
||||
## 鼓励项目
|
||||
|
||||
269
SUMMARY.md
269
SUMMARY.md
@@ -1,16 +1,16 @@
|
||||
# [Docker — 从入门到实践](https://github.com/yeasy/docker_practice/blob/master/SUMMARY.md)
|
||||
# [Docker — 从入门到实践(英文版)](https://github.com/yeasy/docker_practice/blob/english/SUMMARY.md)
|
||||
|
||||
* [前言](README.md)
|
||||
* [修订记录](CHANGELOG.md)
|
||||
* [如何贡献](CONTRIBUTING.md)
|
||||
* [Docker 简介](introduction/README.md)
|
||||
* [什么是 Docker](introduction/what.md)
|
||||
* [为什么要用 Docker](introduction/why.md)
|
||||
* [基本概念](basic_concept/README.md)
|
||||
* [镜像](basic_concept/image.md)
|
||||
* [容器](basic_concept/container.md)
|
||||
* [仓库](basic_concept/repository.md)
|
||||
* [安装 Docker](install/README.md)
|
||||
* [README](README.md)
|
||||
* [CHANGELOG](CHANGELOG.md)
|
||||
* [CONTRIBUTING](CONTRIBUTING.md)
|
||||
* [Introduction](introduction/README.md)
|
||||
* [What is Docker](introduction/what.md)
|
||||
* [Why Docker](introduction/why.md)
|
||||
* [Basic concept](basic_concept/README.md)
|
||||
* [Image](basic_concept/image.md)
|
||||
* [Container](basic_concept/container.md)
|
||||
* [Repository](basic_concept/repository.md)
|
||||
* [Get Docker](install/README.md)
|
||||
* [Ubuntu](install/ubuntu.md)
|
||||
* [Debian](install/debian.md)
|
||||
* [Fedora](install/fedora.md)
|
||||
@@ -18,137 +18,129 @@
|
||||
* [Raspberry Pi](install/raspberry-pi.md)
|
||||
* [macOS](install/mac.md)
|
||||
* [Windows PC](install/windows.md)
|
||||
* [镜像加速器](install/mirror.md)
|
||||
* [使用镜像](image/README.md)
|
||||
* [获取镜像](image/pull.md)
|
||||
* [列出镜像](image/list.md)
|
||||
* [删除本地镜像](image/rm.md)
|
||||
* [利用 commit 理解镜像构成](image/commit.md)
|
||||
* [使用 Dockerfile 定制镜像](image/build.md)
|
||||
* [Dockerfile 指令详解](image/dockerfile/README.md)
|
||||
* [COPY 复制文件](image/dockerfile/copy.md)
|
||||
* [ADD 更高级的复制文件](image/dockerfile/add.md)
|
||||
* [CMD 容器启动命令](image/dockerfile/cmd.md)
|
||||
* [ENTRYPOINT 入口点](image/dockerfile/entrypoint.md)
|
||||
* [ENV 设置环境变量](image/dockerfile/env.md)
|
||||
* [ARG 构建参数](image/dockerfile/arg.md)
|
||||
* [VOLUME 定义匿名卷](image/dockerfile/volume.md)
|
||||
* [EXPOSE 暴露端口](image/dockerfile/expose.md)
|
||||
* [WORKDIR 指定工作目录](image/dockerfile/workdir.md)
|
||||
* [USER 指定当前用户](image/dockerfile/user.md)
|
||||
* [HEALTHCHECK 健康检查](image/dockerfile/healthcheck.md)
|
||||
* [ONBUILD 为他人作嫁衣裳](image/dockerfile/onbuild.md)
|
||||
* [参考文档](image/dockerfile/references.md)
|
||||
* [Dockerfile 多阶段构建](image/multistage-builds/README.md)
|
||||
* [实战多阶段构建 Laravel 镜像](image/multistage-builds/laravel.md)
|
||||
* [其它制作镜像的方式](image/other.md)
|
||||
* [实现原理](image/internal.md)
|
||||
* [操作容器](container/README.md)
|
||||
* [启动](container/run.md)
|
||||
* [守护态运行](container/daemon.md)
|
||||
* [终止](container/stop.md)
|
||||
* [进入容器](container/attach_exec.md)
|
||||
* [导出和导入](container/import_export.md)
|
||||
* [删除](container/rm.md)
|
||||
* [访问仓库](repository/README.md)
|
||||
* [Mirror](install/mirror.md)
|
||||
* [Image](image/README.md)
|
||||
* [pull](image/pull.md)
|
||||
* [list](image/list.md)
|
||||
* [Delete](image/rm.md)
|
||||
* [commit](image/commit.md)
|
||||
* [Dockerfile](image/build.md)
|
||||
* [Dockerfile reference](image/dockerfile/README.md)
|
||||
* [COPY](image/dockerfile/copy.md)
|
||||
* [ADD](image/dockerfile/add.md)
|
||||
* [CMD](image/dockerfile/cmd.md)
|
||||
* [ENTRYPOINT](image/dockerfile/entrypoint.md)
|
||||
* [ENV](image/dockerfile/env.md)
|
||||
* [ARG](image/dockerfile/arg.md)
|
||||
* [VOLUME](image/dockerfile/volume.md)
|
||||
* [EXPOSE](image/dockerfile/expose.md)
|
||||
* [WORKDIR](image/dockerfile/workdir.md)
|
||||
* [USER](image/dockerfile/user.md)
|
||||
* [HEALTHCHECK](image/dockerfile/healthcheck.md)
|
||||
* [ONBUILD](image/dockerfile/onbuild.md)
|
||||
* [References](image/dockerfile/references.md)
|
||||
* [Multistage builds](image/multistage-builds/README.md)
|
||||
* [Multistage builds Laravel](image/multistage-builds/laravel.md)
|
||||
* [manifest](image/manifest.md)
|
||||
* [BuildKit](image/buildkit.md)
|
||||
* [Other](image/other.md)
|
||||
* [Internal](image/internal.md)
|
||||
* [Container](container/README.md)
|
||||
* [run](container/run.md)
|
||||
* [Daemon](container/daemon.md)
|
||||
* [stop](container/stop.md)
|
||||
* [exec](container/attach_exec.md)
|
||||
* [Import and export](container/import_export.md)
|
||||
* [Delete](container/rm.md)
|
||||
* [Repository](repository/README.md)
|
||||
* [Docker Hub](repository/dockerhub.md)
|
||||
* [私有仓库](repository/registry.md)
|
||||
* [私有仓库高级配置](repository/registry_auth.md)
|
||||
* [Docker Registry](repository/registry.md)
|
||||
* [Docker Registry TLS](repository/registry_auth.md)
|
||||
* [Nexus 3](repository/nexus3_registry.md)
|
||||
* [数据管理](data_management/README.md)
|
||||
* [数据卷](data_management/volume.md)
|
||||
* [挂载主机目录](data_management/bind-mounts.md)
|
||||
* [使用网络](network/README.md)
|
||||
* [外部访问容器](network/port_mapping.md)
|
||||
* [容器互联](network/linking.md)
|
||||
* [配置 DNS](network/dns.md)
|
||||
* [高级网络配置](advanced_network/README.md)
|
||||
* [快速配置指南](advanced_network/quick_guide.md)
|
||||
* [容器访问控制](advanced_network/access_control.md)
|
||||
* [端口映射实现](advanced_network/port_mapping.md)
|
||||
* [配置 docker0 网桥](advanced_network/docker0.md)
|
||||
* [自定义网桥](advanced_network/bridge.md)
|
||||
* [工具和示例](advanced_network/example.md)
|
||||
* [编辑网络配置文件](advanced_network/config_file.md)
|
||||
* [实例:创建一个点到点连接](advanced_network/ptp.md)
|
||||
* [Docker 三剑客之 Compose 项目](compose/README.md)
|
||||
* [简介](compose/introduction.md)
|
||||
* [安装与卸载](compose/install.md)
|
||||
* [使用](compose/usage.md)
|
||||
* [命令说明](compose/commands.md)
|
||||
* [Compose 模板文件](compose/compose_file.md)
|
||||
* [实战 Django](compose/django.md)
|
||||
* [实战 Rails](compose/rails.md)
|
||||
* [实战 WordPress](compose/wordpress.md)
|
||||
* [Docker 三剑客之 Machine 项目](machine/README.md)
|
||||
* [安装](machine/install.md)
|
||||
* [使用](machine/usage.md)
|
||||
* [Docker 三剑客之 Docker Swarm](swarm/README.md)
|
||||
* [Data management](data_management/README.md)
|
||||
* [Volumes](data_management/volume.md)
|
||||
* [Bind mounts](data_management/bind-mounts.md)
|
||||
* [Network](network/README.md)
|
||||
* [Port mapping](network/port_mapping.md)
|
||||
* [Linking](network/linking.md)
|
||||
* [DNS](network/dns.md)
|
||||
* [Advanced network](advanced_network/README.md)
|
||||
* [Guide](advanced_network/quick_guide.md)
|
||||
* [Access control](advanced_network/access_control.md)
|
||||
* [Port mapping](advanced_network/port_mapping.md)
|
||||
* [docker0](advanced_network/docker0.md)
|
||||
* [Bridge](advanced_network/bridge.md)
|
||||
* [Example](advanced_network/example.md)
|
||||
* [Config](advanced_network/config_file.md)
|
||||
* [PTP](advanced_network/ptp.md)
|
||||
* [Docker Compose](compose/README.md)
|
||||
* [Introduction](compose/introduction.md)
|
||||
* [Install](compose/install.md)
|
||||
* [Usage](compose/usage.md)
|
||||
* [Commands](compose/commands.md)
|
||||
* [Compose file reference](compose/compose_file.md)
|
||||
* [Django](compose/django.md)
|
||||
* [Rails](compose/rails.md)
|
||||
* [WordPress](compose/wordpress.md)
|
||||
* [Docker Swarm](swarm/README.md)
|
||||
* [Swarm mode](swarm_mode/README.md)
|
||||
* [基本概念](swarm_mode/overview.md)
|
||||
* [创建 Swarm 集群](swarm_mode/create.md)
|
||||
* [部署服务](swarm_mode/deploy.md)
|
||||
* [使用 compose 文件](swarm_mode/stack.md)
|
||||
* [管理密钥](swarm_mode/secret.md)
|
||||
* [管理配置信息](swarm_mode/config.md)
|
||||
* [滚动升级](swarm_mode/rolling_update.md)
|
||||
* [安全](security/README.md)
|
||||
* [内核命名空间](security/kernel_ns.md)
|
||||
* [控制组](security/control_group.md)
|
||||
* [服务端防护](security/daemon_sec.md)
|
||||
* [内核能力机制](security/kernel_capability.md)
|
||||
* [其它安全特性](security/other_feature.md)
|
||||
* [总结](security/summary.md)
|
||||
* [底层实现](underly/README.md)
|
||||
* [基本架构](underly/arch.md)
|
||||
* [命名空间](underly/namespace.md)
|
||||
* [控制组](underly/cgroups.md)
|
||||
* [联合文件系统](underly/ufs.md)
|
||||
* [容器格式](underly/container_format.md)
|
||||
* [网络](underly/network.md)
|
||||
* [Etcd 项目](etcd/README.md)
|
||||
* [简介](etcd/intro.md)
|
||||
* [安装](etcd/install.md)
|
||||
* [集群](etcd/cluster.md)
|
||||
* [使用 etcdctl](etcd/etcdctl.md)
|
||||
* [CoreOS 项目](coreos/README.md)
|
||||
* [简介](coreos/intro.md)
|
||||
* [工具](coreos/intro_tools.md)
|
||||
* [快速搭建 CoreOS 集群](coreos/quickstart.md)
|
||||
* [Kubernetes 项目](kubernetes/README.md)
|
||||
* [简介](kubernetes/intro.md)
|
||||
* [快速上手](kubernetes/quickstart.md)
|
||||
* [基本概念](kubernetes/concepts.md)
|
||||
* [kubectl 使用](kubernetes/kubectl.md)
|
||||
* [架构设计](kubernetes/design.md)
|
||||
* [Mesos - 优秀的集群资源调度平台](mesos/README.md)
|
||||
* [Mesos 简介](mesos/intro.md)
|
||||
* [安装与使用](mesos/installation.md)
|
||||
* [原理与架构](mesos/architecture.md)
|
||||
* [Mesos 配置项解析](mesos/configuration.md)
|
||||
* [日志与监控](mesos/monitor.md)
|
||||
* [常见应用框架](mesos/framework.md)
|
||||
* [本章小结](mesos/summary.md)
|
||||
* [容器与云计算](cloud/README.md)
|
||||
* [简介](cloud/intro.md)
|
||||
* [亚马逊云](cloud/aws.md)
|
||||
* [腾讯云](cloud/qcloud.md)
|
||||
* [阿里云](cloud/alicloud.md)
|
||||
* [小结](cloud/summary.md)
|
||||
* [实战案例-操作系统](cases/os/README.md)
|
||||
* [Overview](swarm_mode/overview.md)
|
||||
* [Create](swarm_mode/create.md)
|
||||
* [Deploy](swarm_mode/deploy.md)
|
||||
* [Stack](swarm_mode/stack.md)
|
||||
* [Secret](swarm_mode/secret.md)
|
||||
* [Config](swarm_mode/config.md)
|
||||
* [Rolling update](swarm_mode/rolling_update.md)
|
||||
* [Security](security/README.md)
|
||||
* [namespace](security/kernel_ns.md)
|
||||
* [cgroups](security/control_group.md)
|
||||
* [Daemon sec](security/daemon_sec.md)
|
||||
* [Kernel capability](security/kernel_capability.md)
|
||||
* [Other feature](security/other_feature.md)
|
||||
* [SUMMARY](security/summary.md)
|
||||
* [Underly](underly/README.md)
|
||||
* [Arch](underly/arch.md)
|
||||
* [namespace](underly/namespace.md)
|
||||
* [cgroups](underly/cgroups.md)
|
||||
* [ufs](underly/ufs.md)
|
||||
* [Container format](underly/container_format.md)
|
||||
* [Network](underly/network.md)
|
||||
* [Etcd](etcd/README.md)
|
||||
* [Introduction](etcd/intro.md)
|
||||
* [Install](etcd/install.md)
|
||||
* [Cluster](etcd/cluster.md)
|
||||
* [etcdctl](etcd/etcdctl.md)
|
||||
* [CoreOS](coreos/README.md)
|
||||
* [Introduction](coreos/intro.md)
|
||||
* [Tools](coreos/intro_tools.md)
|
||||
* [Kubernetes](kubernetes/README.md)
|
||||
* [Introduction](kubernetes/intro.md)
|
||||
* [Quick start](kubernetes/quickstart.md)
|
||||
* [Concepts](kubernetes/concepts.md)
|
||||
* [kubectl](kubernetes/kubectl.md)
|
||||
* [Design](kubernetes/design.md)
|
||||
* [Cloud](cloud/README.md)
|
||||
* [Introduction](cloud/intro.md)
|
||||
* [AWS](cloud/aws.md)
|
||||
* [Tencent Cloud](cloud/tencentCloud.md)
|
||||
* [Alibaba Cloud](cloud/alicloud.md)
|
||||
* [SUMMARY](cloud/summary.md)
|
||||
* [OS](cases/os/README.md)
|
||||
* [Busybox](cases/os/busybox.md)
|
||||
* [Alpine](cases/os/alpine.md)
|
||||
* [Debian Ubuntu](cases/os/debian.md)
|
||||
* [CentOS Fedora](cases/os/centos.md)
|
||||
* [本章小结](cases/os/summary.md)
|
||||
* [实战案例-CI/CD](cases/ci/README.md)
|
||||
* [Drone](cases/ci/drone.md)
|
||||
* [Travis CI](cases/ci/travis.md)
|
||||
* [Docker 开源项目](opensource/README.md)
|
||||
* [SUMMARY](cases/os/summary.md)
|
||||
* [CI/CD](cases/ci/README.md)
|
||||
* [GitHub Actions](cases/ci/actions/README.md)
|
||||
* [Drone](cases/ci/drone/README.md)
|
||||
* [Install Drone](cases/ci/drone/install.md)
|
||||
* [Travis CI](cases/ci/travis/README.md)
|
||||
* [Docker Open Source](opensource/README.md)
|
||||
* [LinuxKit](opensource/linuxkit.md)
|
||||
* [附录](appendix/README.md)
|
||||
* [附录一:常见问题总结](appendix/faq/README.md)
|
||||
* [附录二:热门镜像介绍](appendix/repo/README.md)
|
||||
* [Appendix](appendix/README.md)
|
||||
* [FAQ](appendix/faq/README.md)
|
||||
* [Sample Docker Image](appendix/repo/README.md)
|
||||
* [Ubuntu](appendix/repo/ubuntu.md)
|
||||
* [CentOS](appendix/repo/centos.md)
|
||||
* [Nginx](appendix/repo/nginx.md)
|
||||
@@ -158,7 +150,6 @@
|
||||
* [MongoDB](appendix/repo/mongodb.md)
|
||||
* [Redis](appendix/repo/redis.md)
|
||||
* [Node.js](appendix/repo/nodejs.md)
|
||||
* [附录三:Docker 命令查询](appendix/command/README.md)
|
||||
* [附录四:Dockerfile 最佳实践](appendix/best_practices.md)
|
||||
* [附录五:如何调试 Docker](appendix/debug.md)
|
||||
* [附录六:资源链接](appendix/resources.md)
|
||||
* [Docker commands](appendix/command/README.md)
|
||||
* [Docker debug](appendix/debug.md)
|
||||
* [Resources](appendix/resources.md)
|
||||
|
||||
@@ -6,7 +6,7 @@
|
||||
|
||||
当 Docker 启动时,会自动在主机上创建一个 `docker0` 虚拟网桥,实际上是 Linux 的一个 bridge,可以理解为一个软件交换机。它会在挂载到它的网口之间进行转发。
|
||||
|
||||
同时,Docker 随机分配一个本地未占用的私有网段(在 [RFC1918](http://tools.ietf.org/html/rfc1918) 中定义)中的一个地址给 `docker0` 接口。比如典型的 `172.17.42.1`,掩码为 `255.255.0.0`。此后启动的容器内的网口也会自动分配一个同一网段(`172.17.0.0/16`)的地址。
|
||||
同时,Docker 随机分配一个本地未占用的私有网段(在 [RFC1918](https://tools.ietf.org/html/rfc1918) 中定义)中的一个地址给 `docker0` 接口。比如典型的 `172.17.42.1`,掩码为 `255.255.0.0`。此后启动的容器内的网口也会自动分配一个同一网段(`172.17.0.0/16`)的地址。
|
||||
|
||||
当创建一个 Docker 容器的时候,同时会创建了一对 `veth pair` 接口(当数据包发送到一个接口时,另外一个接口也可以收到相同的数据包)。这对接口一端在容器内,即 `eth0`;另一端在本地并被挂载到 `docker0` 网桥,名称以 `veth` 开头(例如 `vethAQI2QT`)。通过这种方式,主机可以跟容器通信,容器之间也可以相互通信。Docker 就创建了在主机和所有容器之间一个虚拟共享网络。
|
||||
|
||||
|
||||
@@ -22,7 +22,7 @@ $sysctl -w net.ipv4.ip_forward=1
|
||||
#### 访问所有端口
|
||||
当启动 Docker 服务(即 dockerd)的时候,默认会添加一条转发策略到本地主机 iptables 的 FORWARD 链上。策略为通过(`ACCEPT`)还是禁止(`DROP`)取决于配置`--icc=true`(缺省值)还是 `--icc=false`。当然,如果手动指定 `--iptables=false` 则不会添加 `iptables` 规则。
|
||||
|
||||
可见,默认情况下,不同容器之间是允许网络互通的。如果为了安全考虑,可以在 `/etc/docker/daemon.json` 文件中配置 `{"icc": false}` 来禁止它(Ubuntu 14.04 等使用 upstart 的系统在文件 `/etc/default/docker` 中配置 `DOCKER_OPTS=--icc=false`)。
|
||||
可见,默认情况下,不同容器之间是允许网络互通的。如果为了安全考虑,可以在 `/etc/docker/daemon.json` 文件中配置 `{"icc": false}` 来禁止它。
|
||||
|
||||
#### 访问指定端口
|
||||
在通过 `-icc=false` 关闭网络访问后,还可以通过 `--link=CONTAINER_NAME:ALIAS` 选项来访问容器的开放端口。
|
||||
|
||||
@@ -1,344 +1 @@
|
||||
# Dockerfile 最佳实践
|
||||
|
||||
本附录是笔者对 Docker 官方文档中 [Best practices for writing Dockerfiles](https://docs.docker.com/engine/userguide/eng-image/dockerfile_best-practices/) 的理解与翻译。
|
||||
|
||||
## 一般性的指南和建议
|
||||
|
||||
### 容器应该是短暂的
|
||||
|
||||
通过 `Dockerfile` 构建的镜像所启动的容器应该尽可能短暂(生命周期短)。「短暂」意味着可以停止和销毁容器,并且创建一个新容器并部署好所需的设置和配置工作量应该是极小的。
|
||||
|
||||
### 使用 `.dockerignore` 文件
|
||||
|
||||
使用 `Dockerfile` 构建镜像时最好是将 `Dockerfile` 放置在一个新建的空目录下。然后将构建镜像所需要的文件添加到该目录中。为了提高构建镜像的效率,你可以在目录下新建一个 `.dockerignore` 文件来指定要忽略的文件和目录。`.dockerignore` 文件的排除模式语法和 Git 的 `.gitignore` 文件相似。
|
||||
|
||||
### 使用多阶段构建
|
||||
|
||||
在 `Docker 17.05` 以上版本中,你可以使用 [多阶段构建](../image/multistage-builds.md) 来减少所构建镜像的大小。
|
||||
|
||||
### 避免安装不必要的包
|
||||
|
||||
为了降低复杂性、减少依赖、减小文件大小、节约构建时间,你应该避免安装任何不必要的包。例如,不要在数据库镜像中包含一个文本编辑器。
|
||||
|
||||
### 一个容器只运行一个进程
|
||||
|
||||
应该保证在一个容器中只运行一个进程。将多个应用解耦到不同容器中,保证了容器的横向扩展和复用。例如 web 应用应该包含三个容器:web应用、数据库、缓存。
|
||||
|
||||
如果容器互相依赖,你可以使用 [Docker 自定义网络](../network/linking.md) 来把这些容器连接起来。
|
||||
|
||||
### 镜像层数尽可能少
|
||||
|
||||
你需要在 `Dockerfile` 可读性(也包括长期的可维护性)和减少层数之间做一个平衡。
|
||||
|
||||
### 将多行参数排序
|
||||
|
||||
将多行参数按字母顺序排序(比如要安装多个包时)。这可以帮助你避免重复包含同一个包,更新包列表时也更容易。也便于 `PRs` 阅读和审查。建议在反斜杠符号 `\` 之前添加一个空格,以增加可读性。
|
||||
|
||||
下面是来自 `buildpack-deps` 镜像的例子:
|
||||
|
||||
```dockerfile
|
||||
RUN apt-get update && apt-get install -y \
|
||||
bzr \
|
||||
cvs \
|
||||
git \
|
||||
mercurial \
|
||||
subversion
|
||||
```
|
||||
|
||||
### 构建缓存
|
||||
|
||||
在镜像的构建过程中,Docker 会遍历 `Dockerfile` 文件中的指令,然后按顺序执行。在执行每条指令之前,Docker 都会在缓存中查找是否已经存在可重用的镜像,如果有就使用现存的镜像,不再重复创建。如果你不想在构建过程中使用缓存,你可以在 `docker build` 命令中使用 `--no-cache=true` 选项。
|
||||
|
||||
但是,如果你想在构建的过程中使用缓存,你得明白什么时候会,什么时候不会找到匹配的镜像,遵循的基本规则如下:
|
||||
|
||||
* 从一个基础镜像开始(`FROM` 指令指定),下一条指令将和该基础镜像的所有子镜像进行匹配,检查这些子镜像被创建时使用的指令是否和被检查的指令完全一样。如果不是,则缓存失效。
|
||||
* 在大多数情况下,只需要简单地对比 `Dockerfile` 中的指令和子镜像。然而,有些指令需要更多的检查和解释。
|
||||
* 对于 `ADD` 和 `COPY` 指令,镜像中对应文件的内容也会被检查,每个文件都会计算出一个校验和。文件的最后修改时间和最后访问时间不会纳入校验。在缓存的查找过程中,会将这些校验和和已存在镜像中的文件校验和进行对比。如果文件有任何改变,比如内容和元数据,则缓存失效。
|
||||
* 除了 `ADD` 和 `COPY` 指令,缓存匹配过程不会查看临时容器中的文件来决定缓存是否匹配。例如,当执行完 `RUN apt-get -y update` 指令后,容器中一些文件被更新,但 Docker 不会检查这些文件。这种情况下,只有指令字符串本身被用来匹配缓存。
|
||||
|
||||
一旦缓存失效,所有后续的 `Dockerfile` 指令都将产生新的镜像,缓存不会被使用。
|
||||
|
||||
## Dockerfile 指令
|
||||
|
||||
下面针对 `Dockerfile` 中各种指令的最佳编写方式给出建议。
|
||||
|
||||
### FROM
|
||||
|
||||
尽可能使用当前官方仓库作为你构建镜像的基础。推荐使用 [Alpine](https://hub.docker.com/_/alpine/) 镜像,因为它被严格控制并保持最小尺寸(目前小于 5 MB),但它仍然是一个完整的发行版。
|
||||
|
||||
### LABEL
|
||||
|
||||
你可以给镜像添加标签来帮助组织镜像、记录许可信息、辅助自动化构建等。每个标签一行,由 `LABEL` 开头加上一个或多个标签对。下面的示例展示了各种不同的可能格式。`#` 开头的行是注释内容。
|
||||
|
||||
>注意:如果你的字符串中包含空格,必须将字符串放入引号中或者对空格使用转义。如果字符串内容本身就包含引号,必须对引号使用转义。
|
||||
|
||||
```dockerfile
|
||||
# Set one or more individual labels
|
||||
LABEL com.example.version="0.0.1-beta"
|
||||
|
||||
LABEL vendor="ACME Incorporated"
|
||||
|
||||
LABEL com.example.release-date="2015-02-12"
|
||||
|
||||
LABEL com.example.version.is-production=""
|
||||
```
|
||||
|
||||
一个镜像可以包含多个标签,但建议将多个标签放入到一个 `LABEL` 指令中。
|
||||
|
||||
```dockerfile
|
||||
# Set multiple labels at once, using line-continuation characters to break long lines
|
||||
LABEL vendor=ACME\ Incorporated \
|
||||
com.example.is-beta= \
|
||||
com.example.is-production="" \
|
||||
com.example.version="0.0.1-beta" \
|
||||
com.example.release-date="2015-02-12"
|
||||
```
|
||||
|
||||
关于标签可以接受的键值对,参考 [Understanding object labels](https://docs.docker.com/engine/userguide/labels-custom-metadata/)。关于查询标签信息,参考 [Managing labels on objects](https://docs.docker.com/engine/userguide/labels-custom-metadata/#managing-labels-on-objects)。
|
||||
|
||||
### RUN
|
||||
|
||||
为了保持 `Dockerfile` 文件的可读性,可理解性,以及可维护性,建议将长的或复杂的 `RUN` 指令用反斜杠 `\` 分割成多行。
|
||||
|
||||
#### apt-get
|
||||
|
||||
`RUN` 指令最常见的用法是安装包用的 `apt-get`。因为 `RUN apt-get` 指令会安装包,所以有几个问题需要注意。
|
||||
|
||||
不要使用 `RUN apt-get upgrade` 或 `dist-upgrade`,因为许多基础镜像中的「必须」包不会在一个非特权容器中升级。如果基础镜像中的某个包过时了,你应该联系它的维护者。如果你确定某个特定的包,比如 `foo`,需要升级,使用 `apt-get install -y foo` 就行,该指令会自动升级 `foo` 包。
|
||||
|
||||
永远将 `RUN apt-get update` 和 `apt-get install` 组合成一条 `RUN` 声明,例如:
|
||||
|
||||
```dockerfile
|
||||
RUN apt-get update && apt-get install -y \
|
||||
package-bar \
|
||||
package-baz \
|
||||
package-foo
|
||||
```
|
||||
|
||||
将 `apt-get update` 放在一条单独的 `RUN` 声明中会导致缓存问题以及后续的 `apt-get install` 失败。比如,假设你有一个 `Dockerfile` 文件:
|
||||
|
||||
```dockerfile
|
||||
FROM ubuntu:18.04
|
||||
|
||||
RUN apt-get update
|
||||
|
||||
RUN apt-get install -y curl
|
||||
```
|
||||
|
||||
构建镜像后,所有的层都在 Docker 的缓存中。假设你后来又修改了其中的 `apt-get install` 添加了一个包:
|
||||
|
||||
```dockerfile
|
||||
FROM ubuntu:18.04
|
||||
|
||||
RUN apt-get update
|
||||
|
||||
RUN apt-get install -y curl nginx
|
||||
```
|
||||
|
||||
Docker 发现修改后的 `RUN apt-get update` 指令和之前的完全一样。所以,`apt-get update` 不会执行,而是使用之前的缓存镜像。因为 `apt-get update` 没有运行,后面的 `apt-get install` 可能安装的是过时的 `curl` 和 `nginx` 版本。
|
||||
|
||||
使用 `RUN apt-get update && apt-get install -y` 可以确保你的 Dockerfiles 每次安装的都是包的最新的版本,而且这个过程不需要进一步的编码或额外干预。这项技术叫作 `cache busting`。你也可以显示指定一个包的版本号来达到 `cache-busting`,这就是所谓的固定版本,例如:
|
||||
|
||||
```dockerfile
|
||||
RUN apt-get update && apt-get install -y \
|
||||
package-bar \
|
||||
package-baz \
|
||||
package-foo=1.3.*
|
||||
```
|
||||
|
||||
固定版本会迫使构建过程检索特定的版本,而不管缓存中有什么。这项技术也可以减少因所需包中未预料到的变化而导致的失败。
|
||||
|
||||
下面是一个 `RUN` 指令的示例模板,展示了所有关于 `apt-get` 的建议。
|
||||
|
||||
```dockerfile
|
||||
RUN apt-get update && apt-get install -y \
|
||||
aufs-tools \
|
||||
automake \
|
||||
build-essential \
|
||||
curl \
|
||||
dpkg-sig \
|
||||
libcap-dev \
|
||||
libsqlite3-dev \
|
||||
mercurial \
|
||||
reprepro \
|
||||
ruby1.9.1 \
|
||||
ruby1.9.1-dev \
|
||||
s3cmd=1.1.* \
|
||||
&& rm -rf /var/lib/apt/lists/*
|
||||
```
|
||||
|
||||
其中 `s3cmd` 指令指定了一个版本号 `1.1.*`。如果之前的镜像使用的是更旧的版本,指定新的版本会导致 `apt-get udpate` 缓存失效并确保安装的是新版本。
|
||||
|
||||
另外,清理掉 apt 缓存 `var/lib/apt/lists` 可以减小镜像大小。因为 `RUN` 指令的开头为 `apt-get udpate`,包缓存总是会在 `apt-get install` 之前刷新。
|
||||
|
||||
> 注意:官方的 Debian 和 Ubuntu 镜像会自动运行 apt-get clean,所以不需要显式的调用 apt-get clean。
|
||||
|
||||
### CMD
|
||||
|
||||
`CMD` 指令用于执行目标镜像中包含的软件,可以包含参数。`CMD` 大多数情况下都应该以 `CMD ["executable", "param1", "param2"...]` 的形式使用。因此,如果创建镜像的目的是为了部署某个服务(比如 `Apache`),你可能会执行类似于 `CMD ["apache2", "-DFOREGROUND"]` 形式的命令。我们建议任何服务镜像都使用这种形式的命令。
|
||||
|
||||
多数情况下,`CMD` 都需要一个交互式的 `shell` (bash, Python, perl 等),例如 `CMD ["perl", "-de0"]`,或者 `CMD ["PHP", "-a"]`。使用这种形式意味着,当你执行类似 `docker run -it python` 时,你会进入一个准备好的 `shell` 中。`CMD` 应该在极少的情况下才能以 `CMD ["param", "param"]` 的形式与 `ENTRYPOINT` 协同使用,除非你和你的镜像使用者都对 `ENTRYPOINT` 的工作方式十分熟悉。
|
||||
|
||||
### EXPOSE
|
||||
|
||||
`EXPOSE` 指令用于指定容器将要监听的端口。因此,你应该为你的应用程序使用常见的端口。例如,提供 `Apache` web 服务的镜像应该使用 `EXPOSE 80`,而提供 `MongoDB` 服务的镜像使用 `EXPOSE 27017`。
|
||||
|
||||
对于外部访问,用户可以在执行 `docker run` 时使用一个标志来指示如何将指定的端口映射到所选择的端口。
|
||||
|
||||
### ENV
|
||||
|
||||
为了方便新程序运行,你可以使用 `ENV` 来为容器中安装的程序更新 `PATH` 环境变量。例如使用 `ENV PATH /usr/local/nginx/bin:$PATH` 来确保 `CMD ["nginx"]` 能正确运行。
|
||||
|
||||
`ENV` 指令也可用于为你想要容器化的服务提供必要的环境变量,比如 Postgres 需要的 `PGDATA`。
|
||||
|
||||
最后,`ENV` 也能用于设置常见的版本号,比如下面的示例:
|
||||
|
||||
```dockerfile
|
||||
ENV PG_MAJOR 9.3
|
||||
|
||||
ENV PG_VERSION 9.3.4
|
||||
|
||||
RUN curl -SL http://example.com/postgres-$PG_VERSION.tar.xz | tar -xJC /usr/src/postgress && …
|
||||
|
||||
ENV PATH /usr/local/postgres-$PG_MAJOR/bin:$PATH
|
||||
```
|
||||
|
||||
类似于程序中的常量,这种方法可以让你只需改变 `ENV` 指令来自动的改变容器中的软件版本。
|
||||
|
||||
### ADD 和 COPY
|
||||
|
||||
虽然 `ADD` 和 `COPY` 功能类似,但一般优先使用 `COPY`。因为它比 `ADD` 更透明。`COPY` 只支持简单将本地文件拷贝到容器中,而 `ADD` 有一些并不明显的功能(比如本地 tar 提取和远程 URL 支持)。因此,`ADD` 的最佳用例是将本地 tar 文件自动提取到镜像中,例如 `ADD rootfs.tar.xz`。
|
||||
|
||||
如果你的 `Dockerfile` 有多个步骤需要使用上下文中不同的文件。单独 `COPY` 每个文件,而不是一次性的 `COPY` 所有文件,这将保证每个步骤的构建缓存只在特定的文件变化时失效。例如:
|
||||
|
||||
```dockerfile
|
||||
COPY requirements.txt /tmp/
|
||||
|
||||
RUN pip install --requirement /tmp/requirements.txt
|
||||
|
||||
COPY . /tmp/
|
||||
```
|
||||
|
||||
如果将 `COPY . /tmp/` 放置在 `RUN` 指令之前,只要 `.` 目录中任何一个文件变化,都会导致后续指令的缓存失效。
|
||||
|
||||
为了让镜像尽量小,最好不要使用 `ADD` 指令从远程 URL 获取包,而是使用 `curl` 和 `wget`。这样你可以在文件提取完之后删掉不再需要的文件来避免在镜像中额外添加一层。比如尽量避免下面的用法:
|
||||
|
||||
```dockerfile
|
||||
ADD http://example.com/big.tar.xz /usr/src/things/
|
||||
|
||||
RUN tar -xJf /usr/src/things/big.tar.xz -C /usr/src/things
|
||||
|
||||
RUN make -C /usr/src/things all
|
||||
```
|
||||
|
||||
而是应该使用下面这种方法:
|
||||
|
||||
```dockerfile
|
||||
RUN mkdir -p /usr/src/things \
|
||||
&& curl -SL http://example.com/big.tar.xz \
|
||||
| tar -xJC /usr/src/things \
|
||||
&& make -C /usr/src/things all
|
||||
```
|
||||
|
||||
上面使用的管道操作,所以没有中间文件需要删除。
|
||||
|
||||
对于其他不需要 `ADD` 的自动提取功能的文件或目录,你应该使用 `COPY`。
|
||||
|
||||
### ENTRYPOINT
|
||||
|
||||
`ENTRYPOINT` 的最佳用处是设置镜像的主命令,允许将镜像当成命令本身来运行(用 `CMD` 提供默认选项)。
|
||||
|
||||
例如,下面的示例镜像提供了命令行工具 `s3cmd`:
|
||||
|
||||
```dockerfile
|
||||
ENTRYPOINT ["s3cmd"]
|
||||
|
||||
CMD ["--help"]
|
||||
```
|
||||
|
||||
现在直接运行该镜像创建的容器会显示命令帮助:
|
||||
|
||||
```bash
|
||||
$ docker run s3cmd
|
||||
```
|
||||
|
||||
或者提供正确的参数来执行某个命令:
|
||||
|
||||
```bash
|
||||
$ docker run s3cmd ls s3://mybucket
|
||||
```
|
||||
|
||||
这样镜像名可以当成命令行的参考。
|
||||
|
||||
`ENTRYPOINT` 指令也可以结合一个辅助脚本使用,和前面命令行风格类似,即使启动工具需要不止一个步骤。
|
||||
|
||||
例如,`Postgres` 官方镜像使用下面的脚本作为 `ENTRYPOINT`:
|
||||
|
||||
```bash
|
||||
#!/bin/bash
|
||||
set -e
|
||||
|
||||
if [ "$1" = 'postgres' ]; then
|
||||
chown -R postgres "$PGDATA"
|
||||
|
||||
if [ -z "$(ls -A "$PGDATA")" ]; then
|
||||
gosu postgres initdb
|
||||
fi
|
||||
|
||||
exec gosu postgres "$@"
|
||||
fi
|
||||
|
||||
exec "$@"
|
||||
```
|
||||
|
||||
>注意:该脚本使用了 Bash 的内置命令 exec,所以最后运行的进程就是容器的 PID 为 1 的进程。这样,进程就可以接收到任何发送给容器的 Unix 信号了。
|
||||
|
||||
该辅助脚本被拷贝到容器,并在容器启动时通过 `ENTRYPOINT` 执行:
|
||||
|
||||
```dockerfile
|
||||
COPY ./docker-entrypoint.sh /
|
||||
|
||||
ENTRYPOINT ["/docker-entrypoint.sh"]
|
||||
```
|
||||
|
||||
该脚本可以让用户用几种不同的方式和 `Postgres` 交互。
|
||||
|
||||
你可以很简单地启动 `Postgres`:
|
||||
|
||||
```bash
|
||||
$ docker run postgres
|
||||
```
|
||||
|
||||
也可以执行 `Postgres` 并传递参数:
|
||||
|
||||
```bash
|
||||
$ docker run postgres postgres --help
|
||||
```
|
||||
|
||||
最后,你还可以启动另外一个完全不同的工具,比如 `Bash`:
|
||||
|
||||
```bash
|
||||
$ docker run --rm -it postgres bash
|
||||
```
|
||||
|
||||
### VOLUME
|
||||
|
||||
`VOLUME` 指令用于暴露任何数据库存储文件,配置文件,或容器创建的文件和目录。强烈建议使用 `VOLUME` 来管理镜像中的可变部分和用户可以改变的部分。
|
||||
|
||||
### USER
|
||||
|
||||
如果某个服务不需要特权执行,建议使用 `USER` 指令切换到非 root 用户。先在 `Dockerfile` 中使用类似 `RUN groupadd -r postgres && useradd -r -g postgres postgres` 的指令创建用户和用户组。
|
||||
|
||||
>注意:在镜像中,用户和用户组每次被分配的 UID/GID 都是不确定的,下次重新构建镜像时被分配到的 UID/GID 可能会不一样。如果要依赖确定的 UID/GID,你应该显示的指定一个 UID/GID。
|
||||
|
||||
你应该避免使用 `sudo`,因为它不可预期的 TTY 和信号转发行为可能造成的问题比它能解决的问题还多。如果你真的需要和 `sudo` 类似的功能(例如,以 root 权限初始化某个守护进程,以非 root 权限执行它),你可以使用 [gosu](https://github.com/tianon/gosu)。
|
||||
|
||||
最后,为了减少层数和复杂度,避免频繁地使用 `USER` 来回切换用户。
|
||||
|
||||
### WORKDIR
|
||||
|
||||
为了清晰性和可靠性,你应该总是在 `WORKDIR` 中使用绝对路径。另外,你应该使用 `WORKDIR` 来替代类似于 `RUN cd ... && do-something` 的指令,后者难以阅读、排错和维护。
|
||||
|
||||
## 官方仓库示例
|
||||
|
||||
这些官方仓库的 Dockerfile 都是参考典范:https://github.com/docker-library/docs
|
||||
# [Best practices for writing Dockerfiles](https://docs.docker.com/develop/develop-images/dockerfile_best-practices/)
|
||||
|
||||
@@ -30,7 +30,7 @@
|
||||
|
||||
* 使用 Dockerfile 创建镜像时候要添加 .dockerignore 文件或使用干净的工作目录。
|
||||
|
||||
更多内容请查看 [Dockerfile 最佳实践](https://docs.docker.com/engine/userguide/eng-image/dockerfile_best-practices/)
|
||||
更多内容请查看 [Dockerfile 最佳实践](../best_practices.md)
|
||||
|
||||
### 碰到网络问题,无法 pull 镜像,命令行指定 http_proxy 无效?
|
||||
|
||||
@@ -82,7 +82,7 @@ $ docker run --network=my-net --ip=172.25.3.3 -itd --name=my-container busybox
|
||||
|
||||
### 可以在一个容器中同时运行多个应用进程么?
|
||||
|
||||
答:一般并不推荐在同一个容器内运行多个应用进程。如果有类似需求,可以通过一些额外的进程管理机制,比如 `supervisord` 来管理所运行的进程。可以参考 https://docs.docker.com/engine/admin/multi-service_container/ 。
|
||||
答:一般并不推荐在同一个容器内运行多个应用进程。如果有类似需求,可以通过一些额外的进程管理机制,比如 `supervisord` 来管理所运行的进程。可以参考 https://docs.docker.com/config/containers/multi-service_container/ 。
|
||||
|
||||
### 如何控制容器占用系统资源(CPU、内存)的份额?
|
||||
|
||||
@@ -100,7 +100,7 @@ $ docker run --network=my-net --ip=172.25.3.3 -itd --name=my-container busybox
|
||||
|
||||
### Docker 的配置文件放在哪里,如何修改配置?
|
||||
|
||||
答:使用 `upstart` 的系统(如 Ubuntu 14.04)的配置文件在 `/etc/default/docker`,使用 `systemd` 的系统(如 Ubuntu 16.04、Centos 等)的配置文件在 `/etc/docker/daemon.json`。
|
||||
答:使用 `systemd` 的系统(如 Ubuntu 16.04、Centos 等)的配置文件在 `/etc/docker/daemon.json`。
|
||||
|
||||
|
||||
### 如何更改 Docker 的默认存储位置?
|
||||
|
||||
@@ -4,7 +4,7 @@
|
||||
|
||||
[Nginx](https://en.wikipedia.org/wiki/Nginx) 是开源的高效的 Web 服务器实现,支持 HTTP、HTTPS、SMTP、POP3、IMAP 等协议。
|
||||
|
||||
该仓库位于 `https://hub.docker.com/_/nginx/` ,提供了 Nginx 1.0 ~ 1.15.x 各个版本的镜像。
|
||||
该仓库位于 `https://hub.docker.com/_/nginx/` ,提供了 Nginx 1.0 ~ 1.17.x 各个版本的镜像。
|
||||
|
||||
### 使用方法
|
||||
|
||||
|
||||
@@ -4,7 +4,7 @@
|
||||
|
||||
[Node.js](https://en.wikipedia.org/wiki/Node.js) 是基于 JavaScript 的可扩展服务端和网络软件开发平台。
|
||||
|
||||
该仓库位于 `https://hub.docker.com/_/node/` ,提供了 Node.js 0.10 ~ 11.x 各个版本的镜像。
|
||||
该仓库位于 `https://hub.docker.com/_/node/` ,提供了 Node.js 0.10 ~ 12.x 各个版本的镜像。
|
||||
|
||||
### 使用方法
|
||||
|
||||
|
||||
@@ -11,13 +11,13 @@
|
||||
默认会在 `6379` 端口启动数据库。
|
||||
|
||||
```bash
|
||||
$ docker run --name some-redis -d redis
|
||||
$ docker run --name some-redis -d -p 6379:6379 redis
|
||||
```
|
||||
|
||||
另外还可以启用 [持久存储](http://redis.io/topics/persistence)。
|
||||
另外还可以启用 [持久存储](https://redis.io/topics/persistence)。
|
||||
|
||||
```bash
|
||||
$ docker run --name some-redis -d redis redis-server --appendonly yes
|
||||
$ docker run --name some-redis -d -p 6379:6379 redis redis-server --appendonly yes
|
||||
```
|
||||
|
||||
默认数据存储位置在 `VOLUME/data`。可以使用 `--volumes-from some-volume-container` 或 `-v /docker/host/dir:/data` 将数据存放到本地。
|
||||
|
||||
@@ -4,7 +4,7 @@
|
||||
|
||||
[Ubuntu](https://en.wikipedia.org/wiki/Ubuntu) 是流行的 Linux 发行版,其自带软件版本往往较新一些。
|
||||
|
||||
该仓库位于 `https://hub.docker.com/_/ubuntu/` ,提供了 Ubuntu 从 12.04 ~ 18.04 各个版本的镜像。
|
||||
该仓库位于 `https://hub.docker.com/_/ubuntu/` ,提供了 Ubuntu 从 12.04 ~ 19.04 各个版本的镜像。
|
||||
|
||||
### 使用方法
|
||||
|
||||
|
||||
@@ -1,7 +1,7 @@
|
||||
# 基本概念
|
||||
Docker 包括三个基本概念
|
||||
* 镜像(`Image`)
|
||||
* 容器(`Container`)
|
||||
* 仓库(`Repository`)
|
||||
# Basic Concepts
|
||||
Docker contains 3 basic concepts
|
||||
* `Image`
|
||||
* `Container`
|
||||
* `Repository`
|
||||
|
||||
理解了这三个概念,就理解了 Docker 的整个生命周期。
|
||||
Only after knowing the above 3 concepts will we get a deeper understanding of the lifecyle of docker.
|
||||
|
||||
@@ -1,13 +1,13 @@
|
||||
## Docker 容器
|
||||
## Docker Container
|
||||
|
||||
镜像(`Image`)和容器(`Container`)的关系,就像是面向对象程序设计中的 `类` 和 `实例` 一样,镜像是静态的定义,容器是镜像运行时的实体。容器可以被创建、启动、停止、删除、暂停等。
|
||||
The relationship between `Image` and `Container` is just as `Class` and `Instance` in [OOP](https://en.wikipedia.org/wiki/Object-oriented_programming). `Image` is the static definition of `container`, while `containers` are the `images` in running state. `Containers` can be created, started, paused, deleted or stopped.
|
||||
|
||||
容器的实质是进程,但与直接在宿主执行的进程不同,容器进程运行于属于自己的独立的 [命名空间](https://en.wikipedia.org/wiki/Linux_namespaces)。因此容器可以拥有自己的 `root` 文件系统、自己的网络配置、自己的进程空间,甚至自己的用户 ID 空间。容器内的进程是运行在一个隔离的环境里,使用起来,就好像是在一个独立于宿主的系统下操作一样。这种特性使得容器封装的应用比直接在宿主运行更加安全。也因为这种隔离的特性,很多人初学 Docker 时常常会混淆容器和虚拟机。
|
||||
The essence of `container` is `process`, but different from that in the host OS, the container processes run in their individual [`namespaces`](https://en.wikipedia.org/wiki/Linux_namespaces). With the namespace, a container can have its own `root` filesystem, network configurations, process space and even an ID space for users. The processes in a container run in an isolated environment, thus can be used as if it were an individual OS independent of the host OS. This feature makes docker-encapsulated applications safer than those running directly on the host. And that's also an important factor that confuses the novices to tell it from virtual machines.
|
||||
|
||||
前面讲过镜像使用的是分层存储,容器也是如此。每一个容器运行时,是以镜像为基础层,在其上创建一个当前容器的存储层,我们可以称这个为容器运行时读写而准备的存储层为**容器存储层**。
|
||||
As we've discussed, `multi-layered filesystem` is applied to images, and so as the containers. When a container is running, it is based on its image, with a writable layer created on top of it. We call this layer prepared for R/W at runtime [**`Container Layer`**](https://docs.docker.com/storage/storagedriver/#images-and-layers).
|
||||
|
||||
容器存储层的生存周期和容器一样,容器消亡时,容器存储层也随之消亡。因此,任何保存于容器存储层的信息都会随容器删除而丢失。
|
||||
The lifecyle of the container layer is the same as contaier. The container layer dies as soon as the container dies. Therefore, anything stored at the container layer will be discarded when the container is deleted.
|
||||
|
||||
按照 Docker 最佳实践的要求,容器不应该向其存储层内写入任何数据,容器存储层要保持无状态化。所有的文件写入操作,都应该使用 [数据卷(Volume)](../data_management/volume.md)、或者绑定宿主目录,在这些位置的读写会跳过容器存储层,直接对宿主(或网络存储)发生读写,其性能和稳定性更高。
|
||||
As recommended by the [Docker Development Best Practices](https://docs.docker.com/develop/dev-best-practices/#where-and-how-to-persist-application-data), we should not write any data to the container layer to make it stateless. All file write operations should adhere to [`Volume`](../data_management/volume.md) or bind mounts. Writing to volume or bind mounts skips the container layer and R/W to host storage(or network storage) directly, which achieves better performance and stability.
|
||||
|
||||
数据卷的生存周期独立于容器,容器消亡,数据卷不会消亡。因此,使用数据卷后,容器删除或者重新运行之后,数据却不会丢失。
|
||||
The lifecyle of volume is independent of the container, and will not vanish when the container is deleted. In light of it, the data persists when a container is deleted or restarted.
|
||||
|
||||
@@ -1,15 +1,15 @@
|
||||
## Docker 镜像
|
||||
## Docker Image
|
||||
|
||||
我们都知道,操作系统分为内核和用户空间。对于 Linux 而言,内核启动后,会挂载 `root` 文件系统为其提供用户空间支持。而 Docker 镜像(Image),就相当于是一个 `root` 文件系统。比如官方镜像 `ubuntu:18.04` 就包含了完整的一套 Ubuntu 18.04 最小系统的 `root` 文件系统。
|
||||
As we all know, Operating System consists of kernel space and user space. For linux, it will mount `root` filesystem to support user space. For Docker Image, it is similar to a `root` filesystem in Linux. For example, the offical image `ubuntu:18:04` contains a micro `root` filesystem of complete opreating system.
|
||||
|
||||
Docker 镜像是一个特殊的文件系统,除了提供容器运行时所需的程序、库、资源、配置等文件外,还包含了一些为运行时准备的一些配置参数(如匿名卷、环境变量、用户等)。镜像不包含任何动态数据,其内容在构建之后也不会被改变。
|
||||
Docker Image is a special filesystem. Apart from programs, libs, resources and config which support running container, Docker Image also includes config parameters like anonymous volumes, environment variables, users and others. Images don't have any dynamic data. Its content will not be changed after build.
|
||||
|
||||
### 分层存储
|
||||
## Advanced Multi-layered Unification Filesystem (AUFS)
|
||||
|
||||
因为镜像包含操作系统完整的 `root` 文件系统,其体积往往是庞大的,因此在 Docker 设计时,就充分利用 [Union FS](https://en.wikipedia.org/wiki/Union_mount) 的技术,将其设计为分层存储的架构。所以严格来说,镜像并非是像一个 ISO 那样的打包文件,镜像只是一个虚拟的概念,其实际体现并非由一个文件组成,而是由一组文件系统组成,或者说,由多层文件系统联合组成。
|
||||
Because the image contains the complete `root` file system of the operating system, its volume is often huge. So Docker made full use of [Union FS](https://en.wikipedia.org/wiki/Union_mount) and was designed as AUFS when it was designed. So strictly speaking, image is not a packaged file like an ISO image file. Image is just a virtual concept. It is not composed of a single file, but a group of file systems, or a combination of multi-layered filesystems.
|
||||
|
||||
镜像构建时,会一层层构建,前一层是后一层的基础。每一层构建完就不会再发生改变,后一层上的任何改变只发生在自己这一层。比如,删除前一层文件的操作,实际不是真的删除前一层的文件,而是仅在当前层标记为该文件已删除。在最终容器运行的时候,虽然不会看到这个文件,但是实际上该文件会一直跟随镜像。因此,在构建镜像的时候,需要额外小心,每一层尽量只包含该层需要添加的东西,任何额外的东西应该在该层构建结束前清理掉。
|
||||
When building an image, it builds layer by layer, and the former is the basis for the latter. Once each layer is built, it will not change later. Any change on the latter layer will only occur on its own level. For example, deleting the previous layer of files is not really deleting the files, but only marked as deleted in the current layer. When the final container runs, you won't see the file, but in fact the file will always follow the image. Therefore, take more care when building the image, and any redundant file should be cleared up in ahead of the layer's final construction.
|
||||
|
||||
分层存储的特征还使得镜像的复用、定制变的更为容易。甚至可以用之前构建好的镜像作为基础层,然后进一步添加新的层,以定制自己所需的内容,构建新的镜像。
|
||||
The layered storage feature also makes it easier to reuse and customize images. You can even use a previously built image as the base layer, and then add a new layer to customize the content to meet your need to build a new image.
|
||||
|
||||
关于镜像构建,将会在后续相关章节中做进一步的讲解。
|
||||
As for image building, further explanations will be given in subsequent relevant chapters.
|
||||
|
||||
@@ -1,29 +1,29 @@
|
||||
## Docker Registry
|
||||
|
||||
镜像构建完成后,可以很容易的在当前宿主机上运行,但是,如果需要在其它服务器上使用这个镜像,我们就需要一个集中的存储、分发镜像的服务,[Docker Registry](../repository/registry.md) 就是这样的服务。
|
||||
After the construction of an image, we can easily run it on a host. However, if we want to use the image on other servers, we need a centralized image storage and distribution service. The [Docker Registry](../repository/registry.md) we will introduce is such a service.
|
||||
|
||||
一个 **Docker Registry** 中可以包含多个**仓库**(`Repository`);每个仓库可以包含多个**标签**(`Tag`);每个标签对应一个镜像。
|
||||
A **Docker Registry** can contain several `Repositories`, where each repository can contain several tags and each tag corresponds to an image.
|
||||
|
||||
通常,一个仓库会包含同一个软件不同版本的镜像,而标签就常用于对应该软件的各个版本。我们可以通过 `<仓库名>:<标签>` 的格式来指定具体是这个软件哪个版本的镜像。如果不给出标签,将以 `latest` 作为默认标签。
|
||||
Typically, a repository contains images for different versions of the same software, where each tags corresponds to different versions of the software. We can uniquely identify an image of the same software with `repository:tag`. In case not explicitly specified, `latest` is taken as default tag.
|
||||
|
||||
以 [Ubuntu 镜像](https://hub.docker.com/_/ubuntu) 为例,`ubuntu` 是仓库的名字,其内包含有不同的版本标签,如,`16.04`, `18.04`。我们可以通过 `ubuntu:14.04`,或者 `ubuntu:18.04` 来具体指定所需哪个版本的镜像。如果忽略了标签,比如 `ubuntu`,那将视为 `ubuntu:latest`。
|
||||
Taking the [Ubuntu Image](https://hub.docker.com/_/ubuntu) as an example. `ubuntu` is the name for repository, and inside it are tags for different versions, for instance, `16.04`, `18.04`. We can use `ubuntu:16.04` or `ubuntu:18.04` to specify the particular image we want. If the tag is omitted, for example, `ubuntu`, then it will be considered as `ubuntu:latest`.
|
||||
|
||||
仓库名经常以 *两段式路径* 形式出现,比如 `jwilder/nginx-proxy`,前者往往意味着 Docker Registry 多用户环境下的用户名,后者则往往是对应的软件名。但这并非绝对,取决于所使用的具体 Docker Registry 的软件或服务。
|
||||
Repository name is typically seperated by a forward slash(/), for example, `jwilder/nginx-proxy`, the former is to identify a particular user in a multi-user Docker Registry, while the latter corresponds to the software name. But it is not always the case. It also depends on the Docker Registry software or service you are using.
|
||||
|
||||
### Docker Registry 公开服务
|
||||
### Docker Registry Public Services
|
||||
|
||||
Docker Registry 公开服务是开放给用户使用、允许用户管理镜像的 Registry 服务。一般这类公开服务允许用户免费上传、下载公开的镜像,并可能提供收费服务供用户管理私有镜像。
|
||||
`Docker Registry Public Services` are registry services open to users, allowing users to manage their images. Typically, those public services offer user free image uploads and downloads, and possibly provide charged service for privately managed images.
|
||||
|
||||
最常使用的 Registry 公开服务是官方的 [Docker Hub](https://hub.docker.com/),这也是默认的 Registry,并拥有大量的高质量的官方镜像。除此以外,还有 [CoreOS](https://coreos.com/) 的 [Quay.io](https://quay.io/repository/),CoreOS 相关的镜像存储在这里;Google 的 [Google Container Registry](https://cloud.google.com/container-registry/),[Kubernetes](http://kubernetes.io/) 的镜像使用的就是这个服务。
|
||||
The most commonly used registry public service is the official [Docker Hub](https://hub.docker.com/), which is the default registry with thousands of high quality official images. Besides, the images for [Quay.io](https://quay.io/repository/) and CoreOS of [CoreOS](https://coreos.com/) are stored there. Google's [Google Container Registry](https://cloud.google.com/container-registry/) and [Kubernetes](https://kubernetes.io/) also use this service.
|
||||
|
||||
由于某些原因,在国内访问这些服务可能会比较慢。国内的一些云服务商提供了针对 Docker Hub 的镜像服务(`Registry Mirror`),这些镜像服务被称为**加速器**。常见的有 [阿里云加速器](https://cr.console.aliyun.com/#/accelerator)、[DaoCloud 加速器](https://www.daocloud.io/mirror#accelerator-doc) 等。使用加速器会直接从国内的地址下载 Docker Hub 的镜像,比直接从 Docker Hub 下载速度会提高很多。在 [安装 Docker](../install/mirror.md) 一节中有详细的配置方法。
|
||||
Due to some reasons knwon to all, accessing those services from China mainland is slow. There are some cloud service providers in China providing `Registry Mirror` for Docker Hub, those mirror services are called `accelerators`. The well-known ones are [Ali Cloud Image Accelerator](https://cr.console.aliyun.com/#/accelerator) and [DaoCloud Accelerator](https://www.daocloud.io/mirror#accelerator-doc). In China, downloading from these services are much faster than from Docker Hub. The detailed image source configuration tutorial is in the [Docker Installation](../install/mirror.md) section.
|
||||
|
||||
国内也有一些云服务商提供类似于 Docker Hub 的公开服务。比如 [时速云镜像仓库](https://hub.tenxcloud.com/)、[网易云镜像服务](https://c.163.com/hub#/m/library/)、[DaoCloud 镜像市场](https://hub.daocloud.io/)、[阿里云镜像库](https://cr.console.aliyun.com) 等。
|
||||
There are also some cloud service providers that provide public services similar to Docker Hub in China. For example, [Tenxcloud Mirror Registry](https://hub.tenxcloud.com/), [NetEase Mirror Registry](https://c.163.com/hub#/m/library/), [DaoCloud Mirror Market](https://hub.daocloud.io/), [Ali Cloud Mirror Registry](https://cr.console.aliyun.com), etc.
|
||||
|
||||
### 私有 Docker Registry
|
||||
### Private Docker Registry
|
||||
|
||||
除了使用公开服务外,用户还可以在本地搭建私有 Docker Registry。Docker 官方提供了 [Docker Registry](https://hub.docker.com/_/registry/) 镜像,可以直接使用做为私有 Registry 服务。在 [私有仓库](../repository/registry.md) 一节中,会有进一步的搭建私有 Registry 服务的讲解。
|
||||
Apart from using public service, a user can set up private Docker Registry. Docker offical offers the [Docker Registry](https://hub.docker.com/_/registry/) docker image, which can be deployed for private registry service. We will explain how to set it up in detail in the [Private Registry](../repository/registry.md) section.
|
||||
|
||||
开源的 Docker Registry 镜像只提供了 [Docker Registry API](https://docs.docker.com/registry/spec/api/) 的服务端实现,足以支持 `docker` 命令,不影响使用。但不包含图形界面,以及镜像维护、用户管理、访问控制等高级功能。在官方的商业化版本 [Docker Trusted Registry](https://docs.docker.com/datacenter/dtr/2.0/) 中,提供了这些高级功能。
|
||||
The open source Docker Registry image only provides the backend of [Docker Registry API](https://docs.docker.com/registry/spec/api/), which supports the `docker` commands and is enough for personal use, although the advanced functionalities like GUI(Graphical User Interface), Image Maintenance and Access Control are not supported. However, they are provided in the commercial version - [Docker Trusted Registry](https://docs.docker.com/datacenter/dtr/2.0/).
|
||||
|
||||
除了官方的 Docker Registry 外,还有第三方软件实现了 Docker Registry API,甚至提供了用户界面以及一些高级功能。比如,[VMWare Harbor](https://github.com/vmware/harbor) 和 [Sonatype Nexus](https://www.sonatype.com/docker)。
|
||||
Except for the official Docker Registry, there are third-party softwares that implement Docker Registry API, even with some advanced features like user interface. For example, [Harbor](https://github.com/goharbor/harbor) and [Sonatype Nexus](../repository/nexus3_registry.md).
|
||||
|
||||
11
book.json
11
book.json
@@ -1,7 +1,7 @@
|
||||
{
|
||||
"title": "Docker -- 从入门到实践",
|
||||
"title": "Docker Practice",
|
||||
"author": "yeasy",
|
||||
"language": "zh-hans",
|
||||
"language": "en",
|
||||
"links": {
|
||||
"sidebar": {
|
||||
"GitHub": "https://github.com/yeasy/docker_practice"
|
||||
@@ -11,7 +11,7 @@
|
||||
"-livereload",
|
||||
"image-captions",
|
||||
"github",
|
||||
"page-treeview",
|
||||
"page-treeview@2.9.8",
|
||||
"editlink"
|
||||
],
|
||||
"pluginsConfig": {
|
||||
@@ -19,14 +19,13 @@
|
||||
"attributes": {
|
||||
"width": "600"
|
||||
},
|
||||
"caption": "图 _PAGE_LEVEL_._PAGE_IMAGE_NUMBER_ - _CAPTION_"
|
||||
"caption": "Image _PAGE_LEVEL_._PAGE_IMAGE_NUMBER_ - _CAPTION_"
|
||||
},
|
||||
"github": {
|
||||
"url": "https://github.com/yeasy/docker_practice"
|
||||
},
|
||||
"editlink": {
|
||||
"base": "https://github.com/yeasy/docker_practice/blob/master/",
|
||||
"label": "编辑本页"
|
||||
"base": "https://github.com/yeasy/docker_practice/blob/english/"
|
||||
},
|
||||
"page-treeview": {
|
||||
"copyright": "Copyright © yeasy",
|
||||
|
||||
Binary file not shown.
|
Before Width: | Height: | Size: 86 KiB |
28
cases/ci/actions/README.md
Normal file
28
cases/ci/actions/README.md
Normal file
@@ -0,0 +1,28 @@
|
||||
# GitHub Actions
|
||||
|
||||
GitGub Actions 是 GitHub 推出的一款 CI/CD 工具。
|
||||
|
||||
我们可以在每个 job 的 step 中使用 Docker 执行构建步骤。
|
||||
|
||||
```yaml
|
||||
on: push
|
||||
|
||||
name: CI
|
||||
|
||||
jobs:
|
||||
my-job:
|
||||
name: Build
|
||||
runs-on: ubuntu-latest
|
||||
steps:
|
||||
- uses: actions/checkout@master
|
||||
with:
|
||||
fetch-depth: 2
|
||||
- name: run docker container
|
||||
uses: docker://golang:alpine
|
||||
with:
|
||||
args: go version
|
||||
```
|
||||
|
||||
## 参考资料
|
||||
|
||||
* [Actions Docs](https://help.github.com/en/categories/automating-your-workflow-with-github-actions)
|
||||
@@ -1,17 +0,0 @@
|
||||
workspace:
|
||||
base: /srv/drone-demo
|
||||
path: .
|
||||
|
||||
pipeline:
|
||||
build:
|
||||
image: golang:alpine
|
||||
# pull: true
|
||||
environment:
|
||||
- KEY=VALUE
|
||||
secrets: [key1, key2]
|
||||
commands:
|
||||
# - echo $$KEY
|
||||
- pwd
|
||||
- ls
|
||||
- CGO_ENABLED=0 GOOS=linux go build -a -installsuffix cgo -o app .
|
||||
- ./app
|
||||
@@ -1,35 +0,0 @@
|
||||
version: '3'
|
||||
services:
|
||||
|
||||
drone-server:
|
||||
image: drone/drone:0.8-alpine
|
||||
ports:
|
||||
- 443:443
|
||||
# - "${PRO_PUBLIC_IP}:8000:8000"
|
||||
volumes:
|
||||
- drone-data:/var/lib/drone/:rw
|
||||
# - ${SSL_PATH}:/etc/certs
|
||||
restart: always
|
||||
environment:
|
||||
- DRONE_SECRET=drone
|
||||
- DRONE_OPEN=false
|
||||
- DRONE_ADMIN=GITHUB_SERNAME
|
||||
- DRONE_HOST=https://drone.yeasy.com
|
||||
- DRONE_GITHUB=true
|
||||
- DRONE_GITHUB_CLIENT=${DRONE_GITHUB_CLIENT_PRO}
|
||||
- DRONE_GITHUB_SECRET=${DRONE_GITHUB_SECRET_PRO}
|
||||
|
||||
drone-agent:
|
||||
image: drone/agent:0.8-alpine
|
||||
restart: always
|
||||
depends_on:
|
||||
- drone-server
|
||||
volumes:
|
||||
- /var/run/docker.sock:/var/run/docker.sock:rw
|
||||
environment:
|
||||
- DRONE_SECRET=drone
|
||||
- DRONE_SERVER=drone-server:9000
|
||||
dns: 114.114.114.114
|
||||
|
||||
volumes:
|
||||
drone-data:
|
||||
@@ -1,183 +0,0 @@
|
||||
## Drone
|
||||
|
||||
基于 `Docker` 的 `CI/CD` 工具 `Drone` 所有编译、测试的流程都在 `Docker` 容器中进行。
|
||||
|
||||
开发者只需在项目中包含 `.drone.yml` 文件,将代码推送到 git 仓库,`Drone` 就能够自动化的进行编译、测试、发布。
|
||||
|
||||
本小节以 `GitHub` + `Drone` 来演示 `Drone` 的工作流程。当然在实际开发过程中,你的代码也许不在 GitHub 托管,那么你可以尝试使用 `Gogs` + `Drone` 来进行 `CI/CD`。
|
||||
|
||||
### 要求
|
||||
|
||||
* 拥有公网 IP、域名 (如果你不满足要求,可以尝试在本地使用 Gogs + Drone)
|
||||
|
||||
* 域名 SSL 证书 (目前国内有很多云服务商提供免费证书)
|
||||
|
||||
* 熟悉 `Docker` 以及 `Docker Compose`
|
||||
|
||||
* 熟悉 `Git` 基本命令
|
||||
|
||||
* 对 `CI/CD` 有一定了解
|
||||
|
||||
### 新建 GitHub 应用
|
||||
|
||||
登录 GitHub,在 https://github.com/settings/applications/new 新建一个应用。
|
||||
|
||||

|
||||
|
||||
接下来查看这个应用的详情,记录 `Client ID` 和 `Client Secret`,之后配置 Drone 会用到。
|
||||
|
||||
### 配置 Drone
|
||||
|
||||
我们通过使用 `Docker Compose` 来启动 `Drone`,编写 `docker-compose.yml` 文件。
|
||||
|
||||
```yaml
|
||||
version: '3'
|
||||
services:
|
||||
|
||||
drone-server:
|
||||
image: drone/drone:0.8-alpine
|
||||
ports:
|
||||
- 443:443
|
||||
# - "${PRO_PUBLIC_IP}:8000:8000"
|
||||
volumes:
|
||||
- drone-data:/var/lib/drone/:rw
|
||||
- ${SSL_PATH}:/etc/certs:rw
|
||||
restart: always
|
||||
environment:
|
||||
- DRONE_SECRET=drone
|
||||
- DRONE_OPEN=false
|
||||
- DRONE_ADMIN=${GITHUB_SERNAME}
|
||||
- DRONE_HOST=${DRONE_HOST}
|
||||
- DRONE_GITHUB=true
|
||||
- DRONE_GITHUB_CLIENT=${DRONE_GITHUB_CLIENT}
|
||||
- DRONE_GITHUB_SECRET=${DRONE_GITHUB_SECRET}
|
||||
- DRONE_SERVER_CERT=/etc/certs/drone.domain.com.crt
|
||||
- DRONE_SERVER_KEY=/etc/certs/drone.domain.com.key
|
||||
|
||||
drone-agent:
|
||||
image: drone/agent:0.8-alpine
|
||||
restart: always
|
||||
depends_on:
|
||||
- drone-server
|
||||
volumes:
|
||||
- /var/run/docker.sock:/var/run/docker.sock:rw
|
||||
environment:
|
||||
- DRONE_SECRET=drone
|
||||
- DRONE_SERVER=drone-server:9000
|
||||
dns: 114.114.114.114
|
||||
|
||||
volumes:
|
||||
drone-data:
|
||||
```
|
||||
|
||||
替换 `${SSL_PATH}` 为你网站的 SSL 证书路径。
|
||||
|
||||
替换 `${GITHUB_SERNAME}` 为你 GitHub 的用户名,该用户将成为 Drone 的管理员。
|
||||
|
||||
替换 `${DRONE_HOST}` 为你部署 Drone 的域名。
|
||||
|
||||
替换 `${DRONE_GITHUB_CLIENT}` 为你 GitHub 应用的 `Client ID`
|
||||
|
||||
替换 `${DRONE_GITHUB_SECRET}` 为你 GitHub 应用的 `Client Secret`
|
||||
|
||||
*注意:* 如果你的服务器占用了 `443` 端口,请配置 Nginx 代理,这里不再赘述。
|
||||
|
||||
#### 启动 Drone
|
||||
|
||||
```bash
|
||||
$ docker-compose up -d
|
||||
```
|
||||
|
||||
### Drone 关联项目
|
||||
|
||||
在 Github 新建一个名为 `drone-demo` 的仓库。
|
||||
|
||||
打开我们已经部署好的 Drone 网站,使用 GitHub 账号登录,在界面中关联刚刚新建的 `drone-demo` 仓库。
|
||||
|
||||
### 编写项目源代码
|
||||
|
||||
在本机初始化一个 git 仓库
|
||||
|
||||
```bash
|
||||
$ mkdir drone-demo
|
||||
|
||||
$ cd drone-demo
|
||||
|
||||
$ git init
|
||||
|
||||
$ git remote add origin git@github.com:username/drone-demo.git
|
||||
```
|
||||
|
||||
这里以一个简单的 `Go` 程序为例,该程序输出 `Hello World!`
|
||||
|
||||
编写 `app.go` 文件
|
||||
|
||||
```go
|
||||
package main
|
||||
|
||||
import "fmt"
|
||||
|
||||
func main(){
|
||||
fmt.Printf("Hello World!");
|
||||
}
|
||||
```
|
||||
|
||||
编写 `.drone.yml` 文件
|
||||
|
||||
```yaml
|
||||
workspace:
|
||||
base: /srv/drone-demo
|
||||
path: .
|
||||
|
||||
pipeline:
|
||||
build:
|
||||
image: golang:alpine
|
||||
# pull: true
|
||||
environment:
|
||||
- KEY=VALUE
|
||||
secrets: [key1, key2]
|
||||
commands:
|
||||
- echo $$KEY
|
||||
- pwd
|
||||
- ls
|
||||
- CGO_ENABLED=0 GOOS=linux go build -a -installsuffix cgo -o app .
|
||||
- ./app
|
||||
```
|
||||
|
||||
`workspace` 指明 git 源代码克隆的目标路径,本例中 git 源代码将被克隆到 golang 容器中的 `/srv/drone-demo` 目录中。
|
||||
|
||||
`pipeline` 指明构建所需的 Docker 镜像,环境变量,编译指令等。
|
||||
|
||||
现在目录结构如下
|
||||
|
||||
```bash
|
||||
.
|
||||
├── .drone.yml
|
||||
└── app.go
|
||||
```
|
||||
|
||||
### 推送项目源代码到 GitHub
|
||||
|
||||
```bash
|
||||
$ git add .
|
||||
|
||||
$ git commit -m "test drone ci"
|
||||
|
||||
$ git push origin master
|
||||
```
|
||||
|
||||
### 查看项目构建过程及结果
|
||||
|
||||
打开我们部署好的 `Drone` 网站,即可看到构建结果。
|
||||
|
||||

|
||||
|
||||
当然我们也可以把构建结果上传到 GitHub,Docker Registry,云服务商提供的对象存储,或者生产环境中。
|
||||
|
||||
本书 GitBook 也使用 Drone 进行 CI/CD,具体配置信息请查看本书根目录 [`.drone.yml`](https://github.com/yeasy/docker_practice/blob/master/.drone.yml) 文件。
|
||||
|
||||
## 参考链接
|
||||
|
||||
* [Drone Github](https://github.com/drone/drone)
|
||||
|
||||
* [Drone 文档](http://docs.drone.io/)
|
||||
6
cases/ci/drone/.env.example
Normal file
6
cases/ci/drone/.env.example
Normal file
@@ -0,0 +1,6 @@
|
||||
DRONE_SERVER_HOST=
|
||||
DRONE_SERVER_PROTO=
|
||||
DRONE_RPC_SECRET=
|
||||
HOSTNAME=
|
||||
DRONE_GITHUB_CLIENT_ID=
|
||||
DRONE_GITHUB_CLIENT_SECRET=
|
||||
2
cases/ci/drone/.gitignore
vendored
Normal file
2
cases/ci/drone/.gitignore
vendored
Normal file
@@ -0,0 +1,2 @@
|
||||
.env
|
||||
ssl/*
|
||||
99
cases/ci/drone/README.md
Normal file
99
cases/ci/drone/README.md
Normal file
@@ -0,0 +1,99 @@
|
||||
# Drone
|
||||
|
||||
基于 `Docker` 的 `CI/CD` 工具 `Drone` 所有编译、测试的流程都在 `Docker` 容器中进行。
|
||||
|
||||
开发者只需在项目中包含 `.drone.yml` 文件,将代码推送到 git 仓库,`Drone` 就能够自动化的进行编译、测试、发布。
|
||||
|
||||
本小节以 `GitHub` + `Drone` 来演示 `Drone` 的工作流程。当然在实际开发过程中,你的代码也许不在 GitHub 托管,那么你可以尝试使用 `Gogs` + `Drone` 来进行 `CI/CD`。
|
||||
|
||||
## Drone 关联项目
|
||||
|
||||
在 Github 新建一个名为 `drone-demo` 的仓库。
|
||||
|
||||
打开我们已经 [部署好的 Drone 网站](install.md) 或者 [Drone Cloud](https://cloud.drone.io),使用 GitHub 账号登录,在界面中关联刚刚新建的 `drone-demo` 仓库。
|
||||
|
||||
## 编写项目源代码
|
||||
|
||||
初始化一个 git 仓库
|
||||
|
||||
```bash
|
||||
$ mkdir drone-demo
|
||||
|
||||
$ cd drone-demo
|
||||
|
||||
$ git init
|
||||
|
||||
$ git remote add origin git@github.com:username/drone-demo.git
|
||||
```
|
||||
|
||||
这里以一个简单的 `Go` 程序为例,该程序输出 `Hello World!`
|
||||
|
||||
编写 `app.go` 文件
|
||||
|
||||
```go
|
||||
package main
|
||||
|
||||
import "fmt"
|
||||
|
||||
func main(){
|
||||
fmt.Printf("Hello World!\n");
|
||||
}
|
||||
```
|
||||
|
||||
编写 `.drone.yml` 文件
|
||||
|
||||
```yaml
|
||||
kind: pipeline
|
||||
type: docker
|
||||
name: build
|
||||
steps:
|
||||
- name: build
|
||||
image: golang:alpine
|
||||
pull: if-not-exists # always never
|
||||
environment:
|
||||
KEY: VALUE
|
||||
commands:
|
||||
- echo $KEY
|
||||
- pwd
|
||||
- ls
|
||||
- CGO_ENABLED=0 GOOS=linux go build -a -installsuffix cgo -o app .
|
||||
- ./app
|
||||
|
||||
trigger:
|
||||
branch:
|
||||
- master
|
||||
```
|
||||
|
||||
现在目录结构如下
|
||||
|
||||
```bash
|
||||
.
|
||||
├── .drone.yml
|
||||
└── app.go
|
||||
```
|
||||
|
||||
## 推送项目源代码到 GitHub
|
||||
|
||||
```bash
|
||||
$ git add .
|
||||
|
||||
$ git commit -m "test drone ci"
|
||||
|
||||
$ git push origin master
|
||||
```
|
||||
|
||||
## 查看项目构建过程及结果
|
||||
|
||||
打开我们部署好的 `Drone` 网站或者 Drone Cloud,即可看到构建结果。
|
||||
|
||||

|
||||
|
||||
当然我们也可以把构建结果上传到 GitHub,Docker Registry,云服务商提供的对象存储,或者生产环境中。
|
||||
|
||||
本书 GitBook 也使用 Drone 进行 CI/CD,具体配置信息请查看本书根目录 [`.drone.yml`](https://github.com/yeasy/docker_practice/blob/master/.drone.yml) 文件。
|
||||
|
||||
## 参考链接
|
||||
|
||||
* [Drone Github](https://github.com/drone/drone)
|
||||
* [Drone 文档](http://docs.drone.io/)
|
||||
* [Drone 示例](https://github.com/docker-practice/drone-demo)
|
||||
19
cases/ci/drone/demo/.drone.yml
Normal file
19
cases/ci/drone/demo/.drone.yml
Normal file
@@ -0,0 +1,19 @@
|
||||
kind: pipeline
|
||||
type: docker
|
||||
name: build
|
||||
steps:
|
||||
- name: build
|
||||
image: golang:alpine
|
||||
pull: if-not-exists # always never
|
||||
environment:
|
||||
KEY: VALUE
|
||||
commands:
|
||||
- echo $KEY
|
||||
- pwd
|
||||
- ls
|
||||
- CGO_ENABLED=0 GOOS=linux go build -a -installsuffix cgo -o app .
|
||||
- ./app
|
||||
|
||||
trigger:
|
||||
branch:
|
||||
- master
|
||||
1
cases/ci/drone/demo/README.md
Normal file
1
cases/ci/drone/demo/README.md
Normal file
@@ -0,0 +1 @@
|
||||
# Drone Demo
|
||||
@@ -3,5 +3,5 @@ package main
|
||||
import "fmt"
|
||||
|
||||
func main(){
|
||||
fmt.Printf("Hello World!");
|
||||
fmt.Printf("Hello World!\n");
|
||||
}
|
||||
39
cases/ci/drone/docker-compose.yml
Normal file
39
cases/ci/drone/docker-compose.yml
Normal file
@@ -0,0 +1,39 @@
|
||||
version: '3'
|
||||
|
||||
services:
|
||||
|
||||
drone-server:
|
||||
image: drone/drone:1
|
||||
ports:
|
||||
- 443:443
|
||||
- 80:80
|
||||
volumes:
|
||||
- drone-data:/data:rw
|
||||
- ./ssl:/etc/certs
|
||||
restart: always
|
||||
environment:
|
||||
- DRONE_AGENTS_ENABLED=true
|
||||
- DRONE_SERVER_HOST=${DRONE_SERVER_HOST:-drone.domain.com}
|
||||
- DRONE_SERVER_PROTO=${DRONE_SERVER_PROTO:-https}
|
||||
- DRONE_RPC_SECRET=${DRONE_RPC_SECRET:-secret}
|
||||
- DRONE_GITHUB_SERVER=https://github.com
|
||||
- DRONE_GITHUB_CLIENT_ID=${DRONE_GITHUB_CLIENT_ID}
|
||||
- DRONE_GITHUB_CLIENT_SECRET=${DRONE_GITHUB_CLIENT_SECRET}
|
||||
|
||||
drone-agent:
|
||||
image: drone/agent:1
|
||||
restart: always
|
||||
depends_on:
|
||||
- drone-server
|
||||
volumes:
|
||||
- /var/run/docker.sock:/var/run/docker.sock:rw
|
||||
environment:
|
||||
- DRONE_RPC_PROTO=http
|
||||
- DRONE_RPC_HOST=drone-server
|
||||
- DRONE_RPC_SECRET=${DRONE_RPC_SECRET:-secret}
|
||||
- DRONE_RUNNER_NAME=${HOSTNAME:-demo}
|
||||
- DRONE_RUNNER_CAPACITY=2
|
||||
dns: 114.114.114.114
|
||||
|
||||
volumes:
|
||||
drone-data:
|
||||
87
cases/ci/drone/install.md
Normal file
87
cases/ci/drone/install.md
Normal file
@@ -0,0 +1,87 @@
|
||||
# 部署 Drone
|
||||
|
||||
## 要求
|
||||
|
||||
* 拥有公网 IP、域名 (如果你不满足要求,可以尝试在本地使用 Gogs + Drone)
|
||||
|
||||
* 域名 SSL 证书 (目前国内有很多云服务商提供免费证书)
|
||||
|
||||
* 熟悉 `Docker` 以及 `Docker Compose`
|
||||
|
||||
* 熟悉 `Git` 基本命令
|
||||
|
||||
* 对 `CI/CD` 有一定了解
|
||||
|
||||
## 新建 GitHub 应用
|
||||
|
||||
登录 GitHub,在 https://github.com/settings/applications/new 新建一个应用。
|
||||
|
||||
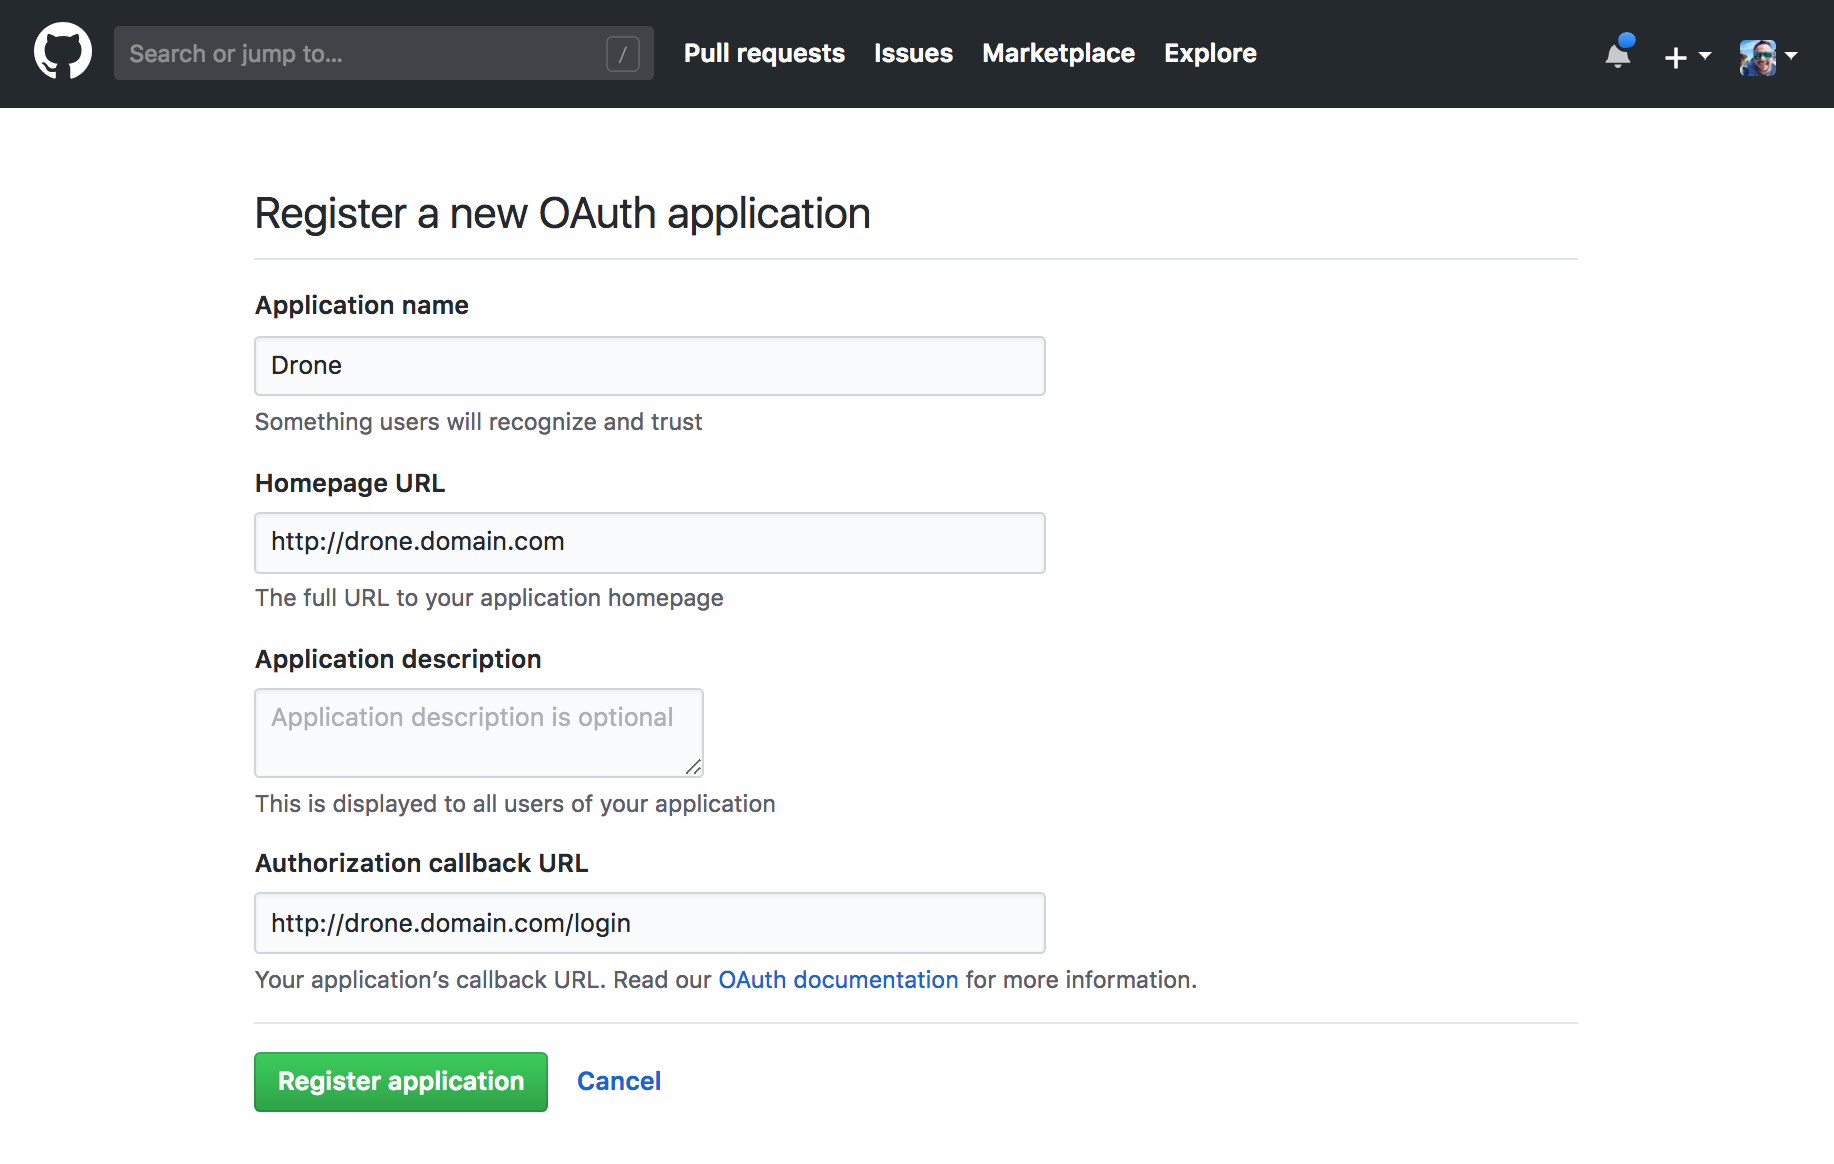
|
||||
|
||||
接下来查看这个应用的详情,记录 `Client ID` 和 `Client Secret`,之后配置 Drone 会用到。
|
||||
|
||||
## 配置 Drone
|
||||
|
||||
我们通过使用 `Docker Compose` 来启动 `Drone`,编写 `docker-compose.yml` 文件。
|
||||
|
||||
```yaml
|
||||
version: '3'
|
||||
|
||||
services:
|
||||
|
||||
drone-server:
|
||||
image: drone/drone:1
|
||||
ports:
|
||||
- 443:443
|
||||
- 80:80
|
||||
volumes:
|
||||
- drone-data:/data:rw
|
||||
- ./ssl:/etc/certs
|
||||
restart: always
|
||||
environment:
|
||||
- DRONE_AGENTS_ENABLED=true
|
||||
- DRONE_SERVER_HOST=${DRONE_SERVER_HOST:-https://drone.yeasy.com}
|
||||
- DRONE_SERVER_PROTO=${DRONE_SERVER_PROTO:-https}
|
||||
- DRONE_RPC_SECRET=${DRONE_RPC_SECRET:-secret}
|
||||
- DRONE_GITHUB_SERVER=https://github.com
|
||||
- DRONE_GITHUB_CLIENT_ID=${DRONE_GITHUB_CLIENT_ID}
|
||||
- DRONE_GITHUB_CLIENT_SECRET=${DRONE_GITHUB_CLIENT_SECRET}
|
||||
|
||||
drone-agent:
|
||||
image: drone/agent:1
|
||||
restart: always
|
||||
depends_on:
|
||||
- drone-server
|
||||
volumes:
|
||||
- /var/run/docker.sock:/var/run/docker.sock:rw
|
||||
environment:
|
||||
- DRONE_RPC_PROTO=http
|
||||
- DRONE_RPC_HOST=drone-server
|
||||
- DRONE_RPC_SECRET=${DRONE_RPC_SECRET:-secret}
|
||||
- DRONE_RUNNER_NAME=${HOSTNAME:-demo}
|
||||
- DRONE_RUNNER_CAPACITY=2
|
||||
dns: 114.114.114.114
|
||||
|
||||
volumes:
|
||||
drone-data:
|
||||
```
|
||||
|
||||
新建 `.env` 文件,输入变量及其值
|
||||
|
||||
```bash
|
||||
# 必填 服务器地址,例如 drone.domain.com
|
||||
DRONE_SERVER_HOST=
|
||||
DRONE_SERVER_PROTO=https
|
||||
DRONE_RPC_SECRET=secret
|
||||
HOSTNAME=demo
|
||||
# 必填 在 GitHub 应用页面查看
|
||||
DRONE_GITHUB_CLIENT_ID=
|
||||
# 必填 在 GitHub 应用页面查看
|
||||
DRONE_GITHUB_CLIENT_SECRET=
|
||||
```
|
||||
|
||||
### 启动 Drone
|
||||
|
||||
```bash
|
||||
$ docker-compose up -d
|
||||
```
|
||||
@@ -56,7 +56,7 @@ $ apk --update add --no-cache <package>
|
||||
|
||||
### 相关资源
|
||||
|
||||
* `Alpine` 官网:http://alpinelinux.org/
|
||||
* `Alpine` 官网:https://www.alpinelinux.org/
|
||||
* `Alpine` 官方仓库:https://github.com/alpinelinux
|
||||
* `Alpine` 官方镜像:https://hub.docker.com/_/alpine/
|
||||
* `Alpine` 官方镜像仓库:https://github.com/gliderlabs/docker-alpine
|
||||
|
||||
@@ -56,7 +56,6 @@ crashsystems/gitlab-docker A trusted, regularly updated build of GitL.
|
||||
sylvainlasnier/memcached This is a Memcached 1.4.14 docker images b... 16 [OK]
|
||||
ubuntu-upstart Upstart is an event-based replacement for ... 16 [OK]
|
||||
mbentley/ubuntu-django-uwsgi-nginx 16 [OK]
|
||||
ansible/ubuntu14.04-ansible Ubuntu 14.04 LTS with ansible 15 [OK]
|
||||
clue/ttrss The Tiny Tiny RSS feed reader allows you t... 14 [OK]
|
||||
dockerfile/ubuntu-desktop Trusted automated Ubuntu Desktop (LXDE) (h... 14 [OK]
|
||||
tutum/ubuntu Ubuntu image with SSH access. For the root... 12 [OK]
|
||||
|
||||
@@ -2,10 +2,10 @@
|
||||
|
||||

|
||||
|
||||
阿里云创立于 2009 年,是中国较早的云计算平台。阿里云致力于提供安全、可靠的计算和数据处理能力。
|
||||
[阿里云](https://www.aliyun.com?source=5176.11533457&userCode=8lx5zmtu&type=copy) 创立于 2009 年,是中国较早的云计算平台。阿里云致力于提供安全、可靠的计算和数据处理能力。
|
||||
|
||||
阿里云的客户群体中,活跃着微博、知乎、魅族、锤子科技、小咖秀等一大批明星互联网公司。在天猫双 11 全球狂欢节等极富挑战的应用场景中,阿里云保持着良好的运行纪录。
|
||||
[阿里云](https://www.aliyun.com?source=5176.11533457&userCode=8lx5zmtu&type=copy) 的客户群体中,活跃着微博、知乎、魅族、锤子科技、小咖秀等一大批明星互联网公司。在天猫双 11 全球狂欢节等极富挑战的应用场景中,阿里云保持着良好的运行纪录。
|
||||
|
||||
阿里云容器服务提供了高性能、可伸缩的容器应用管理服务,支持在一组云服务器上通过 Docker 容器来进行应用生命周期管理。容器服务极大简化了用户对容器管理集群的搭建工作,无缝整合了阿里云虚拟化、存储、网络和安全能力。容器服务提供了多种应用发布方式和流水线般的持续交付能力,原生支持微服务架构,助力用户无缝上云和跨云管理。
|
||||
[阿里云容器服务 Kubernetes 版 ACK](https://www.aliyun.com/product/kubernetes?source=5176.11533457&userCode=8lx5zmtu&type=copy) 提供了高性能、可伸缩的容器应用管理服务,支持在一组云服务器上通过 Docker 容器来进行应用生命周期管理。容器服务极大简化了用户对容器管理集群的搭建工作,无缝整合了阿里云虚拟化、存储、网络和安全能力。容器服务提供了多种应用发布方式和流水线般的持续交付能力,原生支持微服务架构,助力用户无缝上云和跨云管理。
|
||||
|
||||
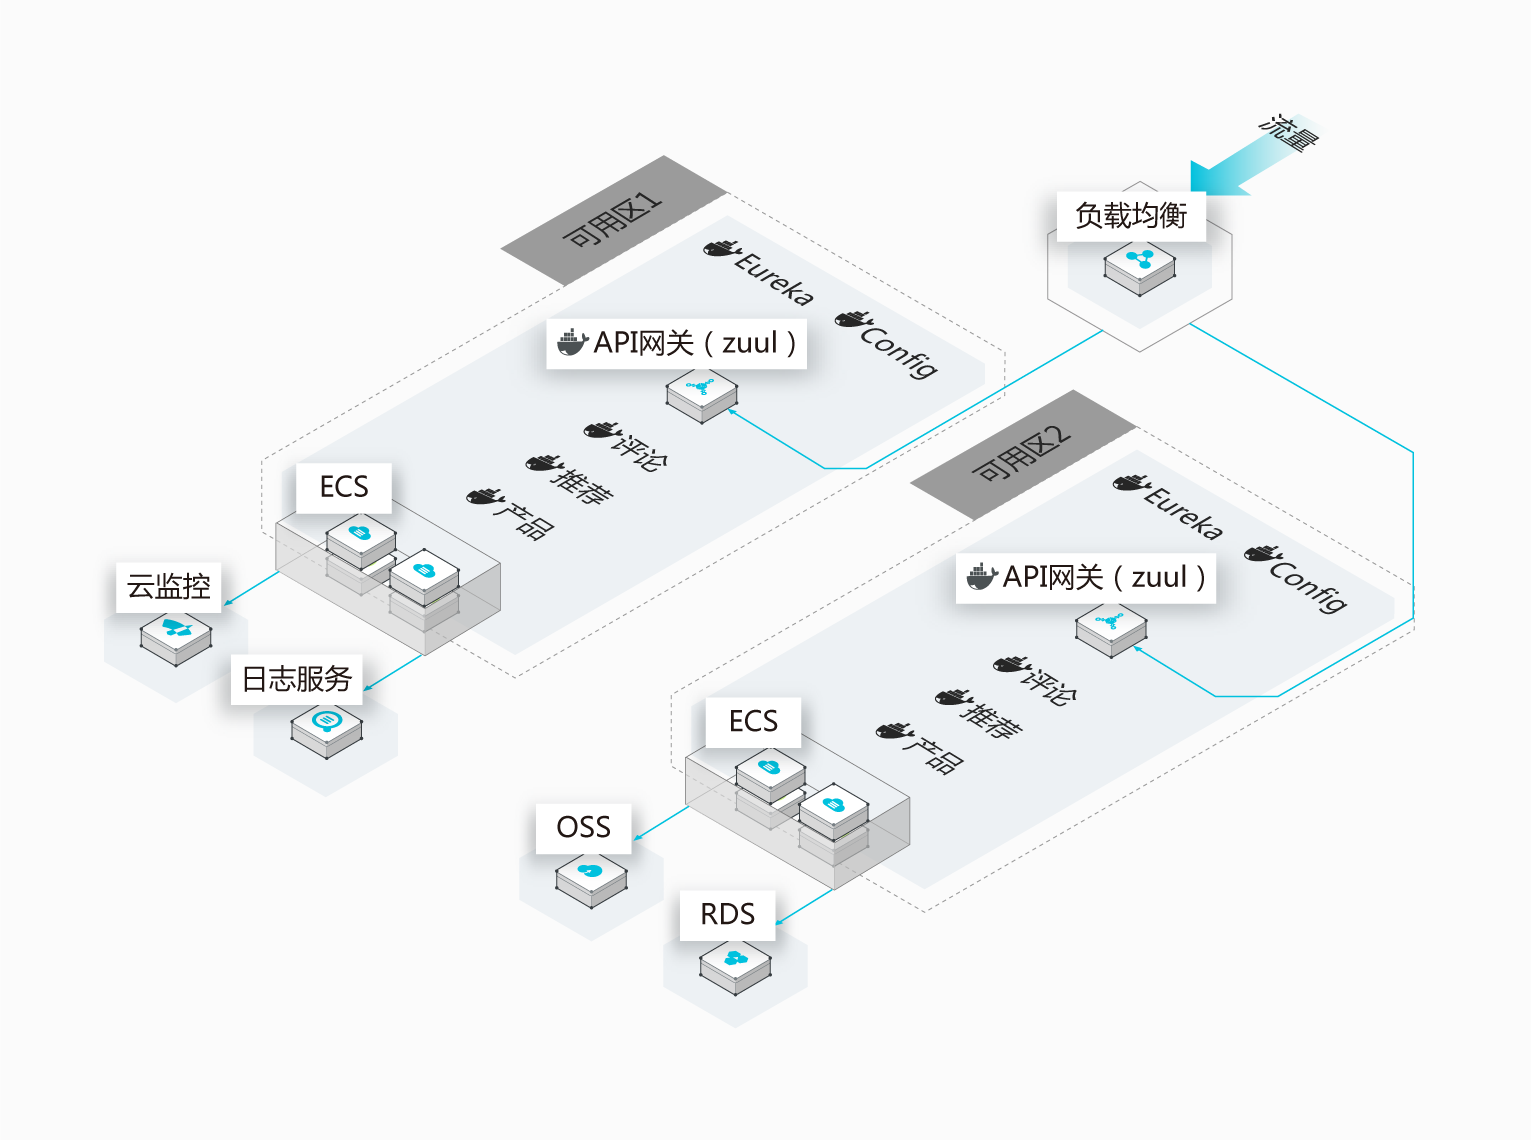
|
||||
|
||||
@@ -2,12 +2,10 @@
|
||||
|
||||

|
||||
|
||||
AWS,即 Amazon Web Services,是亚马逊(Amazon)公司的 IaaS 和 PaaS 平台服务。AWS 提供了一整套基础设施和应用程序服务,使用户几乎能够在云中运行一切应用程序:从企业应用程序和大数据项目,到社交游戏和移动应用程序。AWS 面向用户提供包括弹性计算、存储、数据库、应用程序在内的一整套云计算服务,能够帮助企业降低 IT 投入成本和维护成本。
|
||||
[AWS](https://www.amazonaws.cn),即 Amazon Web Services,是亚马逊(Amazon)公司的 IaaS 和 PaaS 平台服务。AWS 提供了一整套基础设施和应用程序服务,使用户几乎能够在云中运行一切应用程序:从企业应用程序和大数据项目,到社交游戏和移动应用程序。AWS 面向用户提供包括弹性计算、存储、数据库、应用程序在内的一整套云计算服务,能够帮助企业降低 IT 投入成本和维护成本。
|
||||
|
||||
自 2006 年初起,亚马逊 AWS 开始在云中为各种规模的公司提供技术服务平台。利用亚马逊 AWS,软件开发人员可以轻松购买计算、存储、数据库和其他基于 Internet 的服务来支持其应用程序。开发人员能够灵活选择任何开发平台或编程环境,以便于其尝试解决问题。由于开发人员只需按使用量付费,无需前期资本支出,亚马逊 AWS 是向最终用户交付计算资源、保存的数据和其他应用程序的一种经济划算的方式。
|
||||
|
||||
2015 年 AWS 正式发布了 EC2 容器服务(ECS)。ECS 的目的是让 Docker 容器变的更加简单,它提供了一个集群和编排的层,用来控制主机上的容器部署,以及部署之后的集群内的容器的生命周期管理。ECS 是诸如 Docker Swarm、Kubernetes、Mesos 等工具的替代,它们工作在同一个层,除了作为一个服务来提供。这些工具和 ECS 不同的地方在于,前者需要用户自己来部署和管理,而 ECS 是“作为服务”来提供的。
|
||||
|
||||
|
||||

|
||||
|
||||
|
||||
@@ -1,11 +0,0 @@
|
||||
## 腾讯云
|
||||
|
||||

|
||||
|
||||
腾讯云在架构方面经过多年积累,并且有着多年对海量互联网服务的经验。不管是社交、游戏还是其他领域,都有多年的成熟产品来提供产品服务。腾讯在云端完成重要部署,为开发者及企业提供云服务、云数据、云运营等整体一站式服务方案。
|
||||
|
||||
具体包括云服务器、云存储、云数据库和弹性 web 引擎等基础云服务;腾讯云分析(MTA)、腾讯云推送(信鸽)等腾讯整体大数据能力;以及 QQ互联、QQ 空间、微云、微社区等云端链接社交体系。这些正是腾讯云可以提供给这个行业的差异化优势,造就了可支持各种互联网使用场景的高品质的腾讯云技术平台。
|
||||
|
||||
腾讯云容器服务是高度可扩展的高性能容器管理服务,用户可以在托管的云服务器实例集群上轻松运行应用程序。使用该服务,将无需安装、运维、扩展用户的集群管理基础设施,只需进行简单的API调用,便可启动和停止Docker应用程序,查询集群的完整状态,以及使用各种云服务。用户可以根据用户的资源需求和可用性要求在用户的集群中安排容器的置放,满足业务或应用程序的特定要求。
|
||||
|
||||
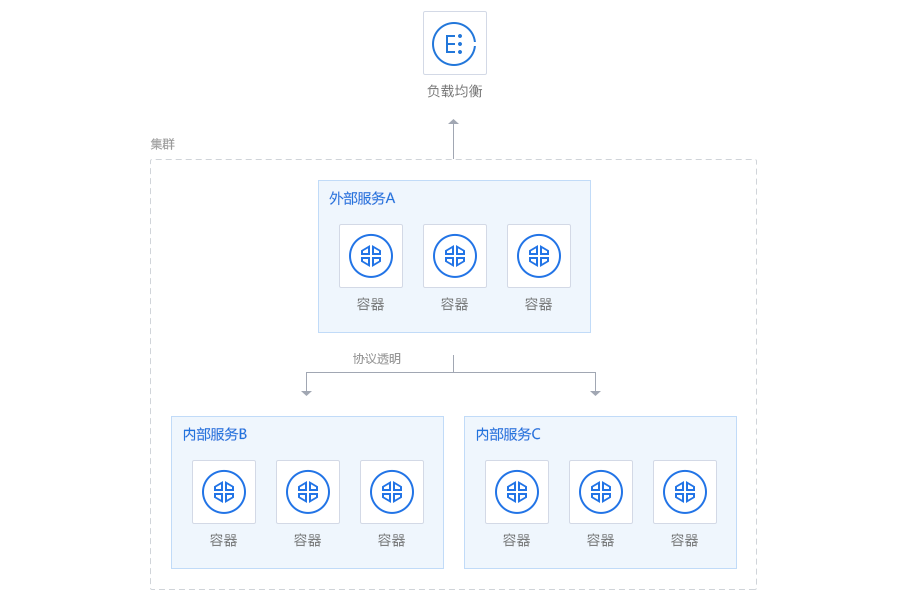
|
||||
@@ -1,4 +1,5 @@
|
||||
## 本章小结
|
||||
|
||||
本章介绍了公有云服务对 Docker 的积极支持,以及新出现的容器云平台。
|
||||
|
||||
事实上,Docker 技术的出现自身就极大推动了云计算行业的发展。
|
||||
|
||||
11
cloud/tencentCloud.md
Normal file
11
cloud/tencentCloud.md
Normal file
@@ -0,0 +1,11 @@
|
||||
## 腾讯云
|
||||
|
||||

|
||||
|
||||
[腾讯云](https://cloud.tencent.com/redirect.php?redirect=1040&cps_key=3a5255852d5db99dcd5da4c72f05df61&from=console) 在架构方面经过多年积累,并且有着多年对海量互联网服务的经验。不管是社交、游戏还是其他领域,都有多年的成熟产品来提供产品服务。腾讯在云端完成重要部署,为开发者及企业提供云服务、云数据、云运营等整体一站式服务方案。
|
||||
|
||||
具体包括 [云服务器](https://cloud.tencent.com/redirect.php?redirect=1001&cps_key=3a5255852d5db99dcd5da4c72f05df61&from=console)、[云存储](https://cloud.tencent.com/redirect.php?redirect=1020&cps_key=3a5255852d5db99dcd5da4c72f05df61&from=console)、[云数据库](https://cloud.tencent.com/redirect.php?redirect=1003&cps_key=3a5255852d5db99dcd5da4c72f05df61&from=console)、[视频与CDN](https://cloud.tencent.com/redirect.php?redirect=1019&cps_key=3a5255852d5db99dcd5da4c72f05df61&from=console) 和 [域名注册](https://dnspod.cloud.tencent.com) 等基础云服务;腾讯云分析(MTA)、腾讯云推送(信鸽)等腾讯整体大数据能力;以及 QQ互联、QQ 空间、微云、微社区等云端链接社交体系。这些正是腾讯云可以提供给这个行业的差异化优势,造就了可支持各种互联网使用场景的高品质的腾讯云技术平台。
|
||||
|
||||
[腾讯云容器服务 TKE](https://cloud.tencent.com/redirect.php?redirect=10058&cps_key=3a5255852d5db99dcd5da4c72f05df61) 是高度可扩展的高性能容器管理服务,用户可以在托管的云服务器实例集群上轻松运行应用程序。使用该服务,将无需安装、运维、扩展用户的集群管理基础设施,只需进行简单的 API 调用,便可启动和停止 Docker 应用程序,查询集群的完整状态,以及使用各种云服务。用户可以根据用户的资源需求和可用性要求在用户的集群中安排容器的置放,满足业务或应用程序的特定要求。
|
||||
|
||||

|
||||
@@ -1,6 +1,7 @@
|
||||
## Compose 命令说明
|
||||
|
||||
### 命令对象与格式
|
||||
|
||||
对于 Compose 来说,大部分命令的对象既可以是项目本身,也可以指定为项目中的服务或者容器。如果没有特别的说明,命令对象将是项目,这意味着项目中所有的服务都会受到命令影响。
|
||||
|
||||
执行 `docker-compose [COMMAND] --help` 或者 `docker-compose help [COMMAND]` 可以查看具体某个命令的使用格式。
|
||||
@@ -66,6 +67,7 @@ docker-compose [-f=<arg>...] [options] [COMMAND] [ARGS...]
|
||||
列出 Compose 文件中包含的镜像。
|
||||
|
||||
#### `kill`
|
||||
|
||||
格式为 `docker-compose kill [options] [SERVICE...]`。
|
||||
|
||||
通过发送 `SIGKILL` 信号来强制停止服务容器。
|
||||
@@ -77,6 +79,7 @@ $ docker-compose kill -s SIGINT
|
||||
```
|
||||
|
||||
#### `logs`
|
||||
|
||||
格式为 `docker-compose logs [options] [SERVICE...]`。
|
||||
|
||||
查看服务容器的输出。默认情况下,docker-compose 将对不同的服务输出使用不同的颜色来区分。可以通过 `--no-color` 来关闭颜色。
|
||||
@@ -84,11 +87,13 @@ $ docker-compose kill -s SIGINT
|
||||
该命令在调试问题的时候十分有用。
|
||||
|
||||
#### `pause`
|
||||
|
||||
格式为 `docker-compose pause [SERVICE...]`。
|
||||
|
||||
暂停一个服务容器。
|
||||
|
||||
#### `port`
|
||||
|
||||
格式为 `docker-compose port [options] SERVICE PRIVATE_PORT`。
|
||||
|
||||
打印某个容器端口所映射的公共端口。
|
||||
@@ -100,6 +105,7 @@ $ docker-compose kill -s SIGINT
|
||||
* `--index=index` 如果同一服务存在多个容器,指定命令对象容器的序号(默认为 1)。
|
||||
|
||||
#### `ps`
|
||||
|
||||
格式为 `docker-compose ps [options] [SERVICE...]`。
|
||||
|
||||
列出项目中目前的所有容器。
|
||||
@@ -109,6 +115,7 @@ $ docker-compose kill -s SIGINT
|
||||
* `-q` 只打印容器的 ID 信息。
|
||||
|
||||
#### `pull`
|
||||
|
||||
格式为 `docker-compose pull [options] [SERVICE...]`。
|
||||
|
||||
拉取服务依赖的镜像。
|
||||
@@ -122,6 +129,7 @@ $ docker-compose kill -s SIGINT
|
||||
推送服务依赖的镜像到 Docker 镜像仓库。
|
||||
|
||||
#### `restart`
|
||||
|
||||
格式为 `docker-compose restart [options] [SERVICE...]`。
|
||||
|
||||
重启项目中的服务。
|
||||
@@ -131,6 +139,7 @@ $ docker-compose kill -s SIGINT
|
||||
* `-t, --timeout TIMEOUT` 指定重启前停止容器的超时(默认为 10 秒)。
|
||||
|
||||
#### `rm`
|
||||
|
||||
格式为 `docker-compose rm [options] [SERVICE...]`。
|
||||
|
||||
删除所有(停止状态的)服务容器。推荐先执行 `docker-compose stop` 命令来停止容器。
|
||||
@@ -195,6 +204,7 @@ $ docker-compose run --no-deps web python manage.py shell
|
||||
* `-T` 不分配伪 tty,意味着依赖 tty 的指令将无法运行。
|
||||
|
||||
#### `scale`
|
||||
|
||||
格式为 `docker-compose scale [options] [SERVICE=NUM...]`。
|
||||
|
||||
设置指定服务运行的容器个数。
|
||||
@@ -214,11 +224,13 @@ $ docker-compose scale web=3 db=2
|
||||
* `-t, --timeout TIMEOUT` 停止容器时候的超时(默认为 10 秒)。
|
||||
|
||||
#### `start`
|
||||
|
||||
格式为 `docker-compose start [SERVICE...]`。
|
||||
|
||||
启动已经存在的服务容器。
|
||||
|
||||
#### `stop`
|
||||
|
||||
格式为 `docker-compose stop [options] [SERVICE...]`。
|
||||
|
||||
停止已经处于运行状态的容器,但不删除它。通过 `docker-compose start` 可以再次启动这些容器。
|
||||
@@ -232,11 +244,13 @@ $ docker-compose scale web=3 db=2
|
||||
查看各个服务容器内运行的进程。
|
||||
|
||||
#### `unpause`
|
||||
|
||||
格式为 `docker-compose unpause [SERVICE...]`。
|
||||
|
||||
恢复处于暂停状态中的服务。
|
||||
|
||||
#### `up`
|
||||
|
||||
格式为 `docker-compose up [options] [SERVICE...]`。
|
||||
|
||||
该命令十分强大,它将尝试自动完成包括构建镜像,(重新)创建服务,启动服务,并关联服务相关容器的一系列操作。
|
||||
@@ -270,6 +284,11 @@ $ docker-compose scale web=3 db=2
|
||||
* `-t, --timeout TIMEOUT` 停止容器时候的超时(默认为 10 秒)。
|
||||
|
||||
#### `version`
|
||||
|
||||
格式为 `docker-compose version`。
|
||||
|
||||
打印版本信息。
|
||||
|
||||
### 参考资料
|
||||
|
||||
* [官方文档](https://docs.docker.com/compose/reference/overview/)
|
||||
|
||||
@@ -18,7 +18,7 @@ services:
|
||||
|
||||
注意每个服务都必须通过 `image` 指令指定镜像或 `build` 指令(需要 Dockerfile)等来自动构建生成镜像。
|
||||
|
||||
如果使用 `build` 指令,在 `Dockerfile` 中设置的选项(例如:`CMD`, `EXPOSE`, `VOLUME`, `ENV` 等) 将会自动被获取,无需在 `docker-compose.yml` 中再次设置。
|
||||
如果使用 `build` 指令,在 `Dockerfile` 中设置的选项(例如:`CMD`, `EXPOSE`, `VOLUME`, `ENV` 等) 将会自动被获取,无需在 `docker-compose.yml` 中重复设置。
|
||||
|
||||
下面分别介绍各个指令的用法。
|
||||
|
||||
@@ -223,7 +223,7 @@ environment:
|
||||
- SESSION_SECRET
|
||||
```
|
||||
|
||||
如果变量名称或者值中用到 `true|false,yes|no` 等表达 [布尔](http://yaml.org/type/bool.html) 含义的词汇,最好放到引号里,避免 YAML 自动解析某些内容为对应的布尔语义。这些特定词汇,包括
|
||||
如果变量名称或者值中用到 `true|false,yes|no` 等表达 [布尔](https://yaml.org/type/bool.html) 含义的词汇,最好放到引号里,避免 YAML 自动解析某些内容为对应的布尔语义。这些特定词汇,包括
|
||||
|
||||
```bash
|
||||
y|Y|yes|Yes|YES|n|N|no|No|NO|true|True|TRUE|false|False|FALSE|on|On|ON|off|Off|OFF
|
||||
@@ -460,7 +460,7 @@ sysctls:
|
||||
|
||||
### `volumes`
|
||||
|
||||
数据卷所挂载路径设置。可以设置宿主机路径 (`HOST:CONTAINER`) 或加上访问模式 (`HOST:CONTAINER:ro`)。
|
||||
数据卷所挂载路径设置。可以设置为宿主机路径(`HOST:CONTAINER`)或者数据卷名称(`VOLUME:CONTAINER`),并且可以设置访问模式 (`HOST:CONTAINER:ro`)。
|
||||
|
||||
该指令中路径支持相对路径。
|
||||
|
||||
@@ -471,6 +471,21 @@ volumes:
|
||||
- ~/configs:/etc/configs/:ro
|
||||
```
|
||||
|
||||
如果路径为数据卷名称,必须在文件中配置数据卷。
|
||||
|
||||
```yaml
|
||||
version: "3"
|
||||
|
||||
services:
|
||||
my_src:
|
||||
image: mysql:8.0
|
||||
volumes:
|
||||
- mysql_data:/var/lib/mysql
|
||||
|
||||
volumes:
|
||||
mysql_data:
|
||||
```
|
||||
|
||||
### 其它指令
|
||||
|
||||
此外,还有包括 `domainname, entrypoint, hostname, ipc, mac_address, privileged, read_only, shm_size, restart, stdin_open, tty, user, working_dir` 等指令,基本跟 `docker run` 中对应参数的功能一致。
|
||||
@@ -557,3 +572,7 @@ MONGO_VERSION=3.6
|
||||
```
|
||||
|
||||
执行 `docker-compose up` 则会启动一个 `mongo:3.6` 镜像的容器。
|
||||
|
||||
### 参考资料
|
||||
|
||||
* [官方文档](https://docs.docker.com/compose/compose-file/)
|
||||
|
||||
1
compose/demo/django/.gitignore
vendored
1
compose/demo/django/.gitignore
vendored
@@ -1 +1,2 @@
|
||||
django_example
|
||||
manage.py
|
||||
|
||||
@@ -6,7 +6,7 @@ services:
|
||||
|
||||
web:
|
||||
build: .
|
||||
command: python3 manage.py runserver 0.0.0.0:8000
|
||||
command: python manage.py runserver 0.0.0.0:8000
|
||||
volumes:
|
||||
- .:/code
|
||||
ports:
|
||||
|
||||
@@ -1,22 +0,0 @@
|
||||
#!/usr/bin/env python
|
||||
import os
|
||||
import sys
|
||||
|
||||
if __name__ == "__main__":
|
||||
os.environ.setdefault("DJANGO_SETTINGS_MODULE", "django_example.settings")
|
||||
try:
|
||||
from django.core.management import execute_from_command_line
|
||||
except ImportError:
|
||||
# The above import may fail for some other reason. Ensure that the
|
||||
# issue is really that Django is missing to avoid masking other
|
||||
# exceptions on Python 2.
|
||||
try:
|
||||
import django
|
||||
except ImportError:
|
||||
raise ImportError(
|
||||
"Couldn't import Django. Are you sure it's installed and "
|
||||
"available on your PYTHONPATH environment variable? Did you "
|
||||
"forget to activate a virtual environment?"
|
||||
)
|
||||
raise
|
||||
execute_from_command_line(sys.argv)
|
||||
@@ -1,2 +1,2 @@
|
||||
Django>=1.8,<2.0
|
||||
psycopg2
|
||||
Django>=2.0,<3.0
|
||||
psycopg2>=2.7,<3.0
|
||||
|
||||
@@ -2,7 +2,11 @@ version: "3"
|
||||
services:
|
||||
|
||||
db:
|
||||
image: mysql:5.7
|
||||
image: mysql:8.0
|
||||
command:
|
||||
- --default_authentication_plugin=mysql_native_password
|
||||
- --character-set-server=utf8mb4
|
||||
- --collation-server=utf8mb4_unicode_ci
|
||||
volumes:
|
||||
- db_data:/var/lib/mysql
|
||||
restart: always
|
||||
|
||||
@@ -1,6 +1,6 @@
|
||||
## 使用 Django
|
||||
|
||||
本小节内容适合 `Python` 开发人员阅读。
|
||||
> 本小节内容适合 `Python` 开发人员阅读。
|
||||
|
||||
我们现在将使用 `Docker Compose` 配置并运行一个 `Django/PostgreSQL` 应用。
|
||||
|
||||
@@ -13,18 +13,18 @@ FROM python:3
|
||||
ENV PYTHONUNBUFFERED 1
|
||||
RUN mkdir /code
|
||||
WORKDIR /code
|
||||
ADD requirements.txt /code/
|
||||
COPY requirements.txt /code/
|
||||
RUN pip install -r requirements.txt
|
||||
ADD . /code/
|
||||
COPY . /code/
|
||||
```
|
||||
|
||||
以上内容指定应用将使用安装了 Python 以及必要依赖包的镜像。更多关于如何编写 `Dockerfile` 文件的信息可以查看 [镜像创建](../image/create.md#利用 Dockerfile 来创建镜像) 和 [ Dockerfile 使用](../dockerfile/README.md)。
|
||||
以上内容指定应用将使用安装了 Python 以及必要依赖包的镜像。更多关于如何编写 `Dockerfile` 文件的信息可以查看 [ Dockerfile 使用](../image/dockerfile/README.md)。
|
||||
|
||||
第二步,在 `requirements.txt` 文件里面写明需要安装的具体依赖包名。
|
||||
|
||||
```bash
|
||||
Django>=1.8,<2.0
|
||||
psycopg2
|
||||
Django>=2.0,<3.0
|
||||
psycopg2>=2.7,<3.0
|
||||
```
|
||||
|
||||
第三步,`docker-compose.yml` 文件将把所有的东西关联起来。它描述了应用的构成(一个 web 服务和一个数据库)、使用的 Docker 镜像、镜像之间的连接、挂载到容器的卷,以及服务开放的端口。
|
||||
@@ -38,7 +38,7 @@ services:
|
||||
|
||||
web:
|
||||
build: .
|
||||
command: python3 manage.py runserver 0.0.0.0:8000
|
||||
command: python manage.py runserver 0.0.0.0:8000
|
||||
volumes:
|
||||
- .:/code
|
||||
ports:
|
||||
@@ -47,15 +47,15 @@ services:
|
||||
- db
|
||||
```
|
||||
|
||||
查看 [`docker-compose.yml` 章节](yml_ref.md) 了解更多详细的工作机制。
|
||||
查看 [`docker-compose.yml` 章节](compose_file.md) 了解更多详细的工作机制。
|
||||
|
||||
现在我们就可以使用 `docker-compose run` 命令启动一个 `Django` 应用了。
|
||||
|
||||
```bash
|
||||
$ docker-compose run web django-admin.py startproject django_example .
|
||||
$ docker-compose run web django-admin startproject django_example .
|
||||
```
|
||||
|
||||
Compose 会先使用 `Dockerfile` 为 web 服务创建一个镜像,接着使用这个镜像在容器里运行 `django-admin.py startproject django_example` 指令。
|
||||
由于 web 服务所使用的镜像并不存在,所以 Compose 会首先使用 `Dockerfile` 为 web 服务构建一个镜像,接着使用这个镜像在容器里运行 `django-admin startproject django_example` 指令。
|
||||
|
||||
这将在当前目录生成一个 `Django` 应用。
|
||||
|
||||
@@ -67,7 +67,7 @@ Dockerfile docker-compose.yml django_example manage.py
|
||||
如果你的系统是 Linux,记得更改文件权限。
|
||||
|
||||
```bash
|
||||
sudo chown -R $USER:$USER .
|
||||
$ sudo chown -R $USER:$USER .
|
||||
```
|
||||
|
||||
首先,我们要为应用设置好数据库的连接信息。用以下内容替换 `django_example/settings.py` 文件中 `DATABASES = ...` 定义的节点内容。
|
||||
|
||||
@@ -4,14 +4,12 @@
|
||||
|
||||
`Compose` 可以通过 Python 的包管理工具 `pip` 进行安装,也可以直接下载编译好的二进制文件使用,甚至能够直接在 Docker 容器中运行。
|
||||
|
||||
前两种方式是传统方式,适合本地环境下安装使用;最后一种方式则不破坏系统环境,更适合云计算场景。
|
||||
|
||||
`Docker for Mac` 、`Docker for Windows` 自带 `docker-compose` 二进制文件,安装 Docker 之后可以直接使用。
|
||||
`Docker Desktop for Mac/Windows` 自带 `docker-compose` 二进制文件,安装 Docker 之后可以直接使用。
|
||||
|
||||
```bash
|
||||
$ docker-compose --version
|
||||
|
||||
docker-compose version 1.17.1, build 6d101fb
|
||||
docker-compose version 1.24.1, build 4667896b
|
||||
```
|
||||
|
||||
Linux 系统请使用以下介绍的方法安装。
|
||||
@@ -23,7 +21,8 @@ Linux 系统请使用以下介绍的方法安装。
|
||||
例如,在 Linux 64 位系统上直接下载对应的二进制包。
|
||||
|
||||
```bash
|
||||
$ sudo curl -L https://github.com/docker/compose/releases/download/1.17.1/docker-compose-`uname -s`-`uname -m` > /usr/local/bin/docker-compose
|
||||
$ sudo curl -L https://github.com/docker/compose/releases/download/1.24.1/docker-compose-`uname -s`-`uname -m` > /usr/local/bin/docker-compose
|
||||
|
||||
$ sudo chmod +x /usr/local/bin/docker-compose
|
||||
```
|
||||
|
||||
@@ -43,7 +42,7 @@ $ sudo pip install -U docker-compose
|
||||
|
||||
```bash
|
||||
Collecting docker-compose
|
||||
Downloading docker-compose-1.17.1.tar.gz (149kB): 149kB downloaded
|
||||
Downloading docker-compose-1.24.1.tar.gz (149kB): 149kB downloaded
|
||||
...
|
||||
Successfully installed docker-compose cached-property requests texttable websocket-client docker-py dockerpty six enum34 backports.ssl-match-hostname ipaddress
|
||||
```
|
||||
@@ -51,66 +50,9 @@ Successfully installed docker-compose cached-property requests texttable websock
|
||||
### bash 补全命令
|
||||
|
||||
```bash
|
||||
$ curl -L https://raw.githubusercontent.com/docker/compose/1.8.0/contrib/completion/bash/docker-compose > /etc/bash_completion.d/docker-compose
|
||||
$ curl -L https://raw.githubusercontent.com/docker/compose/1.24.1/contrib/completion/bash/docker-compose > /etc/bash_completion.d/docker-compose
|
||||
```
|
||||
|
||||
### 容器中执行
|
||||
|
||||
Compose 既然是一个 Python 应用,自然也可以直接用容器来执行它。
|
||||
|
||||
```bash
|
||||
$ curl -L https://github.com/docker/compose/releases/download/1.8.0/run.sh > /usr/local/bin/docker-compose
|
||||
$ chmod +x /usr/local/bin/docker-compose
|
||||
```
|
||||
|
||||
实际上,查看下载的 `run.sh` 脚本内容,如下
|
||||
|
||||
```bash
|
||||
set -e
|
||||
|
||||
VERSION="1.8.0"
|
||||
IMAGE="docker/compose:$VERSION"
|
||||
|
||||
|
||||
# Setup options for connecting to docker host
|
||||
if [ -z "$DOCKER_HOST" ]; then
|
||||
DOCKER_HOST="/var/run/docker.sock"
|
||||
fi
|
||||
if [ -S "$DOCKER_HOST" ]; then
|
||||
DOCKER_ADDR="-v $DOCKER_HOST:$DOCKER_HOST -e DOCKER_HOST"
|
||||
else
|
||||
DOCKER_ADDR="-e DOCKER_HOST -e DOCKER_TLS_VERIFY -e DOCKER_CERT_PATH"
|
||||
fi
|
||||
|
||||
|
||||
# Setup volume mounts for compose config and context
|
||||
if [ "$(pwd)" != '/' ]; then
|
||||
VOLUMES="-v $(pwd):$(pwd)"
|
||||
fi
|
||||
if [ -n "$COMPOSE_FILE" ]; then
|
||||
compose_dir=$(dirname $COMPOSE_FILE)
|
||||
fi
|
||||
# TODO: also check --file argument
|
||||
if [ -n "$compose_dir" ]; then
|
||||
VOLUMES="$VOLUMES -v $compose_dir:$compose_dir"
|
||||
fi
|
||||
if [ -n "$HOME" ]; then
|
||||
VOLUMES="$VOLUMES -v $HOME:$HOME -v $HOME:/root" # mount $HOME in /root to share docker.config
|
||||
fi
|
||||
|
||||
# Only allocate tty if we detect one
|
||||
if [ -t 1 ]; then
|
||||
DOCKER_RUN_OPTIONS="-t"
|
||||
fi
|
||||
if [ -t 0 ]; then
|
||||
DOCKER_RUN_OPTIONS="$DOCKER_RUN_OPTIONS -i"
|
||||
fi
|
||||
|
||||
exec docker run --rm $DOCKER_RUN_OPTIONS $DOCKER_ADDR $COMPOSE_OPTIONS $VOLUMES -w "$(pwd)" $IMAGE "$@"
|
||||
```
|
||||
|
||||
可以看到,它其实是下载了 `docker/compose` 镜像并运行。
|
||||
|
||||
### 卸载
|
||||
|
||||
如果是二进制包方式安装的,删除二进制文件即可。
|
||||
|
||||
@@ -1,6 +1,6 @@
|
||||
## 使用 Rails
|
||||
|
||||
本小节内容适合 `Ruby` 开发人员阅读。
|
||||
> 本小节内容适合 `Ruby` 开发人员阅读。
|
||||
|
||||
我们现在将使用 `Compose` 配置并运行一个 `Rails/PostgreSQL` 应用。
|
||||
|
||||
@@ -17,13 +17,16 @@ ADD Gemfile /myapp/Gemfile
|
||||
RUN bundle install
|
||||
ADD . /myapp
|
||||
```
|
||||
以上内容指定应用将使用安装了 Ruby、Bundler 以及其依赖件的镜像。更多关于如何编写 Dockerfile 文件的信息可以查看 [镜像创建](../image/create.md#利用 Dockerfile 来创建镜像) 和 [Dockerfile 使用](../dockerfile/README.md)。
|
||||
|
||||
以上内容指定应用将使用安装了 Ruby、Bundler 以及其依赖件的镜像。更多关于如何编写 Dockerfile 文件的信息可以查看 [Dockerfile 使用](../image/dockerfile/README.md)。
|
||||
|
||||
下一步,我们需要一个引导加载 Rails 的文件 `Gemfile` 。 等一会儿它还会被 `rails new` 命令覆盖重写。
|
||||
|
||||
```bash
|
||||
source 'https://rubygems.org'
|
||||
gem 'rails', '4.0.2'
|
||||
```
|
||||
|
||||
最后,`docker-compose.yml` 文件才是最神奇的地方。 `docker-compose.yml` 文件将把所有的东西关联起来。它描述了应用的构成(一个 web 服务和一个数据库)、每个镜像的来源(数据库运行在使用预定义的 PostgreSQL 镜像,web 应用侧将从本地目录创建)、镜像之间的连接,以及服务开放的端口。
|
||||
|
||||
```yaml
|
||||
@@ -45,11 +48,13 @@ services:
|
||||
links:
|
||||
- db
|
||||
```
|
||||
|
||||
所有文件就绪后,我们就可以通过使用 `docker-compose run` 命令生成应用的骨架了。
|
||||
|
||||
```bash
|
||||
$ docker-compose run web rails new . --force --database=postgresql --skip-bundle
|
||||
```
|
||||
|
||||
`Compose` 会先使用 `Dockerfile` 为 web 服务创建一个镜像,接着使用这个镜像在容器里运行 `rails new ` 和它之后的命令。一旦这个命令运行完后,应该就可以看一个崭新的应用已经生成了。
|
||||
|
||||
```bash
|
||||
@@ -60,16 +65,19 @@ Gemfile.lock condocker-compose log
|
||||
README.rdoc condocker-compose.ru public
|
||||
Rakefile db test
|
||||
```
|
||||
|
||||
在新的 `Gemfile` 文件去掉加载 `therubyracer` 的行的注释,这样我们便可以使用 Javascript 运行环境:
|
||||
|
||||
```bash
|
||||
gem 'therubyracer', platforms: :ruby
|
||||
```
|
||||
|
||||
现在我们已经有一个新的 `Gemfile` 文件,需要再重新创建镜像。(这个会步骤会改变 Dockerfile 文件本身,所以需要重建一次)。
|
||||
|
||||
```bash
|
||||
$ docker-compose build
|
||||
```
|
||||
|
||||
应用现在就可以启动了,但配置还未完成。Rails 默认读取的数据库目标是 `localhost` ,我们需要手动指定容器的 `db` 。同样的,还需要把用户名修改成和 postgres 镜像预定的一致。
|
||||
打开最新生成的 `database.yml` 文件。用以下内容替换:
|
||||
|
||||
@@ -87,11 +95,13 @@ test:
|
||||
<<: *default
|
||||
database: myapp_test
|
||||
```
|
||||
|
||||
现在就可以启动应用了。
|
||||
|
||||
```bash
|
||||
$ docker-compose up
|
||||
```
|
||||
|
||||
如果一切正常,你应该可以看到 PostgreSQL 的输出,几秒后可以看到这样的重复信息:
|
||||
|
||||
```bash
|
||||
@@ -99,11 +109,13 @@ myapp_web_1 | [2014-01-17 17:16:29] INFO WEBrick 1.3.1
|
||||
myapp_web_1 | [2014-01-17 17:16:29] INFO ruby 2.0.0 (2013-11-22) [x86_64-linux-gnu]
|
||||
myapp_web_1 | [2014-01-17 17:16:29] INFO WEBrick::HTTPServer#start: pid=1 port=3000
|
||||
```
|
||||
|
||||
最后, 我们需要做的是创建数据库,打开另一个终端,运行:
|
||||
|
||||
```bash
|
||||
$ docker-compose run web rake db:create
|
||||
```
|
||||
|
||||
这个 web 应用已经开始在你的 docker 守护进程里面监听着 3000 端口了。
|
||||
|
||||

|
||||
|
||||
@@ -1,6 +1,6 @@
|
||||
## 使用 WordPress
|
||||
|
||||
本小节内容适合 `PHP` 开发人员阅读。
|
||||
> 本小节内容适合 `PHP` 开发人员阅读。
|
||||
|
||||
`Compose` 可以很便捷的让 `Wordpress` 运行在一个独立的环境中。
|
||||
|
||||
@@ -17,7 +17,11 @@ version: "3"
|
||||
services:
|
||||
|
||||
db:
|
||||
image: mysql:5.7
|
||||
image: mysql:8.0
|
||||
command:
|
||||
- --default_authentication_plugin=mysql_native_password
|
||||
- --character-set-server=utf8mb4
|
||||
- --collation-server=utf8mb4_unicode_ci
|
||||
volumes:
|
||||
- db_data:/var/lib/mysql
|
||||
restart: always
|
||||
|
||||
@@ -6,7 +6,7 @@
|
||||
|
||||
### `attach` 命令
|
||||
|
||||
`docker attach` 是 Docker 自带的命令。下面示例如何使用该命令。
|
||||
下面示例如何使用 `docker attach` 命令。
|
||||
|
||||
```bash
|
||||
$ docker run -dit ubuntu
|
||||
|
||||
@@ -4,4 +4,4 @@ CoreOS 的设计是为你提供能够像谷歌一样的大型互联网公司一
|
||||
|
||||
CoreOS 的安装文件和运行依赖非常小,它提供了精简的 Linux 系统。它使用 Linux 容器在更高的抽象层来管理你的服务,而不是通过常规的 YUM 和 APT 来安装包。
|
||||
|
||||
同时,CoreOS 几乎可以运行在任何平台:VirtualBox, Amazon EC2, QEMU/KVM, VMware 和 OpenStack 等等,甚至你所使用的硬件环境。
|
||||
同时,CoreOS 几乎可以运行在任何平台:`VirtualBox`, `Amazon EC2`, `QEMU/KVM`, `VMware` 和 `OpenStack` 等 。
|
||||
|
||||
@@ -1,8 +1,6 @@
|
||||
# CoreOS 介绍
|
||||
|
||||
提起 Docker,我们不得不提的就是 [CoreOS](https://coreos.com/).
|
||||
|
||||
CoreOS 对 Docker 甚至容器技术的发展都带来了巨大的推动作用。其提供了运行现代基础设施的特性,支持大规模服务部署,使得在基于最小化的现代操作系统上构建规模化的计算仓库成为了可能。
|
||||
[CoreOS](https://coreos.com/) 对 Docker 甚至容器技术的发展都带来了巨大的推动作用。其提供了运行现代基础设施的特性,支持大规模服务部署,使得在基于最小化的现代操作系统上构建规模化的计算仓库成为了可能。
|
||||
|
||||
# CoreOS 特性
|
||||
|
||||
@@ -30,4 +28,4 @@ CoreOS 可以在一个机器上很好地运行,但是它被设计用来搭建
|
||||
|
||||
## 服务发现
|
||||
|
||||
很容易定位服务在集群的那里运行并当发生变化时进行通知。它是复杂高动态集群必不可少的。在 CoreOS 中构建高可用和自动故障负载。
|
||||
很容易定位服务在集群的那里运行并当发生变化时进行通知。它是复杂高动态集群必不可少的。
|
||||
|
||||
@@ -6,17 +6,8 @@
|
||||
|
||||
`CoreOS` 的第一个重要组件就是使用 `etcd` 来实现的服务发现。在 `CoreOS` 中 `etcd` 默认以 `rkt` 容器方式运行。
|
||||
|
||||
```bash
|
||||
$ rkt list
|
||||
|
||||
UUID APP IMAGE NAME STATE CREATED STARTED NETWORKS
|
||||
57581644 etcd quay.io/coreos/etcd:v3.2.10 running 1 minute ago 1 minute ago
|
||||
```
|
||||
|
||||
`etcd` 使用方法请查看 [etcd 章节](../etcd/)。
|
||||
`etcd` 使用方法请查看 [etcd 章节](../etcd/)。
|
||||
|
||||
## 容器管理
|
||||
|
||||
第二个组件就是 `Docker`,它用来运行你的代码和应用。`CoreOS` 内置 `Docker`,具体使用请参考本书其他章节。
|
||||
|
||||
`CoreOS` 也内置了由自己开发的容器 `Rkt`,`Rkt` 不属于本书的讨论范围,这里不再赘述。
|
||||
|
||||
@@ -1,85 +0,0 @@
|
||||
# 快速搭建 CoreOS 集群
|
||||
|
||||
在这里我们要搭建一个集群环境,毕竟单机环境没有什么挑战不是?
|
||||
|
||||
然后为了在你的电脑运行一个集群环境,我们使用 Vagrant。
|
||||
|
||||
*Vagrant 的使用这里不再阐述,请自行学习*
|
||||
|
||||
如果你第一次接触 CoreOS 这样的分布式平台,运行一个集群看起来好像一个很复杂的任务,这里我们给你展示在本地快速搭建一个 CoreOS 集群环境是多么的容易。
|
||||
|
||||
## 准备工作
|
||||
|
||||
首先要确认在你本地的机器上已经安装了最新版本的 Virtualbox, Vagrant 和 git。
|
||||
|
||||
这是我们可以在本地模拟集群环境的前提条件,如果你已经拥有,请继续,否则自行搜索学习。
|
||||
|
||||
## 配置工作
|
||||
|
||||
从 CoreOS 官方代码库获取基本配置,并进行修改
|
||||
|
||||
首先,获取模板配置文件
|
||||
|
||||
```bash
|
||||
$ git clone https://github.com/coreos/coreos-vagrant
|
||||
$ cd coreos-vagrant
|
||||
$ cp user-data.sample user-data
|
||||
```
|
||||
|
||||
获取新的 token
|
||||
|
||||
```bash
|
||||
$ curl https://discovery.etcd.io/new
|
||||
```
|
||||
|
||||
把获取的 token 放到 user-data 文件中,示例如下:
|
||||
|
||||
```yml
|
||||
#cloud-config
|
||||
|
||||
coreos:
|
||||
etcd:
|
||||
discovery: https://discovery.etcd.io/<token>
|
||||
```
|
||||
|
||||
## 启动集群
|
||||
|
||||
默认情况下,CoreOS Vagrantfile 将会启动单机。
|
||||
|
||||
我们需要复制并修改 config.rb.sample 文件.
|
||||
|
||||
复制文件
|
||||
|
||||
```bash
|
||||
cp config.rb.sample config.rb
|
||||
```
|
||||
|
||||
修改集群配置参数 num_instances为3。
|
||||
|
||||
启动集群
|
||||
|
||||
```bash
|
||||
vagrant up
|
||||
=>
|
||||
Bringing machine 'core-01' up with 'virtualbox' provider...
|
||||
Bringing machine 'core-02' up with 'virtualbox' provider...
|
||||
Bringing machine 'core-03' up with 'virtualbox' provider...
|
||||
==> core-01: Box 'coreos-alpha' could not be found. Attempting to find and install...
|
||||
core-01: Box Provider: virtualbox
|
||||
core-01: Box Version: >= 0
|
||||
==> core-01: Adding box 'coreos-alpha' (v0) for provider: virtualbox
|
||||
core-01: Downloading: http://storage.core-os.net/coreos/amd64-usr/alpha/coreos_production_vagrant.box
|
||||
core-01: Progress: 46% (Rate: 6105k/s, Estimated time remaining: 0:00:16)
|
||||
```
|
||||
|
||||
添加 ssh 的公匙
|
||||
|
||||
```bash
|
||||
ssh-add ~/.vagrant.d/insecure_private_key
|
||||
```
|
||||
|
||||
连接集群中的第一台机器
|
||||
|
||||
```bash
|
||||
vagrant ssh core-01 -- -A
|
||||
```
|
||||
@@ -69,7 +69,7 @@ $ docker run --rm -it \
|
||||
|
||||
root@2affd44b4667:/# history
|
||||
1 ls
|
||||
2 diskutil list
|
||||
2 diskutil list
|
||||
```
|
||||
|
||||
这样就可以记录在容器输入过的命令了。
|
||||
|
||||
@@ -1,8 +1,8 @@
|
||||
version: "3"
|
||||
|
||||
services:
|
||||
|
||||
# $ docker-compose up server => up a server,Only Support Linux or macOS
|
||||
|
||||
server:
|
||||
image: yeasy/docker_practice:latest
|
||||
ports:
|
||||
@@ -19,13 +19,10 @@ services:
|
||||
- ./:/srv/gitbook-src
|
||||
command: build
|
||||
|
||||
# $ docker run -it --rm -p 4000:80 dockerpracticecn/docker_practice
|
||||
|
||||
# $ docker up offline
|
||||
|
||||
# $ docker run -it --rm -p 4000:80 dockerpracticesig/docker_practice
|
||||
offline:
|
||||
# this image build by travis ci
|
||||
image: dockerpracticecn/docker_practice
|
||||
image: dockerpracticesig/docker_practice
|
||||
ports:
|
||||
- 4000:80
|
||||
|
||||
|
||||
@@ -9,12 +9,12 @@ version: "3.6"
|
||||
services:
|
||||
|
||||
node1:
|
||||
image: quay.io/coreos/etcd
|
||||
image: quay.io/coreos/etcd:v3.4.0
|
||||
volumes:
|
||||
- node1-data:/etcd-data
|
||||
expose:
|
||||
- 2379
|
||||
- 2380
|
||||
- 2380
|
||||
networks:
|
||||
cluster_net:
|
||||
ipv4_address: 172.16.238.100
|
||||
@@ -41,7 +41,7 @@ services:
|
||||
- docker-etcd
|
||||
|
||||
node2:
|
||||
image: quay.io/coreos/etcd
|
||||
image: quay.io/coreos/etcd:v3.4.0
|
||||
volumes:
|
||||
- node2-data:/etcd-data
|
||||
networks:
|
||||
@@ -73,7 +73,7 @@ services:
|
||||
- docker-etcd
|
||||
|
||||
node3:
|
||||
image: quay.io/coreos/etcd
|
||||
image: quay.io/coreos/etcd:v3.4.0
|
||||
volumes:
|
||||
- node3-data:/etcd-data
|
||||
networks:
|
||||
|
||||
@@ -2,12 +2,12 @@ version: "3.6"
|
||||
services:
|
||||
|
||||
node1:
|
||||
image: quay.io/coreos/etcd
|
||||
image: quay.io/coreos/etcd:v3.4.0
|
||||
volumes:
|
||||
- node1-data:/etcd-data
|
||||
expose:
|
||||
- 2379
|
||||
- 2380
|
||||
- 2380
|
||||
networks:
|
||||
cluster_net:
|
||||
ipv4_address: 172.16.238.100
|
||||
@@ -34,7 +34,7 @@ services:
|
||||
- docker-etcd
|
||||
|
||||
node2:
|
||||
image: quay.io/coreos/etcd
|
||||
image: quay.io/coreos/etcd:v3.4.0
|
||||
volumes:
|
||||
- node2-data:/etcd-data
|
||||
networks:
|
||||
@@ -66,7 +66,7 @@ services:
|
||||
- docker-etcd
|
||||
|
||||
node3:
|
||||
image: quay.io/coreos/etcd
|
||||
image: quay.io/coreos/etcd:v3.4.0
|
||||
volumes:
|
||||
- node3-data:/etcd-data
|
||||
networks:
|
||||
|
||||
@@ -2,7 +2,7 @@
|
||||
|
||||
`etcdctl` 是一个命令行客户端,它能提供一些简洁的命令,供用户直接跟 `etcd` 服务打交道,而无需基于 `HTTP API` 方式。这在某些情况下将很方便,例如用户对服务进行测试或者手动修改数据库内容。我们也推荐在刚接触 `etcd` 时通过 `etcdctl` 命令来熟悉相关的操作,这些操作跟 `HTTP API` 实际上是对应的。
|
||||
|
||||
`etcd` 项目二进制发行包中已经包含了 `etcdctl` 工具,没有的话,可以从 [github.com/coreos/etcd/releases](https://github.com/coreos/etcd/releases) 下载。
|
||||
`etcd` 项目二进制发行包中已经包含了 `etcdctl` 工具,没有的话,可以从 [github.com/etcd-io/etcd/releases](https://github.com/etcd-io/etcd/releases) 下载。
|
||||
|
||||
`etcdctl` 支持如下的命令,大体上分为数据库操作和非数据库操作两类,后面将分别进行解释。
|
||||
|
||||
|
||||
@@ -2,7 +2,7 @@
|
||||
|
||||
`etcdctl` 是一个命令行客户端,它能提供一些简洁的命令,供用户直接跟 `etcd` 服务打交道,而无需基于 `HTTP API` 方式。这在某些情况下将很方便,例如用户对服务进行测试或者手动修改数据库内容。我们也推荐在刚接触 `etcd` 时通过 `etcdctl` 命令来熟悉相关的操作,这些操作跟 `HTTP API` 实际上是对应的。
|
||||
|
||||
`etcd` 项目二进制发行包中已经包含了 `etcdctl` 工具,没有的话,可以从 [github.com/coreos/etcd/releases](https://github.com/coreos/etcd/releases) 下载。
|
||||
`etcd` 项目二进制发行包中已经包含了 `etcdctl` 工具,没有的话,可以从 [github.com/etcd-io/etcd/releases](https://github.com/etcd-io/etcd/releases) 下载。
|
||||
|
||||
`etcdctl` 支持如下的命令,大体上分为数据库操作和非数据库操作两类,后面将分别进行解释。
|
||||
|
||||
@@ -14,10 +14,10 @@ USAGE:
|
||||
etcdctl
|
||||
|
||||
VERSION:
|
||||
3.2.10
|
||||
3.4.0
|
||||
|
||||
API VERSION:
|
||||
3.2
|
||||
3.4
|
||||
|
||||
|
||||
COMMANDS:
|
||||
|
||||
@@ -1,19 +1,19 @@
|
||||
## 安装
|
||||
|
||||
`etcd` 基于 `Go` 语言实现,因此,用户可以从 [项目主页](https://github.com/coreos/etcd) 下载源代码自行编译,也可以下载编译好的二进制文件,甚至直接使用制作好的 `Docker` 镜像文件来体验。
|
||||
`etcd` 基于 `Go` 语言实现,因此,用户可以从 [项目主页](https://github.com/etcd-io/etcd) 下载源代码自行编译,也可以下载编译好的二进制文件,甚至直接使用制作好的 `Docker` 镜像文件来体验。
|
||||
|
||||
>注意:本章节内容基于 etcd `3.x` 版本
|
||||
>注意:本章节内容基于 etcd `3.4.x` 版本
|
||||
|
||||
### 二进制文件方式下载
|
||||
|
||||
编译好的二进制文件都在 [github.com/coreos/etcd/releases](https://github.com/coreos/etcd/releases/) 页面,用户可以选择需要的版本,或通过下载工具下载。
|
||||
编译好的二进制文件都在 [github.com/etcd-io/etcd/releases](https://github.com/etcd-io/etcd/releases/) 页面,用户可以选择需要的版本,或通过下载工具下载。
|
||||
|
||||
例如,使用 `curl` 工具下载压缩包,并解压。
|
||||
|
||||
```bash
|
||||
$ curl -L https://github.com/coreos/etcd/releases/download/v3.2.10/etcd-v3.2.10-linux-amd64.tar.gz -o etcd-v3.2.10-linux-amd64.tar.gz
|
||||
$ tar xzvf etcd-v3.2.10-linux-amd64.tar.gz
|
||||
$ cd etcd-v3.2.10-linux-amd64
|
||||
$ curl -L https://github.com/etcd-io/etcd/releases/download/v3.4.0/etcd-v3.4.0-linux-amd64.tar.gz -o etcd-v3.4.0-linux-amd64.tar.gz
|
||||
$ tar xzvf etcd-v3.4.0-linux-amd64.tar.gz
|
||||
$ cd etcd-v3.4.0-linux-amd64
|
||||
```
|
||||
|
||||
解压后,可以看到文件包括
|
||||
@@ -35,14 +35,7 @@ $ sudo cp etcd* /usr/local/bin/
|
||||
|
||||
```bash
|
||||
$ etcd
|
||||
2017-12-03 11:18:34.406082 I | etcdmain: etcd Version: 3.2.10
|
||||
2017-12-03 11:18:34.406226 I | etcdmain: Git SHA: GitNotFound
|
||||
2017-12-03 11:18:34.406235 I | etcdmain: Go Version: go1.9.2
|
||||
2017-12-03 11:18:34.406242 I | etcdmain: Go OS/Arch: darwin/amd64
|
||||
2017-12-03 11:18:34.406250 I | etcdmain: setting maximum number of CPUs to 4, total number of available CPUs is 4
|
||||
2017-12-03 11:18:34.406265 N | etcdmain: failed to detect default host (default host not supported on darwin_amd64)
|
||||
2017-12-03 11:18:34.406279 W | etcdmain: no data-dir provided, using default data-dir ./default.etcd
|
||||
2017-12-03 11:18:34.406457 N | etcdmain: the server is already initialized as member before, starting as etcd member...
|
||||
...
|
||||
2017-12-03 11:18:34.411579 I | embed: listening for peers on http://localhost:2380
|
||||
2017-12-03 11:18:34.411938 I | embed: listening for client requests on localhost:2379
|
||||
```
|
||||
@@ -68,22 +61,27 @@ hello world
|
||||
镜像名称为 `quay.io/coreos/etcd`,可以通过下面的命令启动 `etcd` 服务监听到 `2379` 和 `2380` 端口。
|
||||
|
||||
```bash
|
||||
$ export NODE1=192.168.1.21
|
||||
|
||||
$ docker run --name etcd \
|
||||
-p 2379:2379 \
|
||||
-p 2380:2380 \
|
||||
--volume=etcd-data:/etcd-data \
|
||||
quay.io/coreos/etcd:latest \
|
||||
/usr/local/bin/etcd \
|
||||
--data-dir=/etcd-data --name node1 \
|
||||
--initial-advertise-peer-urls http://${NODE1}:2380 --listen-peer-urls http://0.0.0.0:2380 \
|
||||
--advertise-client-urls http://${NODE1}:2379 --listen-client-urls http://0.0.0.0:2379 \
|
||||
--initial-cluster node1=http://${NODE1}:2380
|
||||
$ docker run \
|
||||
-p 2379:2379 \
|
||||
-p 2380:2380 \
|
||||
--mount type=bind,source=/tmp/etcd-data.tmp,destination=/etcd-data \
|
||||
--name etcd-gcr-v3.4.0 \
|
||||
quay.io/coreos/etcd:v3.4.0 \
|
||||
/usr/local/bin/etcd \
|
||||
--name s1 \
|
||||
--data-dir /etcd-data \
|
||||
--listen-client-urls http://0.0.0.0:2379 \
|
||||
--advertise-client-urls http://0.0.0.0:2379 \
|
||||
--listen-peer-urls http://0.0.0.0:2380 \
|
||||
--initial-advertise-peer-urls http://0.0.0.0:2380 \
|
||||
--initial-cluster s1=http://0.0.0.0:2380 \
|
||||
--initial-cluster-token tkn \
|
||||
--initial-cluster-state new \
|
||||
--log-level info \
|
||||
--logger zap \
|
||||
--log-outputs stderr
|
||||
```
|
||||
|
||||
>注意:etcd 官方标注 `quay.io/coreos/etcd` 即将废弃,启用新的 `gcr.io/etcd-development/etcd` 镜像,但后者由于网络原因,国内不能下载到该镜像,这里仍然使用前者作为演示。
|
||||
|
||||
打开新的终端按照上一步的方法测试 `etcd` 是否成功启动。
|
||||
|
||||
### macOS 中运行
|
||||
|
||||
@@ -4,9 +4,9 @@
|
||||
|
||||
`etcd` 是 `CoreOS` 团队于 2013 年 6 月发起的开源项目,它的目标是构建一个高可用的分布式键值(`key-value`)数据库,基于 `Go` 语言实现。我们知道,在分布式系统中,各种服务的配置信息的管理分享,服务的发现是一个很基本同时也是很重要的问题。`CoreOS` 项目就希望基于 `etcd` 来解决这一问题。
|
||||
|
||||
`etcd` 目前在 [github.com/coreos/etcd](https://github.com/coreos/etcd) 进行维护。
|
||||
`etcd` 目前在 [github.com/etcd-io/etcd](https://github.com/etcd-io/etcd) 进行维护。
|
||||
|
||||
受到 [Apache ZooKeeper](http://zookeeper.apache.org/) 项目和 [doozer](https://github.com/ha/doozerd) 项目的启发,`etcd` 在设计的时候重点考虑了下面四个要素:
|
||||
受到 [Apache ZooKeeper](https://zookeeper.apache.org/) 项目和 [doozer](https://github.com/ha/doozerd) 项目的启发,`etcd` 在设计的时候重点考虑了下面四个要素:
|
||||
|
||||
* 简单:具有定义良好、面向用户的 `API` ([gRPC](https://github.com/grpc/grpc))
|
||||
|
||||
|
||||
@@ -1,13 +1,13 @@
|
||||
# 使用 Docker 镜像
|
||||
# Use Docker Images
|
||||
|
||||
在之前的介绍中,我们知道镜像是 Docker 的三大组件之一。
|
||||
As we have introduced before, `image` is one of the 3 major components of Docker.
|
||||
|
||||
Docker 运行容器前需要本地存在对应的镜像,如果本地不存在该镜像,Docker 会从镜像仓库下载该镜像。
|
||||
Upon running docker container, it can run local image or if the image is not locally available, it will download from a registry.
|
||||
|
||||
本章将介绍更多关于镜像的内容,包括:
|
||||
In this chapter we will introduce more about `image`, including
|
||||
|
||||
* 从仓库获取镜像;
|
||||
* Pull images from registry
|
||||
|
||||
* 管理本地主机上的镜像;
|
||||
* Manage local images
|
||||
|
||||
* 介绍镜像实现的基本原理。
|
||||
* The mechanisms and implementaion of images
|
||||
|
||||
@@ -2,7 +2,7 @@
|
||||
|
||||
从刚才的 `docker commit` 的学习中,我们可以了解到,镜像的定制实际上就是定制每一层所添加的配置、文件。如果我们可以把每一层修改、安装、构建、操作的命令都写入一个脚本,用这个脚本来构建、定制镜像,那么之前提及的无法重复的问题、镜像构建透明性的问题、体积的问题就都会解决。这个脚本就是 Dockerfile。
|
||||
|
||||
Dockerfile 是一个文本文件,其内包含了一条条的**指令(Instruction)**,每一条指令构建一层,因此每一条指令的内容,就是描述该层应当如何构建。
|
||||
Dockerfile 是一个文本文件,其内包含了一条条的 **指令(Instruction)**,每一条指令构建一层,因此每一条指令的内容,就是描述该层应当如何构建。
|
||||
|
||||
还以之前定制 `nginx` 镜像为例,这次我们使用 Dockerfile 来定制。
|
||||
|
||||
@@ -25,7 +25,7 @@ RUN echo '<h1>Hello, Docker!</h1>' > /usr/share/nginx/html/index.html
|
||||
|
||||
### FROM 指定基础镜像
|
||||
|
||||
所谓定制镜像,那一定是以一个镜像为基础,在其上进行定制。就像我们之前运行了一个 `nginx` 镜像的容器,再进行修改一样,基础镜像是必须指定的。而 `FROM` 就是指定**基础镜像**,因此一个 `Dockerfile` 中 `FROM` 是必备的指令,并且必须是第一条指令。
|
||||
所谓定制镜像,那一定是以一个镜像为基础,在其上进行定制。就像我们之前运行了一个 `nginx` 镜像的容器,再进行修改一样,基础镜像是必须指定的。而 `FROM` 就是指定 **基础镜像**,因此一个 `Dockerfile` 中 `FROM` 是必备的指令,并且必须是第一条指令。
|
||||
|
||||
在 [Docker Hub](https://hub.docker.com/search?q=&type=image&image_filter=official) 上有非常多的高质量的官方镜像,有可以直接拿来使用的服务类的镜像,如 [`nginx`](https://hub.docker.com/_/nginx/)、[`redis`](https://hub.docker.com/_/redis/)、[`mongo`](https://hub.docker.com/_/mongo/)、[`mysql`](https://hub.docker.com/_/mysql/)、[`httpd`](https://hub.docker.com/_/httpd/)、[`php`](https://hub.docker.com/_/php/)、[`tomcat`](https://hub.docker.com/_/tomcat/) 等;也有一些方便开发、构建、运行各种语言应用的镜像,如 [`node`](https://hub.docker.com/_/node)、[`openjdk`](https://hub.docker.com/_/openjdk/)、[`python`](https://hub.docker.com/_/python/)、[`ruby`](https://hub.docker.com/_/ruby/)、[`golang`](https://hub.docker.com/_/golang/) 等。可以在其中寻找一个最符合我们最终目标的镜像为基础镜像进行定制。
|
||||
|
||||
@@ -40,7 +40,7 @@ FROM scratch
|
||||
|
||||
如果你以 `scratch` 为基础镜像的话,意味着你不以任何镜像为基础,接下来所写的指令将作为镜像第一层开始存在。
|
||||
|
||||
不以任何系统为基础,直接将可执行文件复制进镜像的做法并不罕见,比如 [`swarm`](https://hub.docker.com/_/swarm/)、[`coreos/etcd`](https://quay.io/repository/coreos/etcd)。对于 Linux 下静态编译的程序来说,并不需要有操作系统提供运行时支持,所需的一切库都已经在可执行文件里了,因此直接 `FROM scratch` 会让镜像体积更加小巧。使用 [Go 语言](https://golang.org/) 开发的应用很多会使用这种方式来制作镜像,这也是为什么有人认为 Go 是特别适合容器微服务架构的语言的原因之一。
|
||||
不以任何系统为基础,直接将可执行文件复制进镜像的做法并不罕见,比如 [`swarm`](https://hub.docker.com/_/swarm/)、[`etcd`](https://quay.io/repository/coreos/etcd)。对于 Linux 下静态编译的程序来说,并不需要有操作系统提供运行时支持,所需的一切库都已经在可执行文件里了,因此直接 `FROM scratch` 会让镜像体积更加小巧。使用 [Go 语言](https://golang.org/) 开发的应用很多会使用这种方式来制作镜像,这也是为什么有人认为 Go 是特别适合容器微服务架构的语言的原因之一。
|
||||
|
||||
### RUN 执行命令
|
||||
|
||||
@@ -132,9 +132,9 @@ docker build [选项] <上下文路径/URL/->
|
||||
|
||||
### 镜像构建上下文(Context)
|
||||
|
||||
如果注意,会看到 `docker build` 命令最后有一个 `.`。`.` 表示当前目录,而 `Dockerfile` 就在当前目录,因此不少初学者以为这个路径是在指定 `Dockerfile` 所在路径,这么理解其实是不准确的。如果对应上面的命令格式,你可能会发现,这是在指定**上下文路径**。那么什么是上下文呢?
|
||||
如果注意,会看到 `docker build` 命令最后有一个 `.`。`.` 表示当前目录,而 `Dockerfile` 就在当前目录,因此不少初学者以为这个路径是在指定 `Dockerfile` 所在路径,这么理解其实是不准确的。如果对应上面的命令格式,你可能会发现,这是在指定 **上下文路径**。那么什么是上下文呢?
|
||||
|
||||
首先我们要理解 `docker build` 的工作原理。Docker 在运行时分为 Docker 引擎(也就是服务端守护进程)和客户端工具。Docker 的引擎提供了一组 REST API,被称为 [Docker Remote API](https://docs.docker.com/engine/reference/api/docker_remote_api/),而如 `docker` 命令这样的客户端工具,则是通过这组 API 与 Docker 引擎交互,从而完成各种功能。因此,虽然表面上我们好像是在本机执行各种 `docker` 功能,但实际上,一切都是使用的远程调用形式在服务端(Docker 引擎)完成。也因为这种 C/S 设计,让我们操作远程服务器的 Docker 引擎变得轻而易举。
|
||||
首先我们要理解 `docker build` 的工作原理。Docker 在运行时分为 Docker 引擎(也就是服务端守护进程)和客户端工具。Docker 的引擎提供了一组 REST API,被称为 [Docker Remote API](https://docs.docker.com/develop/sdk/),而如 `docker` 命令这样的客户端工具,则是通过这组 API 与 Docker 引擎交互,从而完成各种功能。因此,虽然表面上我们好像是在本机执行各种 `docker` 功能,但实际上,一切都是使用的远程调用形式在服务端(Docker 引擎)完成。也因为这种 C/S 设计,让我们操作远程服务器的 Docker 引擎变得轻而易举。
|
||||
|
||||
当我们进行镜像构建的时候,并非所有定制都会通过 `RUN` 指令完成,经常会需要将一些本地文件复制进镜像,比如通过 `COPY` 指令、`ADD` 指令等。而 `docker build` 命令构建镜像,其实并非在本地构建,而是在服务端,也就是 Docker 引擎中构建的。那么在这种客户端/服务端的架构中,如何才能让服务端获得本地文件呢?
|
||||
|
||||
|
||||
178
image/buildkit.md
Normal file
178
image/buildkit.md
Normal file
@@ -0,0 +1,178 @@
|
||||
## 使用 `BuildKit` 构建镜像
|
||||
|
||||
**BuildKit** 是下一代的镜像构建组件,在 https://github.com/moby/buildkit 开源。
|
||||
|
||||
**注意:如果您的镜像构建使用的是云服务商提供的镜像构建服务(Docker Hub 自动构建、腾讯云容器服务、阿里云容器服务等),由于上述服务提供商的 Docker 版本低于 18.09,BuildKit 无法使用,将造成镜像构建失败。建议使用 BuildKit 构建镜像时使用一个新的 Dockerfile 文件(例如 Dockerfile.buildkit)**
|
||||
|
||||
**注意:docker-compose build 命令暂时不支持 BuildKit**
|
||||
|
||||
下面介绍如何在 Docker CE 18.09+ 版本中使用 `BuildKit` 提供的 `Dockerfile` 新指令来更快、更安全的构建 Docker 镜像。
|
||||
|
||||
### 启用 `BuildKit`
|
||||
|
||||
启用 `BuildKit` 必须先设置 **环境变量**。
|
||||
|
||||
Linux、macOS 执行如下命令:
|
||||
|
||||
```bash
|
||||
$ export DOCKER_BUILDKIT=1
|
||||
```
|
||||
|
||||
Windows 执行如下命令:
|
||||
|
||||
```powershell
|
||||
$ set $env:DOCKER_BUILDKIT=1
|
||||
```
|
||||
|
||||
> 以上是设置环境变量的临时方法,若使环境变量永久生效请读者自行设置。
|
||||
|
||||
### `Dockerfile` 新增指令详解
|
||||
|
||||
启用 `BuildKit` 之后,我们可以使用下面几个新的指令来加快镜像构建。
|
||||
|
||||
#### `RUN --mount=type=cache`
|
||||
|
||||
目前,几乎所有的程序都会使用依赖管理工具,例如 `Go` 中的 `go mod`、`Node.js` 中的 `npm` 等等,当我们构建一个镜像时,往往会重复的从互联网中获取依赖包,难以缓存,大大降低了镜像的构建效率。
|
||||
|
||||
例如一个前端工程需要用到 `npm`:
|
||||
|
||||
```docker
|
||||
FROM node:alpine as builder
|
||||
|
||||
WORKDIR /app
|
||||
|
||||
COPY package.json /app/
|
||||
|
||||
RUN npm i --registry=https://registry.npm.taobao.org \
|
||||
&& rm -rf ~/.npm
|
||||
|
||||
COPY src /app/src
|
||||
|
||||
RUN npm run build
|
||||
|
||||
FROM nginx:alpine
|
||||
|
||||
COPY --from=builder /app/dist /app/dist
|
||||
```
|
||||
|
||||
使用多阶段构建,构建的镜像中只包含了目标文件夹 `dist`,但仍然存在一些问题,当 `package.json` 文件变动时,`RUN npm i && rm -rf ~/.npm` 这一层会重新执行,变更多次后,生成了大量的中间层镜像。
|
||||
|
||||
为解决这个问题,进一步的我们可以设想一个类似 **数据卷** 的功能,在镜像构建时把 `node_modules` 文件夹挂载上去,在构建完成后,这个 `node_modules` 文件夹会自动卸载,实际的镜像中并不包含 `node_modules` 这个文件夹,这样我们就省去了每次获取依赖的时间,大大增加了镜像构建效率,同时也避免了生成了大量的中间层镜像。
|
||||
|
||||
`BuildKit` 提供了 `RUN --mount=type=cache` 指令,可以实现上边的设想。
|
||||
|
||||
```docker
|
||||
# syntax = docker/dockerfile:experimental
|
||||
FROM node:alpine as builder
|
||||
|
||||
WORKDIR /app
|
||||
|
||||
COPY package.json /app/
|
||||
|
||||
RUN --mount=type=cache,target=/app/node_modules,id=my_app_npm_module,sharing=locked \
|
||||
--mount=type=cache,target=/root/.npm,id=npm_cache \
|
||||
npm i --registry=https://registry.npm.taobao.org
|
||||
|
||||
COPY src /app/src
|
||||
|
||||
RUN --mount=type=cache,target=/app/node_modules,id=my_app_npm_module,sharing=locked \
|
||||
# --mount=type=cache,target=/app/dist,id=my_app_dist,sharing=locked \
|
||||
npm run build
|
||||
|
||||
FROM nginx:alpine
|
||||
|
||||
# COPY --from=builder /app/dist /app/dist
|
||||
|
||||
# 为了更直观的说明 from 和 source 指令,这里使用 RUN 指令
|
||||
RUN --mount=type=cache,target=/tmp/dist,from=builder,source=/app/dist \
|
||||
# --mount=type=cache,target/tmp/dist,from=my_app_dist,sharing=locked \
|
||||
mkdir -p /app/dist && cp -r /tmp/dist/* /app/dist
|
||||
```
|
||||
|
||||
**由于 `BuildKit` 为实验特性,每个 `Dockerfile` 文件开头都必须加上如下指令**
|
||||
|
||||
```docker
|
||||
# syntax = docker/dockerfile:experimental
|
||||
```
|
||||
|
||||
第一个 `RUN` 指令执行后,`id` 为 `my_app_npm_module` 的缓存文件夹挂载到了 `/app/node_modules` 文件夹中。多次执行也不会产生多个中间层镜像。
|
||||
|
||||
第二个 `RUN` 指令执行时需要用到 `node_modules` 文件夹,`node_modules` 已经挂载,命令也可以正确执行。
|
||||
|
||||
第三个 `RUN` 指令将上一阶段产生的文件复制到指定位置,`from` 指明缓存的来源,这里 `builder` 表示缓存来源于构建的第一阶段,`source` 指明缓存来源的文件夹。
|
||||
|
||||
上面的 `Dockerfile` 中 `--mount=type=cache,...` 中指令作用如下:
|
||||
|
||||
|Option |Description|
|
||||
|---------------------|-----------|
|
||||
|`id` | `id` 设置一个标志,以便区分缓存。|
|
||||
|`target` (必填项) | 缓存的挂载目标文件夹。|
|
||||
|`ro`,`readonly` | 只读,缓存文件夹不能被写入。 |
|
||||
|`sharing` | 有 `shared` `private` `locked` 值可供选择。`sharing` 设置当一个缓存被多次使用时的表现,由于 `BuildKit` 支持并行构建,当多个步骤使用同一缓存时(同一 `id`)会发生冲突。`shared` 表示多个步骤可以同时读写,`private` 表示当多个步骤使用同一缓存时,每个步骤使用不同的缓存,`locked` 表示当一个步骤完成释放缓存后,后一个步骤才能继续使用该缓存。|
|
||||
|`from` | 缓存来源(构建阶段),不填写时为空文件夹。|
|
||||
|`source` | 来源的文件夹路径。|
|
||||
|
||||
#### `RUN --mount=type=bind`
|
||||
|
||||
该指令可以将一个镜像(或上一构建阶段)的文件挂载到指定位置。
|
||||
|
||||
```docker
|
||||
# syntax = docker/dockerfile:experimental
|
||||
RUN --mount=type=bind,from=php:alpine,source=/usr/local/bin/docker-php-entrypoint,target=/docker-php-entrypoint \
|
||||
cat /docker-php-entrypoint
|
||||
```
|
||||
|
||||
#### `RUN --mount=type=tmpfs`
|
||||
|
||||
该指令可以将一个 `tmpfs` 文件系统挂载到指定位置。
|
||||
|
||||
```docker
|
||||
# syntax = docker/dockerfile:experimental
|
||||
RUN --mount=type=tmpfs,target=/temp \
|
||||
mount | grep /temp
|
||||
```
|
||||
|
||||
#### `RUN --mount=type=secret`
|
||||
|
||||
该指令可以将一个文件挂载到指定位置。
|
||||
|
||||
```docker
|
||||
# syntax = docker/dockerfile:experimental
|
||||
RUN --mount=type=secret,id=aws,target=/root/.aws/credentials \
|
||||
cat /root/.aws/credentials
|
||||
```
|
||||
|
||||
```bash
|
||||
$ docker build -t test --secret id=aws,src=$HOME/.aws/credentials .
|
||||
```
|
||||
|
||||
#### `RUN --mount=type=ssh`
|
||||
|
||||
该指令可以挂载 `ssh` 密钥。
|
||||
|
||||
```docker
|
||||
# syntax = docker/dockerfile:experimental
|
||||
FROM alpine
|
||||
RUN apk add --no-cache openssh-client
|
||||
RUN mkdir -p -m 0700 ~/.ssh && ssh-keyscan gitlab.com >> ~/.ssh/known_hosts
|
||||
RUN --mount=type=ssh ssh git@gitlab.com | tee /hello
|
||||
```
|
||||
|
||||
```bash
|
||||
$ eval $(ssh-agent)
|
||||
$ ssh-add ~/.ssh/id_rsa
|
||||
(Input your passphrase here)
|
||||
$ docker build -t test --ssh default=$SSH_AUTH_SOCK .
|
||||
```
|
||||
|
||||
### 清理构建缓存
|
||||
|
||||
执行以下命令清理构建缓存
|
||||
|
||||
```bash
|
||||
$ docker builder prune
|
||||
```
|
||||
|
||||
### 官方文档
|
||||
|
||||
* https://github.com/moby/buildkit/blob/master/frontend/dockerfile/docs/experimental.md
|
||||
@@ -17,7 +17,7 @@ $ docker run --name webserver -d -p 80:80 nginx
|
||||
|
||||
这条命令会用 `nginx` 镜像启动一个容器,命名为 `webserver`,并且映射了 80 端口,这样我们可以用浏览器去访问这个 `nginx` 服务器。
|
||||
|
||||
如果是在 Linux 本机运行的 Docker,或者如果使用的是 Docker for Mac、Docker for Windows,那么可以直接访问:<http://localhost>;如果使用的是 Docker Toolbox,或者是在虚拟机、云服务器上安装的 Docker,则需要将 `localhost` 换为虚拟机地址或者实际云服务器地址。
|
||||
如果是在 Linux 本机运行的 Docker,或者如果使用的是 Docker Desktop for Mac/Windows,那么可以直接访问:<http://localhost>;如果使用的是 Docker Toolbox,或者是在虚拟机、云服务器上安装的 Docker,则需要将 `localhost` 换为虚拟机地址或者实际云服务器地址。
|
||||
|
||||
直接用浏览器访问的话,我们会看到默认的 Nginx 欢迎页面。
|
||||
|
||||
@@ -116,7 +116,7 @@ e43d811ce2f4 4 weeks ago /bin/sh -c #(nop) CMD ["nginx" "-g" "da
|
||||
docker run --name web2 -d -p 81:80 nginx:v2
|
||||
```
|
||||
|
||||
这里我们命名为新的服务为 `web2`,并且映射到 `81` 端口。如果是 Docker for Mac/Windows 或 Linux 桌面的话,我们就可以直接访问 <http://localhost:81> 看到结果,其内容应该和之前修改后的 `webserver` 一样。
|
||||
这里我们命名为新的服务为 `web2`,并且映射到 `81` 端口。如果是 Docker Desktop for Mac/Windows 或 Linux 桌面的话,我们就可以直接访问 <http://localhost:81> 看到结果,其内容应该和之前修改后的 `webserver` 一样。
|
||||
|
||||
至此,我们第一次完成了定制镜像,使用的是 `docker commit` 命令,手动操作给旧的镜像添加了新的一层,形成新的镜像,对镜像多层存储应该有了更直观的感觉。
|
||||
|
||||
@@ -126,6 +126,6 @@ docker run --name web2 -d -p 81:80 nginx:v2
|
||||
|
||||
首先,如果仔细观察之前的 `docker diff webserver` 的结果,你会发现除了真正想要修改的 `/usr/share/nginx/html/index.html` 文件外,由于命令的执行,还有很多文件被改动或添加了。这还仅仅是最简单的操作,如果是安装软件包、编译构建,那会有大量的无关内容被添加进来,如果不小心清理,将会导致镜像极为臃肿。
|
||||
|
||||
此外,使用 `docker commit` 意味着所有对镜像的操作都是黑箱操作,生成的镜像也被称为**黑箱镜像**,换句话说,就是除了制作镜像的人知道执行过什么命令、怎么生成的镜像,别人根本无从得知。而且,即使是这个制作镜像的人,过一段时间后也无法记清具体在操作的。虽然 `docker diff` 或许可以告诉得到一些线索,但是远远不到可以确保生成一致镜像的地步。这种黑箱镜像的维护工作是非常痛苦的。
|
||||
此外,使用 `docker commit` 意味着所有对镜像的操作都是黑箱操作,生成的镜像也被称为 **黑箱镜像**,换句话说,就是除了制作镜像的人知道执行过什么命令、怎么生成的镜像,别人根本无从得知。而且,即使是这个制作镜像的人,过一段时间后也无法记清具体在操作的。虽然 `docker diff` 或许可以告诉得到一些线索,但是远远不到可以确保生成一致镜像的地步。这种黑箱镜像的维护工作是非常痛苦的。
|
||||
|
||||
而且,回顾之前提及的镜像所使用的分层存储的概念,除当前层外,之前的每一层都是不会发生改变的,换句话说,任何修改的结果仅仅是在当前层进行标记、添加、修改,而不会改动上一层。如果使用 `docker commit` 制作镜像,以及后期修改的话,每一次修改都会让镜像更加臃肿一次,所删除的上一层的东西并不会丢失,会一直如影随形的跟着这个镜像,即使根本无法访问到。这会让镜像更加臃肿。
|
||||
|
||||
16
image/demo/buildkit/Dockerfile
Normal file
16
image/demo/buildkit/Dockerfile
Normal file
@@ -0,0 +1,16 @@
|
||||
FROM node:alpine as builder
|
||||
|
||||
WORKDIR /app
|
||||
|
||||
COPY package.json /app/
|
||||
|
||||
RUN npm i --registry=https://registry.npm.taobao.org \
|
||||
&& rm -rf ~/.npm
|
||||
|
||||
COPY src /app/src
|
||||
|
||||
RUN npm run build
|
||||
|
||||
FROM nginx:alpine
|
||||
|
||||
COPY --from=builder /app/dist /app/dist
|
||||
37
image/demo/buildkit/Dockerfile.buildkit
Normal file
37
image/demo/buildkit/Dockerfile.buildkit
Normal file
@@ -0,0 +1,37 @@
|
||||
# syntax = docker/dockerfile:experimental
|
||||
|
||||
FROM node:alpine as builder
|
||||
|
||||
WORKDIR /app
|
||||
|
||||
COPY package.json /app/
|
||||
|
||||
RUN --mount=type=cache,target=/app/node_modules,id=my_app_npm_module,sharing=locked \
|
||||
--mount=type=cache,target=/root/.npm,id=npm_cache \
|
||||
npm i --registry=https://registry.npm.taobao.org
|
||||
|
||||
COPY src /app/src
|
||||
|
||||
RUN --mount=type=cache,target=/app/node_modules,id=my_app_npm_module,sharing=locked \
|
||||
# --mount=type=cache,target=/app/dist,id=my_app_dist,sharing=locked \
|
||||
npm run build
|
||||
|
||||
FROM nginx:alpine
|
||||
|
||||
# COPY --from=builder /app/dist /app/dist
|
||||
|
||||
# 为了更直观的说明 from 和 source 指令,这里使用 RUN 指令
|
||||
RUN --mount=type=cache,target=/tmp/dist,from=builder,source=/app/dist \
|
||||
# --mount=type=cache,target/tmp/dist,from=my_app_dist,sharing=locked \
|
||||
mkdir -p /app/dist && cp -r /tmp/dist/* /app/dist
|
||||
|
||||
RUN --mount=type=bind,from=php:alpine,source=/usr/local/bin/docker-php-entrypoint,target=/docker-php-entrypoint \
|
||||
cat /docker-php-entrypoint
|
||||
|
||||
RUN --mount=type=tmpfs,target=/temp \
|
||||
mount | grep /temp
|
||||
|
||||
RUN --mount=type=secret,id=aws,target=/root/.aws/credentials \
|
||||
cat /root/.aws/credentials
|
||||
|
||||
# docker build -t test --secret id=aws,src=$PWD/aws.txt --progress=plain -f Dockerfile.buildkit .
|
||||
1
image/demo/buildkit/aws.txt
Normal file
1
image/demo/buildkit/aws.txt
Normal file
@@ -0,0 +1 @@
|
||||
awskey
|
||||
11
image/demo/buildkit/package.json
Normal file
11
image/demo/buildkit/package.json
Normal file
@@ -0,0 +1,11 @@
|
||||
{
|
||||
"name": "my_app",
|
||||
"version": "19.6.0",
|
||||
"devDependencies": {
|
||||
"webpack": "*",
|
||||
"webpack-cli": "*"
|
||||
},
|
||||
"scripts": {
|
||||
"build": "mkdir -p $PWD/dist && cp -r src/* dist/"
|
||||
}
|
||||
}
|
||||
1
image/demo/buildkit/src/index.js
Normal file
1
image/demo/buildkit/src/index.js
Normal file
@@ -0,0 +1 @@
|
||||
console.log(1);
|
||||
@@ -28,7 +28,7 @@ CMD [ "sh", "-c", "echo $HOME" ]
|
||||
|
||||
提到 `CMD` 就不得不提容器中应用在前台执行和后台执行的问题。这是初学者常出现的一个混淆。
|
||||
|
||||
Docker 不是虚拟机,容器中的应用都应该以前台执行,而不是像虚拟机、物理机里面那样,用 upstart/systemd 去启动后台服务,容器内没有后台服务的概念。
|
||||
Docker 不是虚拟机,容器中的应用都应该以前台执行,而不是像虚拟机、物理机里面那样,用 `systemd` 去启动后台服务,容器内没有后台服务的概念。
|
||||
|
||||
一些初学者将 `CMD` 写为:
|
||||
|
||||
|
||||
@@ -2,6 +2,6 @@
|
||||
|
||||
* `Dockerfie` 官方文档:https://docs.docker.com/engine/reference/builder/
|
||||
|
||||
* `Dockerfile` 最佳实践文档:https://docs.docker.com/engine/userguide/eng-image/dockerfile_best-practices/
|
||||
* `Dockerfile` 最佳实践文档:https://docs.docker.com/develop/develop-images/dockerfile_best-practices/
|
||||
|
||||
* `Docker` 官方镜像 `Dockerfile`:https://github.com/docker-library/docs
|
||||
|
||||
@@ -2,7 +2,7 @@
|
||||
|
||||
Docker 镜像是怎么实现增量的修改和维护的?
|
||||
|
||||
每个镜像都由很多层次构成,Docker 使用 [Union FS](http://en.wikipedia.org/wiki/UnionFS) 将这些不同的层结合到一个镜像中去。
|
||||
每个镜像都由很多层次构成,Docker 使用 [Union FS](https://en.wikipedia.org/wiki/UnionFS) 将这些不同的层结合到一个镜像中去。
|
||||
|
||||
通常 Union FS 有两个用途, 一方面可以实现不借助 LVM、RAID 将多个 disk 挂到同一个目录下,另一个更常用的就是将一个只读的分支和一个可写的分支联合在一起,Live CD 正是基于此方法可以允许在镜像不变的基础上允许用户在其上进行一些写操作。
|
||||
|
||||
|
||||
@@ -1,6 +1,6 @@
|
||||
## 列出镜像
|
||||
## List all Images
|
||||
|
||||
要想列出已经下载下来的镜像,可以使用 `docker image ls` 命令。
|
||||
If you want to list all the images downloaded, you can use the command `docker image ls` or `docker images`.
|
||||
|
||||
```bash
|
||||
$ docker image ls
|
||||
@@ -13,17 +13,17 @@ ubuntu 18.04 f753707788c5 4 weeks ago
|
||||
ubuntu latest f753707788c5 4 weeks ago 127 MB
|
||||
```
|
||||
|
||||
列表包含了 `仓库名`、`标签`、`镜像 ID`、`创建时间` 以及 `所占用的空间`。
|
||||
You can see `Repository`, `Tag`, `Image ID`, `Created` and `Size` from the list.
|
||||
|
||||
其中仓库名、标签在之前的基础概念章节已经介绍过了。**镜像 ID** 则是镜像的唯一标识,一个镜像可以对应多个**标签**。因此,在上面的例子中,我们可以看到 `ubuntu:18.04` 和 `ubuntu:latest` 拥有相同的 ID,因为它们对应的是同一个镜像。
|
||||
Among these, the repository name and tag have been introduced in the basic concepts chapter. **Image ID** is the unique identifier for the image, and an image can correspond to multiple **labels**. In the exmaple above, we can see `ubuntu:18:04` and `ubuntu:latest` having the same ID, since they are aliases for the same image.
|
||||
|
||||
### 镜像体积
|
||||
### Image Size
|
||||
|
||||
如果仔细观察,会注意到,这里标识的所占用空间和在 Docker Hub 上看到的镜像大小不同。比如,`ubuntu:18.04` 镜像大小,在这里是 `127 MB`,但是在 [Docker Hub](https://hub.docker.com/r/library/ubuntu/tags/) 显示的却是 `50 MB`。这是因为 Docker Hub 中显示的体积是压缩后的体积。在镜像下载和上传过程中镜像是保持着压缩状态的,因此 Docker Hub 所显示的大小是网络传输中更关心的流量大小。而 `docker image ls` 显示的是镜像下载到本地后,展开的大小,准确说,是展开后的各层所占空间的总和,因为镜像到本地后,查看空间的时候,更关心的是本地磁盘空间占用的大小。
|
||||
If you pay close attention to all of these. You may find that the disk space they occupy is different from the one at Docker Hub. For example, `ubuntu:18.04` is `127MB` here, but on [Docker Hub](https://hub.docker.com/r/library/ubuntu/tags/), `50MB` is displayed. That's because what is shown on Docker Hub is the size after compression. During image download and upload, the image is compressed, because the data transfer is the main factor taken into consideration. However, when we use the command `docker image ls`, that's the size after expansion. To be more precisely, the total size after expanding all the layers locally, because we care more about local space occupied when an image is on our disk.
|
||||
|
||||
另外一个需要注意的问题是,`docker image ls` 列表中的镜像体积总和并非是所有镜像实际硬盘消耗。由于 Docker 镜像是多层存储结构,并且可以继承、复用,因此不同镜像可能会因为使用相同的基础镜像,从而拥有共同的层。由于 Docker 使用 Union FS,相同的层只需要保存一份即可,因此实际镜像硬盘占用空间很可能要比这个列表镜像大小的总和要小的多。
|
||||
One more thing to note is that in the `docker image ls` list, the total size of images is far less than the actual size. Since the Docker imags are stored in multiple layers, and there are inheritance and reuse, there might be different images using the same basic images and sharing some common layers. As we have mentioned, Docker uses Union FS, we only keep one copy for the same layers, so the actual space occupied is far less than the mere sum.
|
||||
|
||||
你可以通过以下命令来便捷的查看镜像、容器、数据卷所占用的空间。
|
||||
You can use the following command to see the space utilized by images, containers, data volumes.
|
||||
|
||||
```bash
|
||||
$ docker system df
|
||||
@@ -35,15 +35,15 @@ Local Volumes 9 0 652.2MB
|
||||
Build Cache 0B 0B
|
||||
```
|
||||
|
||||
### 虚悬镜像
|
||||
### Dangling Image
|
||||
|
||||
上面的镜像列表中,还可以看到一个特殊的镜像,这个镜像既没有仓库名,也没有标签,均为 `<none>`。:
|
||||
In the image list above, we can see a special image, the one without repository name nor tag, all being `<none>`:
|
||||
|
||||
```bash
|
||||
<none> <none> 00285df0df87 5 days ago 342 MB
|
||||
```
|
||||
|
||||
这个镜像原本是有镜像名和标签的,原来为 `mongo:3.2`,随着官方镜像维护,发布了新版本后,重新 `docker pull mongo:3.2` 时,`mongo:3.2` 这个镜像名被转移到了新下载的镜像身上,而旧的镜像上的这个名称则被取消,从而成为了 `<none>`。除了 `docker pull` 可能导致这种情况,`docker build` 也同样可以导致这种现象。由于新旧镜像同名,旧镜像名称被取消,从而出现仓库名、标签均为 `<none>` 的镜像。这类无标签镜像也被称为 **虚悬镜像(dangling image)** ,可以用下面的命令专门显示这类镜像:
|
||||
This image is originally with name and tag(`mongo:3.2`). As the official image being maintained, and the release of new versions, when we execute `docker pull mongo:3.2`, the tag `mongo:3.2` is transferred to the new iamge, and the name on the old image is canceled, end up being `<none>`. Besides, `docker pull`, `docker build` might also cause this phenomemon. Because the new and old image are of the same name, the name of the old image is canceled, thus causing the repository and tag both being `<none>`. These images without tags are also called **dangling images**, we can use the following commands to show them:
|
||||
|
||||
```bash
|
||||
$ docker image ls -f dangling=true
|
||||
@@ -51,27 +51,27 @@ REPOSITORY TAG IMAGE ID CREATED
|
||||
<none> <none> 00285df0df87 5 days ago 342 MB
|
||||
```
|
||||
|
||||
一般来说,虚悬镜像已经失去了存在的价值,是可以随意删除的,可以用下面的命令删除。
|
||||
Generally speaking, the dangling images are useless, we can remove them with the following commands with ease:
|
||||
|
||||
```bash
|
||||
$ docker image prune
|
||||
```
|
||||
|
||||
### 中间层镜像
|
||||
### Intermediate Layer Images
|
||||
|
||||
为了加速镜像构建、重复利用资源,Docker 会利用 **中间层镜像**。所以在使用一段时间后,可能会看到一些依赖的中间层镜像。默认的 `docker image ls` 列表中只会显示顶层镜像,如果希望显示包括中间层镜像在内的所有镜像的话,需要加 `-a` 参数。
|
||||
To accelerate the build of images and improve the resource utilization, Docker uses **Intermediate Layer Images**. So after using Docker for a while, you may see a list of intermediate images as dependencies. The default `docker image ls` only shows the top images, if you want to show all the images including intermediate images, you need to add the `-a` paramter.
|
||||
|
||||
```bash
|
||||
$ docker image ls -a
|
||||
```
|
||||
|
||||
这样会看到很多无标签的镜像,与之前的虚悬镜像不同,这些无标签的镜像很多都是中间层镜像,是其它镜像所依赖的镜像。这些无标签镜像不应该删除,否则会导致上层镜像因为依赖丢失而出错。实际上,这些镜像也没必要删除,因为之前说过,相同的层只会存一遍,而这些镜像是别的镜像的依赖,因此并不会因为它们被列出来而多存了一份,无论如何你也会需要它们。只要删除那些依赖它们的镜像后,这些依赖的中间层镜像也会被连带删除。
|
||||
You will see a lot of images without tags with this command. Differing from `dangling images`, these untagged images are intermediate layer images, and are what a lot of other images depend on. These untagged images should not be deleted, otherwise, it will cause missing dependencies errors for upstream images. In fact, these images are not necessary to delete, as we have mentioned, the same layers will be only stored once. These images are dependencies for other images, and their existence will not cause any redundancy, you will need them in any way. They will disappear the moment you delete all the images that reference them.
|
||||
|
||||
### 列出部分镜像
|
||||
### List Images Partially
|
||||
|
||||
不加任何参数的情况下,`docker image ls` 会列出所有顶级镜像,但是有时候我们只希望列出部分镜像。`docker image ls` 有好几个参数可以帮助做到这个事情。
|
||||
Without any parameter, `docker image ls` lists all the top-level images, but sometimes we only want them partially. `docker image ls` has several parameters to help us achieve this goal.
|
||||
|
||||
根据仓库名列出镜像
|
||||
To list images based on repository name.
|
||||
|
||||
```bash
|
||||
$ docker image ls ubuntu
|
||||
@@ -80,7 +80,7 @@ ubuntu 18.04 f753707788c5 4 weeks ago
|
||||
ubuntu latest f753707788c5 4 weeks ago 127 MB
|
||||
```
|
||||
|
||||
列出特定的某个镜像,也就是说指定仓库名和标签
|
||||
To list a certain image, specifying repository name and label.
|
||||
|
||||
```bash
|
||||
$ docker image ls ubuntu:18.04
|
||||
@@ -88,7 +88,7 @@ REPOSITORY TAG IMAGE ID CREATED
|
||||
ubuntu 18.04 f753707788c5 4 weeks ago 127 MB
|
||||
```
|
||||
|
||||
除此以外,`docker image ls` 还支持强大的过滤器参数 `--filter`,或者简写 `-f`。之前我们已经看到了使用过滤器来列出虚悬镜像的用法,它还有更多的用法。比如,我们希望看到在 `mongo:3.2` 之后建立的镜像,可以用下面的命令:
|
||||
Besides, `docker image ls` supports the `--filter` parameter, or simply `-f`. As we have seen before, using filter to list dangling image, and it has more usages. For example, if we want to see images with edition after `mongo:3.2`, we can use the following command:
|
||||
|
||||
```bash
|
||||
$ docker image ls -f since=mongo:3.2
|
||||
@@ -97,18 +97,18 @@ redis latest 5f515359c7f8 5 days ago
|
||||
nginx latest 05a60462f8ba 5 days ago 181 MB
|
||||
```
|
||||
|
||||
想查看某个位置之前的镜像也可以,只需要把 `since` 换成 `before` 即可。
|
||||
If we want to see some versions of images before, we can simply replace `since` with `before`.
|
||||
|
||||
此外,如果镜像构建时,定义了 `LABEL`,还可以通过 `LABEL` 来过滤。
|
||||
If we have defined the `LABEL` during the image build, we can also filter with the `LABEL` option.
|
||||
|
||||
```bash
|
||||
$ docker image ls -f label=com.example.version=0.1
|
||||
...
|
||||
```
|
||||
|
||||
### 以特定格式显示
|
||||
### Show with Specified Format
|
||||
|
||||
默认情况下,`docker image ls` 会输出一个完整的表格,但是我们并非所有时候都会需要这些内容。比如,刚才删除虚悬镜像的时候,我们需要利用 `docker image ls` 把所有的虚悬镜像的 ID 列出来,然后才可以交给 `docker image rm` 命令作为参数来删除指定的这些镜像,这个时候就用到了 `-q` 参数。
|
||||
By default, `docker image ls` will show a full list, but we do not need it all the time. For example, when we delete dangling images, we use `docker image ls` to list all the IDs of dangling images and then pass them over to `docker image rm` as parameters to remove the specified images. Under this circumstance, we can apply the `-q` option.
|
||||
|
||||
```bash
|
||||
$ docker image ls -q
|
||||
@@ -121,11 +121,11 @@ f753707788c5
|
||||
1e0c3dd64ccd
|
||||
```
|
||||
|
||||
`--filter` 配合 `-q` 产生出指定范围的 ID 列表,然后送给另一个 `docker` 命令作为参数,从而针对这组实体成批的进行某种操作的做法在 Docker 命令行使用过程中非常常见,不仅仅是镜像,将来我们会在各个命令中看到这类搭配以完成很强大的功能。因此每次在文档看到过滤器后,可以多注意一下它们的用法。
|
||||
`--filter` together with `-q` to generate a ID list in a specified range, and then passing them over to another `docker` command as parameter is a common practice for Docker commands. Not only for images, we will see all this kind of combinations in other kinds of commands, with them, we can achieve great functionalities. So when you see some filters while reading the documents, please pay attention to how they are used in practice.
|
||||
|
||||
另外一些时候,我们可能只是对表格的结构不满意,希望自己组织列;或者不希望有标题,这样方便其它程序解析结果等,这就用到了 [Go 的模板语法](https://gohugo.io/templates/go-templates/)。
|
||||
In some other occasions, we may not be content with the table structure and would like to reorganize the columns. In this case, we can use the [Go Templates](https://gohugo.io/templates/go-templates/).
|
||||
|
||||
比如,下面的命令会直接列出镜像结果,并且只包含镜像ID和仓库名:
|
||||
For example, using the following commands will list the image results, with only image ID and repository names.
|
||||
|
||||
```bash
|
||||
$ docker image ls --format "{{.ID}}: {{.Repository}}"
|
||||
@@ -138,7 +138,7 @@ f753707788c5: ubuntu
|
||||
1e0c3dd64ccd: ubuntu
|
||||
```
|
||||
|
||||
或者打算以表格等距显示,并且有标题行,和默认一样,不过自己定义列:
|
||||
Or we may want to show the table with equal horizontal tabulations and with title, we can define them by ourselves.
|
||||
|
||||
```bash
|
||||
$ docker image ls --format "table {{.ID}}\t{{.Repository}}\t{{.Tag}}"
|
||||
|
||||
178
image/manifest.md
Normal file
178
image/manifest.md
Normal file
@@ -0,0 +1,178 @@
|
||||
## 构建多种系统架构支持的 Docker 镜像 -- docker manifest 命令详解
|
||||
|
||||
我们知道使用镜像创建一个容器,该镜像必须与 Docker 宿主机系统架构一致,例如 `Linux x86_64` 架构的系统中只能使用 `Linux x86_64` 的镜像创建容器。
|
||||
|
||||
> macOS 除外,其使用了 [binfmt_misc](https://docs.docker.com/docker-for-mac/multi-arch/) 提供了多种架构支持,在 macOS 系统上 (x86_64) 可以运行 arm 等其他架构的镜像。
|
||||
|
||||
例如我们在 `Linux x86_64` 中构建一个 `username/test` 镜像。
|
||||
|
||||
```Dockerfile
|
||||
FROM alpine
|
||||
|
||||
CMD echo 1
|
||||
```
|
||||
|
||||
构建镜像后推送到 Docker Hub,之后我们尝试在树莓派 `Linux arm64v8` 中使用这个镜像。
|
||||
|
||||
```bash
|
||||
$ docker run -it --rm username/test
|
||||
```
|
||||
|
||||
可以发现这个镜像根本获取不到。
|
||||
|
||||
要解决这个问题,通常采用的做法是通过镜像名区分不同系统架构的镜像,例如在 `Linux x86_64` 和 `Linux arm64v8` 分别构建 `username/test` 和 `username/arm64v8-test` 镜像。运行时使用对应架构的镜像即可。
|
||||
|
||||
这样做显得很繁琐,那么有没有一种方法让 Docker 引擎根据系统架构自动拉取对应的镜像呢?
|
||||
|
||||
我们发现在 `Linux x86_64` 和 `Linux arm64v8` 架构的计算机中执行 `$ docker run golang:alpine go version` 时我们发现可以正确的运行。
|
||||
|
||||
这是什么原因呢?
|
||||
|
||||
原因就是 `golang:alpine` 官方镜像有一个 [`manifest` 列表](https://docs.docker.com/registry/spec/manifest-v2-2/)。
|
||||
|
||||
当用户获取一个镜像时,Docker 引擎会首先查找该镜像是否有 `manifest` 列表,如果有的话 Docker 引擎会按照 Docker 运行环境(系统及架构)查找出对应镜像(例如 `golang:alpine`)。如果没有的话会直接获取镜像(例如上例中我们构建的 `username/test`)。
|
||||
|
||||
我们可以使用 `$ docker manifest inspect golang:alpine` 查看这个 `manifest` 列表的结构。
|
||||
|
||||
由于该命令属于实验特性,必须设置如下 **环境变量** 之后才能使用:
|
||||
|
||||
```bash
|
||||
# Linux、macOS
|
||||
|
||||
$ export DOCKER_CLI_EXPERIMENTAL=enabled
|
||||
|
||||
# Windows
|
||||
|
||||
$ set $env:DOCKER_CLI_EXPERIMENTAL=enabled
|
||||
```
|
||||
|
||||
> 以上是设置环境变量的临时方法,若使环境变量永久生效请读者自行设置。
|
||||
|
||||
设置之后,执行结果如下
|
||||
|
||||
```bash
|
||||
$ docker manifest inspect golang:alpine
|
||||
```
|
||||
|
||||
```json
|
||||
{
|
||||
"schemaVersion": 2,
|
||||
"mediaType": "application/vnd.docker.distribution.manifest.list.v2+json",
|
||||
"manifests": [
|
||||
{
|
||||
"mediaType": "application/vnd.docker.distribution.manifest.v2+json",
|
||||
"size": 1365,
|
||||
"digest": "sha256:5e28ac423243b187f464d635bcfe1e909f4a31c6c8bce51d0db0a1062bec9e16",
|
||||
"platform": {
|
||||
"architecture": "amd64",
|
||||
"os": "linux"
|
||||
}
|
||||
},
|
||||
{
|
||||
"mediaType": "application/vnd.docker.distribution.manifest.v2+json",
|
||||
"size": 1365,
|
||||
"digest": "sha256:2945c46e26c9787da884b4065d1de64cf93a3b81ead1b949843dda1fcd458bae",
|
||||
"platform": {
|
||||
"architecture": "arm",
|
||||
"os": "linux",
|
||||
"variant": "v7"
|
||||
}
|
||||
},
|
||||
{
|
||||
"mediaType": "application/vnd.docker.distribution.manifest.v2+json",
|
||||
"size": 1365,
|
||||
"digest": "sha256:87fff60114fd3402d0c1a7ddf1eea1ded658f171749b57dc782fd33ee2d47b2d",
|
||||
"platform": {
|
||||
"architecture": "arm64",
|
||||
"os": "linux",
|
||||
"variant": "v8"
|
||||
}
|
||||
},
|
||||
{
|
||||
"mediaType": "application/vnd.docker.distribution.manifest.v2+json",
|
||||
"size": 1365,
|
||||
"digest": "sha256:607b43f1d91144f82a9433764e85eb3ccf83f73569552a49bc9788c31b4338de",
|
||||
"platform": {
|
||||
"architecture": "386",
|
||||
"os": "linux"
|
||||
}
|
||||
},
|
||||
{
|
||||
"mediaType": "application/vnd.docker.distribution.manifest.v2+json",
|
||||
"size": 1365,
|
||||
"digest": "sha256:25ead0e21ed5e246ce31e274b98c09aaf548606788ef28eaf375dc8525064314",
|
||||
"platform": {
|
||||
"architecture": "ppc64le",
|
||||
"os": "linux"
|
||||
}
|
||||
},
|
||||
{
|
||||
"mediaType": "application/vnd.docker.distribution.manifest.v2+json",
|
||||
"size": 1365,
|
||||
"digest": "sha256:69f5907fa93ea591175b2c688673775378ed861eeb687776669a48692bb9754d",
|
||||
"platform": {
|
||||
"architecture": "s390x",
|
||||
"os": "linux"
|
||||
}
|
||||
}
|
||||
]
|
||||
}
|
||||
```
|
||||
|
||||
可以看出 `manifest` 列表中包含了不同系统架构所对应的镜像 `digest` 值,这样 Docker 就可以在不同的架构中使用相同的 `manifest` (例如 `golang:alpine`) 获取对应的镜像。
|
||||
|
||||
下面介绍如何使用 `$ docker manifest` 命令创建并推送 `manifest` 列表到 Docker Hub。
|
||||
|
||||
### 构建镜像
|
||||
|
||||
首先在 `Linux x86_64` 构建 `username/x8664-test` 镜像。并在 `Linux arm64v8` 中构建 `username/arm64v8-test` 镜像,构建好之后推送到 Docker Hub。
|
||||
|
||||
### 创建 `manifest` 列表
|
||||
|
||||
```bash
|
||||
# $ docker manifest create MANIFEST_LIST MANIFEST [MANIFEST...]
|
||||
$ docker manifest create username/test \
|
||||
username/x8664-test \
|
||||
username/arm64v8-test
|
||||
```
|
||||
|
||||
当要修改一个 `manifest` 列表时,可以加入 `-a,--amend` 参数。
|
||||
|
||||
### 设置 `manifest` 列表
|
||||
|
||||
```bash
|
||||
# $ docker manifest annotate [OPTIONS] MANIFEST_LIST MANIFEST
|
||||
$ docker manifest annotate username/test \
|
||||
username/x8664-test \
|
||||
--os linux --arch x86_64
|
||||
|
||||
$ docker manifest annotate username/test \
|
||||
username/arm64v8-test \
|
||||
--os linux --arch arm64 --variant v8
|
||||
```
|
||||
|
||||
这样就配置好了 `manifest` 列表。
|
||||
|
||||
### 查看 `manifest` 列表
|
||||
|
||||
```bash
|
||||
$ docker manifest inspect username/test
|
||||
```
|
||||
|
||||
### 推送 `manifest` 列表
|
||||
|
||||
最后我们可以将其推送到 Docker Hub。
|
||||
|
||||
```bash
|
||||
$ docker manifest push username/test
|
||||
```
|
||||
|
||||
### 测试
|
||||
|
||||
我们在 `Linux x86_64` `Linux arm64v8` 中分别执行 `$ docker run -it --rm username/test` 命令,发现可以正确的执行。
|
||||
|
||||
### 官方博客
|
||||
|
||||
详细了解 `manifest` 可以阅读官方博客。
|
||||
|
||||
* https://blog.docker.com/2017/11/multi-arch-all-the-things/
|
||||
@@ -15,11 +15,11 @@
|
||||
例如,编写 `app.go` 文件,该程序输出 `Hello World!`
|
||||
|
||||
```go
|
||||
package main
|
||||
package main
|
||||
|
||||
import "fmt"
|
||||
import "fmt"
|
||||
|
||||
func main(){
|
||||
func main(){
|
||||
fmt.Printf("Hello World!");
|
||||
}
|
||||
```
|
||||
@@ -146,7 +146,7 @@ WORKDIR /root/
|
||||
|
||||
COPY --from=0 /go/src/github.com/go/helloworld/app .
|
||||
|
||||
CMD ["./app"]
|
||||
CMD ["./app"]
|
||||
```
|
||||
|
||||
构建镜像
|
||||
|
||||
@@ -17,7 +17,7 @@ COPY database/ /app/database/
|
||||
COPY composer.json /app/
|
||||
|
||||
RUN cd /app \
|
||||
&& composer config -g repo.packagist composer https://packagist.laravel-china.org \
|
||||
&& composer config -g repo.packagist composer https://mirrors.aliyun.com/composer/ \
|
||||
&& composer install \
|
||||
--ignore-platform-reqs \
|
||||
--no-interaction \
|
||||
|
||||
@@ -62,7 +62,7 @@ COPY webpack.mix.js /app/
|
||||
COPY resources/assets/ /app/resources/assets/
|
||||
|
||||
RUN cd /app \
|
||||
&& npm run production
|
||||
&& npm run production
|
||||
```
|
||||
|
||||
### 安装 Composer 依赖
|
||||
@@ -76,7 +76,7 @@ COPY database/ /app/database/
|
||||
COPY composer.json composer.lock /app/
|
||||
|
||||
RUN cd /app \
|
||||
&& composer config -g repo.packagist composer https://packagist.laravel-china.org \
|
||||
&& composer config -g repo.packagist composer https://mirrors.aliyun.com/composer/ \
|
||||
&& composer install \
|
||||
--ignore-platform-reqs \
|
||||
--no-interaction \
|
||||
@@ -184,7 +184,7 @@ COPY database/ /app/database/
|
||||
COPY composer.json /app/
|
||||
|
||||
RUN cd /app \
|
||||
&& composer config -g repo.packagist composer https://packagist.laravel-china.org \
|
||||
&& composer config -g repo.packagist composer https://mirrors.aliyun.com/composer/ \
|
||||
&& composer install \
|
||||
--ignore-platform-reqs \
|
||||
--no-interaction \
|
||||
|
||||
@@ -8,32 +8,33 @@
|
||||
|
||||
压缩包可以是本地文件、远程 Web 文件,甚至是从标准输入中得到。压缩包将会在镜像 `/` 目录展开,并直接作为镜像第一层提交。
|
||||
|
||||
比如我们想要创建一个 [OpenVZ](https://openvz.org) 的 Ubuntu 14.04 [模板](https://openvz.org/Download/template/precreated)的镜像:
|
||||
比如我们想要创建一个 [OpenVZ](https://openvz.org) 的 Ubuntu 16.04 [模板](https://openvz.org/Download/template/precreated)的镜像:
|
||||
|
||||
```bash
|
||||
$ docker import \
|
||||
http://download.openvz.org/template/precreated/ubuntu-14.04-x86_64-minimal.tar.gz \
|
||||
openvz/ubuntu:14.04
|
||||
Downloading from http://download.openvz.org/template/precreated/ubuntu-14.04-x86_64-minimal.tar.gz
|
||||
sha256:f477a6e18e989839d25223f301ef738b69621c4877600ae6467c4e5289822a79B/78.42 MB
|
||||
http://download.openvz.org/template/precreated/ubuntu-16.04-x86_64.tar.gz \
|
||||
openvz/ubuntu:16.04
|
||||
|
||||
Downloading from http://download.openvz.org/template/precreated/ubuntu-16.04-x86_64.tar.gz
|
||||
sha256:412b8fc3e3f786dca0197834a698932b9c51b69bd8cf49e100c35d38c9879213
|
||||
```
|
||||
|
||||
这条命令自动下载了 `ubuntu-14.04-x86_64-minimal.tar.gz` 文件,并且作为根文件系统展开导入,并保存为镜像 `openvz/ubuntu:14.04`。
|
||||
这条命令自动下载了 `ubuntu-16.04-x86_64.tar.gz` 文件,并且作为根文件系统展开导入,并保存为镜像 `openvz/ubuntu:16.04`。
|
||||
|
||||
导入成功后,我们可以用 `docker image ls` 看到这个导入的镜像:
|
||||
|
||||
```bash
|
||||
$ docker image ls openvz/ubuntu
|
||||
REPOSITORY TAG IMAGE ID CREATED SIZE
|
||||
openvz/ubuntu 14.04 f477a6e18e98 55 seconds ago 214.9 MB
|
||||
openvz/ubuntu 16.04 412b8fc3e3f7 55 seconds ago 505MB
|
||||
```
|
||||
|
||||
如果我们查看其历史的话,会看到描述中有导入的文件链接:
|
||||
|
||||
```bash
|
||||
$ docker history openvz/ubuntu:14.04
|
||||
$ docker history openvz/ubuntu:16.04
|
||||
IMAGE CREATED CREATED BY SIZE COMMENT
|
||||
f477a6e18e98 About a minute ago 214.9 MB Imported from http://download.openvz.org/template/precreated/ubuntu-14.04-x86_64-minimal.tar.gz
|
||||
f477a6e18e98 About a minute ago 214.9 MB Imported from http://download.openvz.org/template/precreated/ubuntu-16.04-x86_64.tar.gz
|
||||
```
|
||||
|
||||
### `docker save` 和 `docker load`
|
||||
|
||||
@@ -1,19 +1,20 @@
|
||||
## 获取镜像
|
||||
## Pull Docker Images
|
||||
|
||||
之前提到过,[Docker Hub](https://hub.docker.com/explore/) 上有大量的高质量的镜像可以用,这里我们就说一下怎么获取这些镜像。
|
||||
As we have mentioned, there are many high quality docker images on [Docker Hub](https://hub.docker.com/explore/). In this section, we will introduce how to `pull` these images.
|
||||
|
||||
从 Docker 镜像仓库获取镜像的命令是 `docker pull`。其命令格式为:
|
||||
The command to fetch image from docker registry is `docker pull`. The command format is:
|
||||
|
||||
```bash
|
||||
docker pull [选项] [Docker Registry 地址[:端口号]/]仓库名[:标签]
|
||||
docker pull [OPTIONS] [Docker Registry ADDRESS[:PORT]/]NAME[:TAG]
|
||||
```
|
||||
|
||||
具体的选项可以通过 `docker pull --help` 命令看到,这里我们说一下镜像名称的格式。
|
||||
More options can be found by `docker pull --help` command. Now let us see the format for image names.
|
||||
|
||||
* Docker 镜像仓库地址:地址的格式一般是 `<域名/IP>[:端口号]`。默认地址是 Docker Hub。
|
||||
* 仓库名:如之前所说,这里的仓库名是两段式名称,即 `<用户名>/<软件名>`。对于 Docker Hub,如果不给出用户名,则默认为 `library`,也就是官方镜像。
|
||||
* Docker Repository Address: the address format is typically `<domain/IP>[:PORT]`. The default address is Docker Hub.
|
||||
|
||||
比如:
|
||||
* Repository: as mentioned before, the repository name consists of 2 parts, i.e., `username/software-name`(separated by the slash). For docker Hub, if the username is not specified, the default is `library`, where all the official images are in.
|
||||
|
||||
For example,
|
||||
|
||||
```bash
|
||||
$ docker pull ubuntu:18.04
|
||||
@@ -27,17 +28,17 @@ Digest: sha256:147913621d9cdea08853f6ba9116c2e27a3ceffecf3b492983ae97c3d643fbbe
|
||||
Status: Downloaded newer image for ubuntu:18.04
|
||||
```
|
||||
|
||||
上面的命令中没有给出 Docker 镜像仓库地址,因此将会从 Docker Hub 获取镜像。而镜像名称是 `ubuntu:18.04`,因此将会获取官方镜像 `library/ubuntu` 仓库中标签为 `18.04` 的镜像。
|
||||
The Docker image repository is not given, so it will pull the image from Docker Hub. Since the image name is `ubuntu:18.04`, so it will get the official image with tag `18.04` from `library/ubuntu`.
|
||||
|
||||
从下载过程中可以看到我们之前提及的分层存储的概念,镜像是由多层存储所构成。下载也是一层层的去下载,并非单一文件。下载过程中给出了每一层的 ID 的前 12 位。并且下载结束后,给出该镜像完整的 `sha256` 的摘要,以确保下载一致性。
|
||||
From the download log, we can see the layered storage concept - images are composed of multiple layers of storage. And we download images layer by layer instead of a single file. During the download process, the first 12 hexadecimal bits of each layer are shown. And after the download, the `sha256` summary is given, to verify the integrity of downloaded files.
|
||||
|
||||
在使用上面命令的时候,你可能会发现,你所看到的层 ID 以及 `sha256` 的摘要和这里的不一样。这是因为官方镜像是一直在维护的,有任何新的 bug,或者版本更新,都会进行修复再以原来的标签发布,这样可以确保任何使用这个标签的用户可以获得更安全、更稳定的镜像。
|
||||
When using the above command, you may find that the layer ID and `sha256` you see are different from what they are here, because the official layer is maintained and updated frequently. In case there is any new bug or new edition, the image will be rebuilt and published with the original tag. This makes sure that all the users use safer and more stable images.
|
||||
|
||||
*如果从 Docker Hub 下载镜像非常缓慢,可以参照 [镜像加速器](/install/mirror.md) 一节配置加速器。*
|
||||
*If it is slow to download images from Docker Hub, you can refer to [Image Accelerators](/install/mirror.md) to configure accelerator.*
|
||||
|
||||
### 运行
|
||||
### Run
|
||||
With the image, we can run a container based on the image. Taking the above `ubuntu:18.04` as an example, if we want to start the `bash` inside it for interactive operations, we can execute the following commands.
|
||||
|
||||
有了镜像后,我们就能够以这个镜像为基础启动并运行一个容器。以上面的 `ubuntu:18.04` 为例,如果我们打算启动里面的 `bash` 并且进行交互式操作的话,可以执行下面的命令。
|
||||
|
||||
```bash
|
||||
$ docker run -it --rm \
|
||||
@@ -59,13 +60,16 @@ VERSION_CODENAME=bionic
|
||||
UBUNTU_CODENAME=bionic
|
||||
```
|
||||
|
||||
`docker run` 就是运行容器的命令,具体格式我们会在 [容器](../container) 一节进行详细讲解,我们这里简要的说明一下上面用到的参数。
|
||||
`docker run` is the command for running the container, the detailed format will be explained in the [container](../container) chapter. Here we only illustrate the parameters used above.
|
||||
|
||||
* `-it`:这是两个参数,一个是 `-i`:交互式操作,一个是 `-t` 终端。我们这里打算进入 `bash` 执行一些命令并查看返回结果,因此我们需要交互式终端。
|
||||
* `--rm`:这个参数是说容器退出后随之将其删除。默认情况下,为了排障需求,退出的容器并不会立即删除,除非手动 `docker rm`。我们这里只是随便执行个命令,看看结果,不需要排障和保留结果,因此使用 `--rm` 可以避免浪费空间。
|
||||
* `ubuntu:18.04`:这是指用 `ubuntu:18.04` 镜像为基础来启动容器。
|
||||
* `bash`:放在镜像名后的是**命令**,这里我们希望有个交互式 Shell,因此用的是 `bash`。
|
||||
* `-it`: There are 2 parameters here, the first is `-i`, for interactive operations, another is `-t`, which is for terminal. What we intend to do is to enter the `bash` terminal of docker, then execute some commands and see the output. That's why we need the interactive terminal.
|
||||
|
||||
进入容器后,我们可以在 Shell 下操作,执行任何所需的命令。这里,我们执行了 `cat /etc/os-release`,这是 Linux 常用的查看当前系统版本的命令,从返回的结果可以看到容器内是 `Ubuntu 18.04.1 LTS` 系统。
|
||||
* `--rm`: Remove the docker after stop it. In default, for troubleshooting, the docker is not removed immediately after quitting, unless manually remove it using `docker rm`. But in our case, we only test the commands and to see the resutls, we don't care much about the results, so we use `--rm` to avoid wasting space.
|
||||
|
||||
最后我们通过 `exit` 退出了这个容器。
|
||||
* `ubuntu:18.04`: use `ubuntu:18:04` as the base image to start the container.
|
||||
|
||||
* `bash`: What we have after the image name is **command**, since we want an interactive shell, so we use `bash` as the command here.
|
||||
|
||||
After entering the comainer, we can execute any command we want. Here, we executed `cat etc/os-release`, which is the commonly-used command to view the version of the current OS. We can see from the result that the container is based on `Ubuntu 18.04.1 LTS`.
|
||||
|
||||
In the end, we quit the container with `exit`.
|
||||
|
||||
@@ -64,7 +64,7 @@ Untagged: node@sha256:b4f0e0bdeb578043c1ea6862f0d40cc4afe32a4a582f3be235a3b16442
|
||||
|
||||
因此当我们使用上面命令删除镜像的时候,实际上是在要求删除某个标签的镜像。所以首先需要做的是将满足我们要求的所有镜像标签都取消,这就是我们看到的 `Untagged` 的信息。因为一个镜像可以对应多个标签,因此当我们删除了所指定的标签后,可能还有别的标签指向了这个镜像,如果是这种情况,那么 `Delete` 行为就不会发生。所以并非所有的 `docker image rm` 都会产生删除镜像的行为,有可能仅仅是取消了某个标签而已。
|
||||
|
||||
当该镜像所有的标签都被取消了,该镜像很可能会失去了存在的意义,因此会触发删除行为。镜像是多层存储结构,因此在删除的时候也是从上层向基础层方向依次进行判断删除。镜像的多层结构让镜像复用变动非常容易,因此很有可能某个其它镜像正依赖于当前镜像的某一层。这种情况,依旧不会触发删除该层的行为。直到没有任何层依赖当前层时,才会真实的删除当前层。这就是为什么,有时候会奇怪,为什么明明没有别的标签指向这个镜像,但是它还是存在的原因,也是为什么有时候会发现所删除的层数和自己 `docker pull` 看到的层数不一样的源。
|
||||
当该镜像所有的标签都被取消了,该镜像很可能会失去了存在的意义,因此会触发删除行为。镜像是多层存储结构,因此在删除的时候也是从上层向基础层方向依次进行判断删除。镜像的多层结构让镜像复用变得非常容易,因此很有可能某个其它镜像正依赖于当前镜像的某一层。这种情况,依旧不会触发删除该层的行为。直到没有任何层依赖当前层时,才会真实的删除当前层。这就是为什么,有时候会奇怪,为什么明明没有别的标签指向这个镜像,但是它还是存在的原因,也是为什么有时候会发现所删除的层数和自己 `docker pull` 看到的层数不一样的原因。
|
||||
|
||||
除了镜像依赖以外,还需要注意的是容器对镜像的依赖。如果有用这个镜像启动的容器存在(即使容器没有运行),那么同样不可以删除这个镜像。之前讲过,容器是以镜像为基础,再加一层容器存储层,组成这样的多层存储结构去运行的。因此该镜像如果被这个容器所依赖的,那么删除必然会导致故障。如果这些容器是不需要的,应该先将它们删除,然后再来删除镜像。
|
||||
|
||||
|
||||
@@ -1,7 +1,7 @@
|
||||
# 安装 Docker
|
||||
# Docker Installation
|
||||
|
||||
Docker 分为 CE 和 EE 两大版本。CE 即社区版(免费,支持周期 7 个月),EE 即企业版,强调安全,付费使用,支持周期 24 个月。
|
||||
Docker has 2 major editions, CE and EE. CE is the Community Edition(free, 7 month as a support cycle), while EE is the Enterprise Edition, which emphasizes on security, paid membership, and the support cycle is 24 months.
|
||||
|
||||
Docker CE 分为 **stable**, **test**, 和 **nightly** 三个更新频道。每六个月发布一个 **stable** 版本 (18.09, 19.03, 19.09...)。
|
||||
Docker CE has 3 update channels, **stable**, **test** and **nightly**, and releases a **stable** version every other 6 months(18.09, 19.03, 19.09...).
|
||||
|
||||
官方网站上有各种环境下的 [安装指南](https://docs.docker.com/engine/installation/),这里主要介绍 Docker CE 在 Linux 、Windows 10 (PC) 和 macOS 上的安装。
|
||||
You can find the [Installation Guidance](https://docs.docker.com/engine/installation/) at the official website. We mainly introduce Docker CE installation on Linux, Windows 10(PC) and macOS here.
|
||||
|
||||
@@ -1,16 +1,15 @@
|
||||
## CentOS 安装 Docker CE
|
||||
## Install Docker CE on CentOS
|
||||
|
||||
>警告:切勿在没有配置 Docker YUM 源的情况下直接使用 yum 命令安装 Docker.
|
||||
> WARNING: DO NOT install Docker with yum directly without configuring yum source.
|
||||
|
||||
### 准备工作
|
||||
### Prerequisites
|
||||
|
||||
#### 系统要求
|
||||
#### OS Requirement
|
||||
Docker CE supports 64-bit version of CentOS 7, and it requires the kernel version to be no older than 3.10. CentOS 7 satisfies the minimum kernel version requirement. But due to the comparatively old kernel, some of the functionalities like `overlay2` are unable to be used, and some other features may be unstable.
|
||||
|
||||
Docker CE 支持 64 位版本 CentOS 7,并且要求内核版本不低于 3.10。 CentOS 7 满足最低内核的要求,但由于内核版本比较低,部分功能(如 `overlay2` 存储层驱动)无法使用,并且部分功能可能不太稳定。
|
||||
#### Uninstall the Old Versions
|
||||
|
||||
#### 卸载旧版本
|
||||
|
||||
旧版本的 Docker 称为 `docker` 或者 `docker-engine`,使用以下命令卸载旧版本:
|
||||
The old versions of Docker are called `docker` or `docker-engine`, you can have them uninstalled with the following command:
|
||||
|
||||
```bash
|
||||
$ sudo yum remove docker \
|
||||
@@ -25,9 +24,9 @@ $ sudo yum remove docker \
|
||||
docker-engine
|
||||
```
|
||||
|
||||
### 使用 yum 安装
|
||||
### Install with yum
|
||||
|
||||
执行以下命令安装依赖包:
|
||||
Use the following commands to install the dependencies:
|
||||
|
||||
```bash
|
||||
$ sudo yum install -y yum-utils \
|
||||
@@ -35,80 +34,79 @@ $ sudo yum install -y yum-utils \
|
||||
lvm2
|
||||
```
|
||||
|
||||
鉴于国内网络问题,强烈建议使用国内源,官方源请在注释中查看。
|
||||
|
||||
执行下面的命令添加 `yum` 软件源:
|
||||
Due to the network issues in China mainland, it is highly recommended for Chinese users to use Chinese sources. Please refer to the official sources in the comments(they are replaced by a Chinese source).
|
||||
|
||||
Use the following command to add `dnf` source.
|
||||
```bash
|
||||
$ sudo yum-config-manager \
|
||||
--add-repo \
|
||||
https://mirrors.ustc.edu.cn/docker-ce/linux/centos/docker-ce.repo
|
||||
|
||||
|
||||
# 官方源
|
||||
# Official source
|
||||
# $ sudo yum-config-manager \
|
||||
# --add-repo \
|
||||
# https://download.docker.com/linux/centos/docker-ce.repo
|
||||
# https://download.docker.com/linux/centos/docker-ce.repo
|
||||
```
|
||||
|
||||
如果需要测试版本的 Docker CE 请使用以下命令:
|
||||
If you want to use the `test` version of Docker CE, use the following command:
|
||||
|
||||
```bash
|
||||
$ sudo yum-config-manager --enable docker-ce-test
|
||||
```
|
||||
|
||||
如果需要每日构建版本的 Docker CE 请使用以下命令:
|
||||
As for `nightly` version:
|
||||
|
||||
```bash
|
||||
$ sudo yum-config-manager --enable docker-ce-nightly
|
||||
```
|
||||
|
||||
#### 安装 Docker CE
|
||||
#### Install Docker CE
|
||||
|
||||
更新 `yum` 软件源缓存,并安装 `docker-ce`。
|
||||
Update `yum` source cache,and then install `docker-ce`.
|
||||
|
||||
```bash
|
||||
$ sudo yum makecache fast
|
||||
$ sudo yum install docker-ce
|
||||
```
|
||||
|
||||
### 使用脚本自动安装
|
||||
### Install with Automatic Scripts
|
||||
|
||||
在测试或开发环境中 Docker 官方为了简化安装流程,提供了一套便捷的安装脚本,CentOS 系统上可以使用这套脚本安装:
|
||||
To simplify the installation process during test or development, Docker official provides a convenient installation script, you can install docker on CentOS with the following script:
|
||||
|
||||
```bash
|
||||
$ curl -fsSL get.docker.com -o get-docker.sh
|
||||
$ sudo sh get-docker.sh --mirror Aliyun
|
||||
```
|
||||
|
||||
执行这个命令后,脚本就会自动的将一切准备工作做好,并且把 Docker CE 的 Edge 版本安装在系统中。
|
||||
After execution, the script will have everything prepared, and have installed the stable version on your OS.
|
||||
|
||||
### 启动 Docker CE
|
||||
### Start Docker CE
|
||||
|
||||
```bash
|
||||
$ sudo systemctl enable docker
|
||||
$ sudo systemctl start docker
|
||||
```
|
||||
|
||||
### 建立 docker 用户组
|
||||
### Add Docker Usergroups
|
||||
|
||||
默认情况下,`docker` 命令会使用 [Unix socket](https://en.wikipedia.org/wiki/Unix_domain_socket) 与 Docker 引擎通讯。而只有 `root` 用户和 `docker` 组的用户才可以访问 Docker 引擎的 Unix socket。出于安全考虑,一般 Linux 系统上不会直接使用 `root` 用户。因此,更好地做法是将需要使用 `docker` 的用户加入 `docker` 用户组。
|
||||
Command `docker` uses [Unix socket](https://en.wikipedia.org/wiki/Unix_domain_socket) to communicate with Docker engine by default. Only users of `root` and `docker` groups can communicate with Unix socket of the Docker engine.`root` user is not directly used on Linux systems in general for security. Therefore, it is better to add users who need to use `docker` to the `docker` user group.
|
||||
|
||||
建立 `docker` 组:
|
||||
create `docker` group:
|
||||
|
||||
```bash
|
||||
$ sudo groupadd docker
|
||||
```
|
||||
|
||||
将当前用户加入 `docker` 组:
|
||||
add current user to `docker` group:
|
||||
|
||||
```bash
|
||||
$ sudo usermod -aG docker $USER
|
||||
```
|
||||
|
||||
退出当前终端并重新登录,进行如下测试。
|
||||
Exit current terminal and relogin to test.
|
||||
|
||||
### 测试 Docker 是否安装正确
|
||||
### Verify the Installation
|
||||
|
||||
```bash
|
||||
$ docker run hello-world
|
||||
@@ -141,22 +139,22 @@ For more examples and ideas, visit:
|
||||
https://docs.docker.com/get-started/
|
||||
```
|
||||
|
||||
若能正常输出以上信息,则说明安装成功。
|
||||
If it shows the above message, it means your installation is successful.
|
||||
|
||||
### 镜像加速
|
||||
### Registry Mirror(In China)
|
||||
|
||||
鉴于国内网络问题,后续拉取 Docker 镜像十分缓慢,强烈建议安装 Docker 之后配置 [国内镜像加速](mirror.md)。
|
||||
If you pull docker images very slowly, then you can configure [Registry Mirror](mirror.md).
|
||||
|
||||
### 添加内核参数
|
||||
### Add kernel Parameters
|
||||
|
||||
默认配置下,如果在 CentOS 使用 Docker CE 看到下面的这些警告信息:
|
||||
If you see the following warnings when using Docker CE,
|
||||
|
||||
```bash
|
||||
WARNING: bridge-nf-call-iptables is disabled
|
||||
WARNING: bridge-nf-call-ip6tables is disabled
|
||||
```
|
||||
|
||||
请添加内核配置参数以启用这些功能。
|
||||
Please add the kernel parameters to enable these features.
|
||||
|
||||
```bash
|
||||
$ sudo tee -a /etc/sysctl.conf <<-EOF
|
||||
@@ -165,12 +163,12 @@ net.bridge.bridge-nf-call-iptables = 1
|
||||
EOF
|
||||
```
|
||||
|
||||
然后重新加载 `sysctl.conf` 即可
|
||||
Then reload the `sysctl.confg`
|
||||
|
||||
```bash
|
||||
$ sudo sysctl -p
|
||||
```
|
||||
|
||||
### 参考文档
|
||||
### References
|
||||
|
||||
* [Docker 官方 CentOS 安装文档](https://docs.docker.com/install/linux/docker-ce/centos/)。
|
||||
* [Docker Official Installation Documents for Fedora](https://docs.docker.com/install/linux/docker-ce/centos/)
|
||||
|
||||
@@ -1,21 +1,18 @@
|
||||
## Debian 安装 Docker CE
|
||||
## Install Docker CE on Debian
|
||||
> WARNING: DO NOT install Docker with apt directly without configuring apt source.
|
||||
|
||||
>警告:切勿在没有配置 Docker APT 源的情况下直接使用 apt 命令安装 Docker.
|
||||
### Prerequisites
|
||||
|
||||
### 准备工作
|
||||
#### OS Requirement
|
||||
|
||||
#### 系统要求
|
||||
|
||||
Docker CE 支持以下版本的 [Debian](https://www.debian.org/intro/about) 操作系统:
|
||||
Docker CE supports the following [Debian](https://www.debian.org/intro/about) versions.
|
||||
|
||||
* Buster 10
|
||||
* Stretch 9
|
||||
* Jessie 8 (LTS) (Docker CE v18.06 及以下版本)
|
||||
* Wheezy 7.7 (EOL) (Docker CE v18.03 及以下版本)
|
||||
|
||||
#### 卸载旧版本
|
||||
#### Uninstall the Old Versions
|
||||
|
||||
旧版本的 Docker 称为 `docker` 或者 `docker-engine`,使用以下命令卸载旧版本:
|
||||
The old versions of Docker are called `docker` or `docker-engine`, you can have them uninstalled with the following command:
|
||||
|
||||
```bash
|
||||
$ sudo apt-get remove docker \
|
||||
@@ -23,15 +20,9 @@ $ sudo apt-get remove docker \
|
||||
docker.io
|
||||
```
|
||||
|
||||
#### Debian 7 Wheezy
|
||||
### Install with apt
|
||||
|
||||
Debian 7 的内核默认为 3.2,为了满足 Docker CE 的需求,应该安装 [`backports`](https://backports.debian.org/Instructions/) 的内核。
|
||||
|
||||
### 使用 APT 安装
|
||||
|
||||
由于 apt 源使用 HTTPS 以确保软件下载过程中不被篡改。因此,我们首先需要添加使用 HTTPS 传输的软件包以及 CA 证书。
|
||||
|
||||
Debian 8 Jessie 或者 Debian 9 Stretch 使用以下命令:
|
||||
Since the apt source uses HTTPS to make sure that the software is not modified maliciously during download, we have to add the apt source via HTTPS as well as the CA certificate.
|
||||
|
||||
```bash
|
||||
$ sudo apt-get update
|
||||
@@ -45,33 +36,19 @@ $ sudo apt-get install \
|
||||
software-properties-common
|
||||
```
|
||||
|
||||
Debian 7 Wheezy 使用以下命令:
|
||||
Due to the network issues in China mainland, it is highly recommended for Chinese users to use Chinese sources. Please refer to the official sources in the comments(they are replaced by a Chinese source).
|
||||
|
||||
```bash
|
||||
$ sudo apt-get update
|
||||
|
||||
$ sudo apt-get install \
|
||||
apt-transport-https \
|
||||
ca-certificates \
|
||||
curl \
|
||||
lsb-release \
|
||||
python-software-properties
|
||||
|
||||
```
|
||||
|
||||
鉴于国内网络问题,强烈建议使用国内源,官方源请在注释中查看。
|
||||
|
||||
为了确认所下载软件包的合法性,需要添加软件源的 GPG 密钥。
|
||||
To verify the validity of the package downloaded, we have to add the GPG key for the package source.
|
||||
|
||||
```bash
|
||||
$ curl -fsSL https://mirrors.ustc.edu.cn/docker-ce/linux/debian/gpg | sudo apt-key add -
|
||||
|
||||
|
||||
# 官方源
|
||||
# Official source
|
||||
# $ curl -fsSL https://download.docker.com/linux/debian/gpg | sudo apt-key add -
|
||||
```
|
||||
|
||||
然后,我们需要向 `source.list` 中添加 Docker CE 软件源:
|
||||
After that, we need to add the Docker CE source to `source.list`:
|
||||
|
||||
```bash
|
||||
$ sudo add-apt-repository \
|
||||
@@ -79,26 +56,18 @@ $ sudo add-apt-repository \
|
||||
$(lsb_release -cs) \
|
||||
stable"
|
||||
|
||||
# 官方源
|
||||
# Official source
|
||||
# $ sudo add-apt-repository \
|
||||
# "deb [arch=amd64] https://download.docker.com/linux/debian \
|
||||
# $(lsb_release -cs) \
|
||||
# stable"
|
||||
# stable"
|
||||
```
|
||||
|
||||
>以上命令会添加稳定版本的 Docker CE APT 源,如果需要测试或每日构建版本的 Docker CE 请将 stable 改为 test 或者 nightly。
|
||||
> The above commands will add the APT source for the stable version of Docker CE. If you need the `test` or `nightly` source, please replace with them to meet your own needs.
|
||||
|
||||
Debian 7 需要进行额外的操作:
|
||||
#### Install Docker CE
|
||||
|
||||
编辑 `/etc/apt/sources.list` 将 deb-src 一行删除或者使用 # 注释。
|
||||
|
||||
```bash
|
||||
deb-src [arch=amd64] https://download.docker.com/linux/debian wheezy stable
|
||||
```
|
||||
|
||||
#### 安装 Docker CE
|
||||
|
||||
更新 apt 软件包缓存,并安装 `docker-ce`。
|
||||
Update apt cache and install `docker-ce`.
|
||||
|
||||
```bash
|
||||
$ sudo apt-get update
|
||||
@@ -106,49 +75,43 @@ $ sudo apt-get update
|
||||
$ sudo apt-get install docker-ce
|
||||
```
|
||||
|
||||
### 使用脚本自动安装
|
||||
### Install with Automatic Scripts
|
||||
|
||||
在测试或开发环境中 Docker 官方为了简化安装流程,提供了一套便捷的安装脚本,Debian 系统上可以使用这套脚本安装:
|
||||
To simplify the installation process during test or development, Docker official provides a convenient installation script, you can install docker on Debian with the following script:
|
||||
|
||||
```bash
|
||||
$ curl -fsSL get.docker.com -o get-docker.sh
|
||||
$ sudo sh get-docker.sh --mirror Aliyun
|
||||
```
|
||||
|
||||
执行这个命令后,脚本就会自动的将一切准备工作做好,并且把 Docker CE 的 Edge 版本安装在系统中。
|
||||
After execution, the script will have everything prepared, and have installed the stable version on your OS.
|
||||
|
||||
### 启动 Docker CE
|
||||
### Start Docker CE
|
||||
|
||||
```bash
|
||||
$ sudo systemctl enable docker
|
||||
$ sudo systemctl start docker
|
||||
```
|
||||
|
||||
Debian 7 Wheezy 请使用以下命令启动
|
||||
### Add Docker Usergroups
|
||||
|
||||
```bash
|
||||
$ sudo service docker start
|
||||
```
|
||||
Command `docker` uses [Unix socket](https://en.wikipedia.org/wiki/Unix_domain_socket) to communicate with Docker engine by default. Only users of `root` and `docker` groups can communicate with Unix socket of the Docker engine.`root` user is not directly used on Linux systems in general for security. Therefore, it is better to add users who need to use `docker` to the `docker` user group.
|
||||
|
||||
### 建立 docker 用户组
|
||||
|
||||
默认情况下,`docker` 命令会使用 [Unix socket](https://en.wikipedia.org/wiki/Unix_domain_socket) 与 Docker 引擎通讯。而只有 `root` 用户和 `docker` 组的用户才可以访问 Docker 引擎的 Unix socket。出于安全考虑,一般 Linux 系统上不会直接使用 `root` 用户。因此,更好地做法是将需要使用 `docker` 的用户加入 `docker` 用户组。
|
||||
|
||||
建立 `docker` 组:
|
||||
create `docker` group:
|
||||
|
||||
```bash
|
||||
$ sudo groupadd docker
|
||||
```
|
||||
|
||||
将当前用户加入 `docker` 组:
|
||||
add current user to `docker` group:
|
||||
|
||||
```bash
|
||||
$ sudo usermod -aG docker $USER
|
||||
```
|
||||
|
||||
退出当前终端并重新登录,进行如下测试。
|
||||
Exit current terminal and relogin to test.
|
||||
|
||||
### 测试 Docker 是否安装正确
|
||||
### Verify the Installation
|
||||
|
||||
```bash
|
||||
$ docker run hello-world
|
||||
@@ -181,12 +144,12 @@ For more examples and ideas, visit:
|
||||
https://docs.docker.com/get-started/
|
||||
```
|
||||
|
||||
若能正常输出以上信息,则说明安装成功。
|
||||
If it shows the above message, it means your installation is successful.
|
||||
|
||||
### 镜像加速
|
||||
### Registry Mirror(In China)
|
||||
|
||||
鉴于国内网络问题,后续拉取 Docker 镜像十分缓慢,强烈建议安装 Docker 之后配置 [国内镜像加速](mirror.md)。
|
||||
If you pull docker images very slowly, then you can configure [Registry Mirror](mirror.md).
|
||||
|
||||
### 参考文档
|
||||
### References
|
||||
|
||||
* [Docker 官方 Debian 安装文档](https://docs.docker.com/install/linux/docker-ce/debian/)
|
||||
* [Docker Official Installation Documents for Debian](https://docs.docker.com/install/linux/docker-ce/debian/)
|
||||
|
||||
@@ -1,20 +1,21 @@
|
||||
## Fedora 安装 Docker CE
|
||||
## Install Docker CE on Fedora
|
||||
|
||||
>警告:切勿在没有配置 Docker dnf 源的情况下直接使用 dnf 命令安装 Docker.
|
||||
> WARNING: DO NOT install Docker with dnf directly without configuring dnf source.
|
||||
|
||||
### 准备工作
|
||||
### Prerequisites
|
||||
|
||||
#### 系统要求
|
||||
#### OS Requirement
|
||||
|
||||
Docker CE 支持以下版本的 [Fedora](https://fedoraproject.org/) 操作系统:
|
||||
|
||||
* 26 (Docker CE v18.03 及以下版本)
|
||||
* 27
|
||||
Docker CE supports the following [Fedora](https://fedoraproject.org/) versions:
|
||||
|
||||
* 28
|
||||
* 29
|
||||
* 30
|
||||
|
||||
#### 卸载旧版本
|
||||
#### Uninstall the Old Versions
|
||||
|
||||
旧版本的 Docker 称为 `docker` 或者 `docker-engine`,使用以下命令卸载旧版本:
|
||||
The old versions of Docker are called `docker` or `docker-engine`, you can have them uninstalled with the following command:
|
||||
|
||||
```bash
|
||||
$ sudo dnf remove docker \
|
||||
@@ -29,17 +30,16 @@ $ sudo dnf remove docker \
|
||||
docker-engine
|
||||
```
|
||||
|
||||
### 使用 dnf 安装
|
||||
### Install with dnf
|
||||
|
||||
执行以下命令安装依赖包:
|
||||
Execute the following command to install the dependencies.
|
||||
|
||||
```bash
|
||||
$ sudo dnf -y install dnf-plugins-core
|
||||
```
|
||||
Due to the network issues in China mainland, it is highly recommended for Chinese users to use Chinese sources. Please refer to the official sources in the comments(they are replaced by a Chinese source).
|
||||
|
||||
鉴于国内网络问题,强烈建议使用国内源,官方源请在注释中查看。
|
||||
|
||||
执行下面的命令添加 `dnf` 软件源:
|
||||
Use the following command to add `dnf` source.
|
||||
|
||||
```bash
|
||||
$ sudo dnf config-manager \
|
||||
@@ -47,40 +47,40 @@ $ sudo dnf config-manager \
|
||||
https://mirrors.ustc.edu.cn/docker-ce/linux/fedora/docker-ce.repo
|
||||
|
||||
|
||||
# 官方源
|
||||
# Official source
|
||||
# $ sudo dnf config-manager \
|
||||
# --add-repo \
|
||||
# https://download.docker.com/linux/fedora/docker-ce.repo
|
||||
```
|
||||
|
||||
如果需要测试版本的 Docker CE 请使用以下命令:
|
||||
If you want to use the `test` version of Docker CE, use the following command:
|
||||
|
||||
```bash
|
||||
$ sudo dnf config-manager --set-enabled docker-ce-test
|
||||
```
|
||||
|
||||
如果需要每日构建版本的 Docker CE 请使用以下命令:
|
||||
As for `nightly` version:
|
||||
|
||||
```bash
|
||||
$ sudo dnf config-manager --set-enabled docker-ce-nightly
|
||||
```
|
||||
|
||||
你也可以禁用测试版本的 Docker CE
|
||||
You are also free to disable the test version of Docker CE:
|
||||
|
||||
```bash
|
||||
$ sudo dnf config-manager --set-disabled docker-ce-test
|
||||
```
|
||||
|
||||
#### 安装 Docker CE
|
||||
#### Install Docker CE
|
||||
|
||||
更新 `dnf` 软件源缓存,并安装 `docker-ce`。
|
||||
Update `dnf` source cache,and then install `docker-ce`.
|
||||
|
||||
```bash
|
||||
$ sudo dnf update
|
||||
$ sudo dnf install docker-ce
|
||||
```
|
||||
|
||||
你也可以使用以下命令安装指定版本的 Docker
|
||||
You can also use the following command to install a certain docker verion you want:
|
||||
|
||||
```bash
|
||||
$ dnf list docker-ce --showduplicates | sort -r
|
||||
@@ -90,43 +90,43 @@ docker-ce.x86_64 18.06.1.ce-3.fc28 docker-ce-stable
|
||||
$ sudo dnf -y install docker-ce-18.06.1.ce
|
||||
```
|
||||
|
||||
### 使用脚本自动安装
|
||||
### Install with Automatic Scripts
|
||||
|
||||
在测试或开发环境中 Docker 官方为了简化安装流程,提供了一套便捷的安装脚本,Debian 系统上可以使用这套脚本安装:
|
||||
To simplify the installation process during test or development, Docker official provides a convenient installation script, you can install docker on Fedora with the following script:
|
||||
|
||||
```bash
|
||||
$ curl -fsSL get.docker.com -o get-docker.sh
|
||||
$ sudo sh get-docker.sh --mirror Aliyun
|
||||
```
|
||||
|
||||
执行这个命令后,脚本就会自动的将一切准备工作做好,并且把 Docker CE 最新版本安装在系统中。
|
||||
After execution, the script will have everything prepared, and have installed the stable version on your OS.
|
||||
|
||||
### 启动 Docker CE
|
||||
### Start Docker CE
|
||||
|
||||
```bash
|
||||
$ sudo systemctl enable docker
|
||||
$ sudo systemctl start docker
|
||||
```
|
||||
|
||||
### 建立 docker 用户组
|
||||
### Add Docker Usergroups
|
||||
|
||||
默认情况下,`docker` 命令会使用 [Unix socket](https://en.wikipedia.org/wiki/Unix_domain_socket) 与 Docker 引擎通讯。而只有 `root` 用户和 `docker` 组的用户才可以访问 Docker 引擎的 Unix socket。出于安全考虑,一般 Linux 系统上不会直接使用 `root` 用户。因此,更好地做法是将需要使用 `docker` 的用户加入 `docker` 用户组。
|
||||
Command `docker` uses [Unix socket](https://en.wikipedia.org/wiki/Unix_domain_socket) to communicate with Docker engine by default. Only users of `root` and `docker` groups can communicate with Unix socket of the Docker engine.`root` user is not directly used on Linux systems in general for security. Therefore, it is better to add users who need to use `docker` to the `docker` user group.
|
||||
|
||||
建立 `docker` 组:
|
||||
create `docker` group:
|
||||
|
||||
```bash
|
||||
$ sudo groupadd docker
|
||||
```
|
||||
|
||||
将当前用户加入 `docker` 组:
|
||||
add current user to `docker` group:
|
||||
|
||||
```bash
|
||||
$ sudo usermod -aG docker $USER
|
||||
```
|
||||
|
||||
退出当前终端并重新登录,进行如下测试。
|
||||
Exit current terminal and relogin to test.
|
||||
|
||||
### 测试 Docker 是否安装正确
|
||||
### Verify the Installation
|
||||
|
||||
```bash
|
||||
$ docker run hello-world
|
||||
@@ -159,12 +159,12 @@ For more examples and ideas, visit:
|
||||
https://docs.docker.com/get-started/
|
||||
```
|
||||
|
||||
若能正常输出以上信息,则说明安装成功。
|
||||
If it shows the above message, it means your installation is successful.
|
||||
|
||||
### 镜像加速
|
||||
### Registry Mirror(In China)
|
||||
|
||||
鉴于国内网络问题,后续拉取 Docker 镜像十分缓慢,强烈建议安装 Docker 之后配置 [国内镜像加速](mirror.md)。
|
||||
If you pull docker images very slowly, then you can configure [Registry Mirror](mirror.md).
|
||||
|
||||
### 参考文档
|
||||
### References
|
||||
|
||||
* [Docker 官方 Fedora 安装文档](https://docs.docker.com/install/linux/docker-ce/fedora)。
|
||||
* [Docker Official Installation Documents for Fedora](https://docs.docker.com/install/linux/docker-ce/fedora)
|
||||
|
||||
@@ -1,73 +1,78 @@
|
||||
## macOS 安装 Docker
|
||||
## Install Docker Desktop CE on maxOS
|
||||
|
||||
### 系统要求
|
||||
### OS Requirement
|
||||
|
||||
[Docker for Mac](https://docs.docker.com/docker-for-mac/) 要求系统最低为 macOS 10.10.3 Yosemite。如果系统不满足需求,可以安装 [Docker Toolbox](https://docs.docker.com/toolbox/overview/)。
|
||||
The minimum OS version requirement [Docker Desktop for Mac](https://docs.docker.com/docker-for-mac/) is macOS El Capitan 10.11.
|
||||
|
||||
### 安装
|
||||
### Installation
|
||||
|
||||
#### 使用 Homebrew 安装
|
||||
#### Install with Homebrew
|
||||
|
||||
[Homebrew](http://brew.sh/) 的 [Cask](https://caskroom.github.io/) 已经支持 Docker for Mac,因此可以很方便的使用 Homebrew Cask 来进行安装:
|
||||
The [Cask](https://caskroom.github.io/) of [Homebrew](https://brew.sh/) has already supported Docker Desktop for Mac, so we can instrall it with Homebrew Cask easily.
|
||||
|
||||
```bash
|
||||
$ brew cask install docker
|
||||
```
|
||||
|
||||
#### 手动下载安装
|
||||
#### Download and Install Manually
|
||||
|
||||
如果需要手动下载,请点击以下链接下载 [Stable](https://download.docker.com/mac/stable/Docker.dmg) 或 [Edge](https://download.docker.com/mac/edge/Docker.dmg) 版本的 Docker for Mac。
|
||||
If you need to download `Docker Desktop for Mac` manually, please click the [Stable](https://download.docker.com/mac/stable/Docker.dmg) or [Edge](https://download.docker.com/mac/edge/Docker.dmg) link to downlaod it.
|
||||
|
||||
如同 macOS 其它软件一样,安装也非常简单,双击下载的 `.dmg` 文件,然后将那只叫 [Moby](https://blog.docker.com/2013/10/call-me-moby-dock/) 的鲸鱼图标拖拽到 `Application` 文件夹即可(其间需要输入用户密码)。
|
||||
Just as other softwares on macOS, the installation of Docker Desktop for macOS is easy. You only need to double click the `.dmg` file, and then drag the whale([Moby](https://blog.docker.com/2013/10/call-me-moby-dock/)) icon to the `Applications` folder. During the process, you will be prompted to enter your password for your mac.
|
||||
|
||||

|
||||
|
||||
### 运行
|
||||
### Run
|
||||
|
||||
从应用中找到 Docker 图标并点击运行。
|
||||
Find the Docker icon from your applications, and double click the icon to run Docker Desktop.
|
||||
|
||||

|
||||
|
||||
运行之后,会在右上角菜单栏看到多了一个鲸鱼图标,这个图标表明了 Docker 的运行状态。
|
||||
After running, there should be a whale icon on the top right bar of your mac desktop. This icon indicates the running status of Docker.
|
||||
|
||||

|
||||
|
||||
第一次点击图标,可能会看到这个安装成功的界面,点击 "Got it!" 可以关闭这个窗口。
|
||||
For the first time clicking on the icon, you may see the successful installation window. Clicking on "Got it!" will close the window.
|
||||
|
||||

|
||||
|
||||
以后每次点击鲸鱼图标会弹出操作菜单。
|
||||
Clicking on the whale icon each time afterwards will show you the operation menu.
|
||||
|
||||

|
||||
|
||||
启动终端后,通过命令可以检查安装后的 Docker 版本。
|
||||
After opening the terminal, you can check the newly-installed Docker version with commands.
|
||||
|
||||
```bash
|
||||
$ docker --version
|
||||
Docker version 17.10.0-ce, build f4ffd25
|
||||
Docker version 19.03.1, build 74b1e89
|
||||
$ docker-compose --version
|
||||
docker-compose version 1.17.0-rc1, build a0f95af
|
||||
docker-compose version 1.24.1, build 4667896b
|
||||
$ docker-machine --version
|
||||
docker-machine version 0.13.0, build 9ba6da9
|
||||
docker-machine version 0.16.1, build cce350d7
|
||||
```
|
||||
|
||||
如果 `docker version`、`docker info` 都正常的话,可以尝试运行一个 [Nginx 服务器](https://hub.docker.com/_/nginx/):
|
||||
If `docker version` and `docker info` shows no error nor warning, you can try to run an [Nginx Server](https://hub.docker.com/_/nginx/).
|
||||
|
||||
|
||||
```bash
|
||||
$ docker run -d -p 80:80 --name webserver nginx
|
||||
```
|
||||
|
||||
服务运行后,可以访问 <http://localhost>,如果看到了 "Welcome to nginx!",就说明 Docker for Mac 安装成功了。
|
||||
When the sever is up and running, you can visit <http://localhost>, if you see "Welcome to nginx!", it means the installation of Docker Desktop for macOS is successful.
|
||||
|
||||

|
||||
|
||||
要停止 Nginx 服务器并删除执行下面的命令:
|
||||
To stop the Nginx server and delete it, you can execute the following commands:
|
||||
|
||||
```bash
|
||||
$ docker stop webserver
|
||||
$ docker rm webserver
|
||||
```
|
||||
|
||||
### 镜像加速
|
||||
### Registry Mirror(In China)
|
||||
|
||||
鉴于国内网络问题,后续拉取 Docker 镜像十分缓慢,强烈建议安装 Docker 之后配置 [国内镜像加速](mirror.md)。
|
||||
If you pull docker images very slowly, then you can configure [Registry Mirror](mirror.md).
|
||||
|
||||
### References
|
||||
|
||||
* [Official Document](https://docs.docker.com/docker-for-mac/install/)
|
||||
|
||||
@@ -1,66 +1,64 @@
|
||||
## 镜像加速器
|
||||
## Mirror Accelerators
|
||||
|
||||
国内从 Docker Hub 拉取镜像有时会遇到困难,此时可以配置镜像加速器。Docker 官方和国内很多云服务商都提供了国内加速器服务,例如:
|
||||
You may have difficulty pulling images from Docker Hub if you are in China. To resolve this issue, you may configure mirror accelerators. There are many cloud service providers that provide accelerators in China, for example,
|
||||
|
||||
* [Docker 官方提供的中国 registry mirror `https://registry.docker-cn.com`](https://docs.docker.com/registry/recipes/mirror/#use-case-the-china-registry-mirror)
|
||||
* [七牛云加速器 `https://reg-mirror.qiniu.com/`](https://kirk-enterprise.github.io/hub-docs/#/user-guide/mirror)
|
||||
* [Azure China Mirrors `https://dockerhub.azk8s.cn`](https://github.com/Azure/container-service-for-azure-china/blob/master/aks/README.md#22-container-registry-proxy)
|
||||
* [Alibaba Cloud Accelerator(Login Required)](https://cr.console.aliyun.com/cn-hangzhou/mirrors)
|
||||
* [Qiniu Cloud Accelerator `https://reg-mirror.qiniu.com`](https://kirk-enterprise.github.io/hub-docs/#/user-guide/mirror)
|
||||
|
||||
> 当配置某一个加速器地址之后,若发现拉取不到镜像,请切换到另一个加速器地址。
|
||||
> Since some mirror services may be down sometimes, it is recommended to configure multiple mirrors simultaneously.
|
||||
|
||||
> 国内各大云服务商均提供了 Docker 镜像加速服务,建议根据运行 Docker 的云平台选择对应的镜像加速服务。
|
||||
> Most of the cloud service giants in China provide Docker image acceleration services, you can choose acceleration services based on which platform you are running Docker on. For more detailed information, you may refer to their official documents.
|
||||
|
||||
我们以 Docker 官方加速器 `https://registry.docker-cn.com` 为例进行介绍。
|
||||
We take Azure China Mirrors `https://dockerhub.azk8s.cn` as an example to introduce more.
|
||||
|
||||
### Ubuntu 14.04、Debian 7 Wheezy
|
||||
|
||||
对于使用 [upstart](http://upstart.ubuntu.com/) 的系统而言,编辑 `/etc/default/docker` 文件,在其中的 `DOCKER_OPTS` 中配置加速器地址:
|
||||
|
||||
```bash
|
||||
DOCKER_OPTS="--registry-mirror=https://registry.docker-cn.com"
|
||||
```
|
||||
|
||||
重新启动服务。
|
||||
|
||||
```bash
|
||||
$ sudo service docker restart
|
||||
```
|
||||
|
||||
### Ubuntu 16.04+、Debian 8+、CentOS 7
|
||||
|
||||
对于使用 [systemd](https://www.freedesktop.org/wiki/Software/systemd/) 的系统,请在 `/etc/docker/daemon.json` 中写入如下内容(如果文件不存在请新建该文件)
|
||||
For Operating Systems using [systemd](https://www.freedesktop.org/wiki/Software/systemd/), please write the following contents inside `/etc/docker/daemon.json`. And if the file does not exist, please create the file.
|
||||
|
||||
```json
|
||||
{
|
||||
"registry-mirrors": [
|
||||
"https://registry.docker-cn.com"
|
||||
"https://dockerhub.azk8s.cn",
|
||||
"https://reg-mirror.qiniu.com"
|
||||
]
|
||||
}
|
||||
```
|
||||
> Note, make sure the file is in valid json format, otherwise Docker will be unable to start.
|
||||
|
||||
> 注意,一定要保证该文件符合 json 规范,否则 Docker 将不能启动。
|
||||
|
||||
之后重新启动服务。
|
||||
Then restart the service.
|
||||
|
||||
```bash
|
||||
$ sudo systemctl daemon-reload
|
||||
$ sudo systemctl restart docker
|
||||
```
|
||||
|
||||
>注意:如果您之前查看旧教程,修改了 `docker.service` 文件内容,请去掉您添加的内容(`--registry-mirror=https://registry.docker-cn.com`),这里不再赘述。
|
||||
> Note: if you refered to the old tutorial previously, and modified the content of `docker.service`, please remove the added contents(`--registry-mirror=https://dockerhub.azk8s.cn`).
|
||||
|
||||
### Windows 10
|
||||
|
||||
对于使用 Windows 10 的系统,在系统右下角托盘 Docker 图标内右键菜单选择 `Settings`,打开配置窗口后左侧导航菜单选择 `Daemon`。在 `Registry mirrors` 一栏中填写加速器地址 `https://registry.docker-cn.com`,之后点击 `Apply` 保存后 Docker 就会重启并应用配置的镜像地址了。
|
||||
For windows 10, choose `Settings` in the list after click on the Docker icon at the right-bottom of the desktop. Then choose `Daemon`, and inside the `Registry mirrors`, fill in `https://dockerhub.azk8s.cn`. And finally click `Apply` to save and apply the changes.
|
||||
|
||||
### macOS
|
||||
|
||||
对于使用 macOS 的用户,在任务栏点击 Docker for mac 应用图标 -> Perferences... -> Daemon -> Registry mirrors。在列表中填写加速器地址 `https://registry.docker-cn.com`。修改完成之后,点击 `Apply & Restart` 按钮,Docker 就会重启并应用配置的镜像地址了。
|
||||
For macOS users, click Docker Desktop icon at the task bar -> Perferences... -> Daemon -> Registry mirrors. Then fill in the accelerator address `https://dockerhub.azk8s.cn` in the list. After the modification, click on `Apply & Restart` button, Docker will restart and apply the new mirror address.
|
||||
|
||||
### 检查加速器是否生效
|
||||
### Verify the Accelerator
|
||||
|
||||
配置加速器之后,如果拉取镜像仍然十分缓慢,请手动检查加速器配置是否生效,在命令行执行 `docker info`,如果从结果中看到了如下内容,说明配置成功。
|
||||
After executing `$docker info`, if you can see the following result, you have successfully configured it.
|
||||
|
||||
```bash
|
||||
Registry Mirrors:
|
||||
https://registry.docker-cn.com/
|
||||
https://dockerhub.azk8s.cn/
|
||||
```
|
||||
|
||||
### gcr.io Mirror
|
||||
|
||||
In China, we cannot fetch `gcr.io/*` mirrors direclty, but we can replace `gcr.io/<repo-name>/<image-name>:<version>` with `gcr.azk8s.cn/<repo-name>/<image-name>:<version>`, for example
|
||||
|
||||
```bash
|
||||
# $ docker pull gcr.io/google_containers/hyperkube-amd64:v1.9.2
|
||||
|
||||
$ docker pull gcr.azk8s.cn/google_containers/hyperkube-amd64:v1.9.2
|
||||
```
|
||||
Some files were not shown because too many files have changed in this diff Show More
Reference in New Issue
Block a user